

Any good incident response plan should include tool preparation. There are so many tools you need to have ready that you will not have the time to build them once you are engaged in an incident. One of those tools is WinFE for forensic imaging and system investigations.
Many Incident Responders will use a bootable live Linux distro, like Kali, in forensic mode. However, there are many scenarios where a Linux OS is not the best fit for the job, and you need a Windows system. So, I argue that you should prepare for any scenario as a good Incident Responder, and WinFE can fill the gaps.
What is WinFE?

Windows Forensic Environment, shortened to WinFE, is a Windows Preinstallation Environment(WinPE) designed for digital forensic data collection. WinFE is a bootable live Windows OS with many features to aid DFIR engagement.
Features List
- Compatible with x86, amd_64(x64), and ARM CPUs
- Hard drive write-blocker
- BitLocker support
- Legacy and UEFI boot support
- Embedded FTK Imager for full-disk imaging with hashes.
- Establish a temporary network and file share services to move off the system.
- Password reset tool, File Explorer, and more…
One of the main reasons I first switched to WinFE from using a live Linux distro, like Ubuntu or Kali, is the ability for WinFE to access the Windows proprietary ReFS files system.
I am Sold. Where do I Download a Copy of WinFE?
I have some bad news if you want to download a WinFE copy. Microsoft licensing is why you are unlikely to find a download of the WinFE ISO anywhere. WinFE is built on WinPE; anyone can make a WinPE bootable ISO with their licensed copy of Windows. However, if someone were to create a WinPE ISO, and by extension, WinFE, and distribute the ISO, they would be committing copyright infringement. So, we have to build the WinFE bootable ISO ourselves from our own licensed Windows OS.
Don’t Be a Leech!
The WinFE team has very politely asked that you pay £9.99 GBP for each copy of WinFE that you produce. No license key is required to make or use WinFE. However, web-hosting and code signing certs are not free for the WinFE team. Help the WinFE Team out and pay for your copy.
How to Build a WinFE ISO: Prepwork
Before we get started, we will need to download a few things. This process is only for the 32-bit and 64-bit versions of WinFE. If you want to build the ARM version, the process is about the same, but you need ARM versions of the software.
Download the following files.
- 7-Zip: Latest version
- WinFE Build Package
- Windows ADK for Windows 10, version 2004
- Windows PE add-on for the ADK, version 2004
- FTK Imager 3.4.0.1 – 32-Bit Version
- FTK Imager 4.2.0 – 64-Bit Version
Note On FTK Imager
Due to changes in the company that made the FTK Imaging software, it can be difficult to find the correct version nowadays. So, I have provided links to my Google Drive so you can download the correct version without hunting for these older versions. Below, I have included third-party verification that the files are safe.
--Combo 7Zip File with both 64 & 32-bit versions.
7Zip Password: ftkimager
File Name: FTK_Imager_32&64Bit-versions.7z
SHA256 Hash: 42EC3C6CB53B22DE14E56E2C538AEE4C79D39D46BF0B3F16B82DC3E1213D7EB1
VirusTotal File Link: https://www.virustotal.com/gui/file/42ec3c6cb53b22de14e56e2c538aee4c79d39d46bf0b3f16b82dc3e1213d7eb1

--Individual Install Files inside combo 7zip archive.
File Name: AccessData_FTK_Imager_(x64)_4.2.0.exe
SHA256 Hash: 621D480506A915EECF691715B9A63C7FFBFE1A7F03E19DD4D3D9E4F894E38D7B
VirusTotal File Link: https://www.virustotal.com/gui/file/621d480506a915eecf691715b9a63c7ffbfe1a7f03e19dd4d3d9e4f894e38d7b

File Name: AccessData FTK Imager 3.4.0.5.exe
SHA256 Hash: F441D991DD1C1D31A427DF1520EC2705CC626D4A104BDD10F385ADE9E323A233
VirusTotal File Link: https://www.virustotal.com/gui/file/f441d991dd1c1d31a427df1520ec2705cc626d4a104bdd10f385ade9e323a233
Note on Windows ADK & Win OS Versions
The 32-bit versions of Windows PE are no longer included in the Windows PE add-ons starting with the ADK for Windows 11, version 22H2. The last supported version of 32-bit Windows PE is available in the Windows PE add-on for Windows 10, version 2004.
https://learn.microsoft.com/en-us/windows-hardware/get-started/adk-install
As stated above, WinPE 32-bit support is unavailable past Windows 10 version 2004. This means the OS we build WinFE with must be Windows 10 between versions 1803 and 2004; any newer or older versions will not work.
Building a WinFE ISO
1. Prerequisite Installs
Before building our WinFE image, we must install the prerequisite software packages. Run the downloaded
- Windows ADK installation file(“adksetup.exe”). Accept all the default options.
- Windows PE add-on for the ADK(“adkwinpesetup.exe”). Accept all the default options.
- Install 7Zip.
2. Unpack the WinFE Framework Package
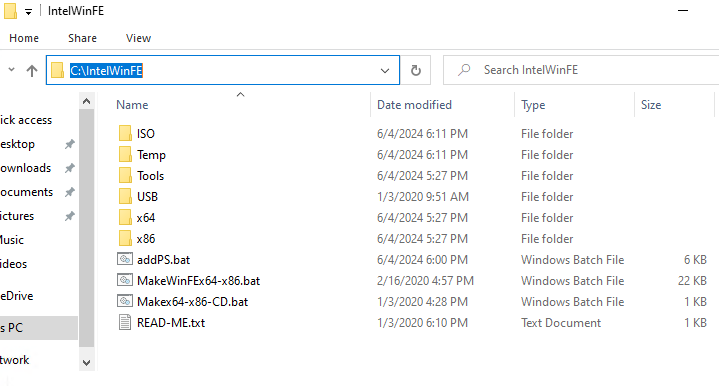
Use 7Zip to unpack the WinFE Framework package we downloaded earlier(“IntelWinFE.7z”). Unpack the file to the root of the “C:\” drive(“C:\IntelWinFE”).
3. Install FTK Imager

We will install 32 and 64-bit versions of FTK Imager to copy the installation files. Before starting, ensure FTK Imager is not currently installed.
Launch the 32-bit version of FTK Imager(“AccessData FTK Imager 3.4.0.5.exe”) and install the software with all the defaults. Once the installation is complete, copy the entire “C:\Program Files (x86)\AccessData\FTK Imager” folder to “C:\IntelWinFE\USB\x86-x64\tools\x86\”.
Uninstall the 32-bit version of FTK Imager and install the 64-bit version(“AccessData_FTK_Imager_4.7.1.exe”). After installation, copy the entire “C:\Program Files\AccessData\FTK Imager” folder to the “C:\IntelWinFE\USB\x86-x64\tools\x64\” folder.
4. Add PowerShell Support – Edit MakeWinFEx64-x86.bat
This step is optional, but you will regret it if you do not do it. We are building a bootable live Windows ISO we can use for forensics or any kind of troubleshooting. If we add PowerShell abilities to our live Windows OS, we can script many different types of jobs. For example, we could write a PowerShell script to perform a KAPE collection and much more.
In the WinFE framework directory(“C:\IntelWinFE\”), locate the BAT file named “MakeWinFEx64-x86.bat” and open it so we can add in some new lines.
Go to line 227 and paste in the below lines.
:: x86 PowerSehll Addons
Dism /Add-Package /Image:Temp\mount /PackagePath:"C:\Program Files (x86)\Windows Kits\10\Assessment and Deployment Kit\Windows Preinstallation Environment\x86\WinPE_OCs\WinPE-WMI.cab"
Dism /Add-Package /Image:Temp\mount /PackagePath:"C:\Program Files (x86)\Windows Kits\10\Assessment and Deployment Kit\Windows Preinstallation Environment\x86\WinPE_OCs\en-us\WinPE-WMI_en-us.cab"
Dism /Add-Package /Image:Temp\mount /PackagePath:"C:\Program Files (x86)\Windows Kits\10\Assessment and Deployment Kit\Windows Preinstallation Environment\x86\WinPE_OCs\WinPE-NetFX.cab"
Dism /Add-Package /Image:Temp\mount /PackagePath:"C:\Program Files (x86)\Windows Kits\10\Assessment and Deployment Kit\Windows Preinstallation Environment\x86\WinPE_OCs\en-us\WinPE-NetFX_en-us.cab"
Dism /Add-Package /Image:Temp\mount /PackagePath:"C:\Program Files (x86)\Windows Kits\10\Assessment and Deployment Kit\Windows Preinstallation Environment\x86\WinPE_OCs\WinPE-Scripting.cab"
Dism /Add-Package /Image:Temp\mount /PackagePath:"C:\Program Files (x86)\Windows Kits\10\Assessment and Deployment Kit\Windows Preinstallation Environment\x86\WinPE_OCs\en-us\WinPE-Scripting_en-us.cab"
Dism /Add-Package /Image:Temp\mount /PackagePath:"C:\Program Files (x86)\Windows Kits\10\Assessment and Deployment Kit\Windows Preinstallation Environment\x86\WinPE_OCs\WinPE-PowerShell.cab"
Dism /Add-Package /Image:Temp\mount /PackagePath:"C:\Program Files (x86)\Windows Kits\10\Assessment and Deployment Kit\Windows Preinstallation Environment\x86\WinPE_OCs\en-us\WinPE-PowerShell_en-us.cab"
Dism /Add-Package /Image:Temp\mount /PackagePath:"C:\Program Files (x86)\Windows Kits\10\Assessment and Deployment Kit\Windows Preinstallation Environment\x86\WinPE_OCs\WinPE-StorageWMI.cab"
Dism /Add-Package /Image:Temp\mount /PackagePath:"C:\Program Files (x86)\Windows Kits\10\Assessment and Deployment Kit\Windows Preinstallation Environment\x86\WinPE_OCs\en-us\WinPE-StorageWMI_en-us.cab"
Dism /Add-Package /Image:Temp\mount /PackagePath:"C:\Program Files (x86)\Windows Kits\10\Assessment and Deployment Kit\Windows Preinstallation Environment\x86\WinPE_OCs\WinPE-DismCmdlets.cab"
Dism /Add-Package /Image:Temp\mount /PackagePath:"C:\Program Files (x86)\Windows Kits\10\Assessment and Deployment Kit\Windows Preinstallation Environment\x86\WinPE_OCs\en-us\WinPE-DismCmdlets_en-us.cab"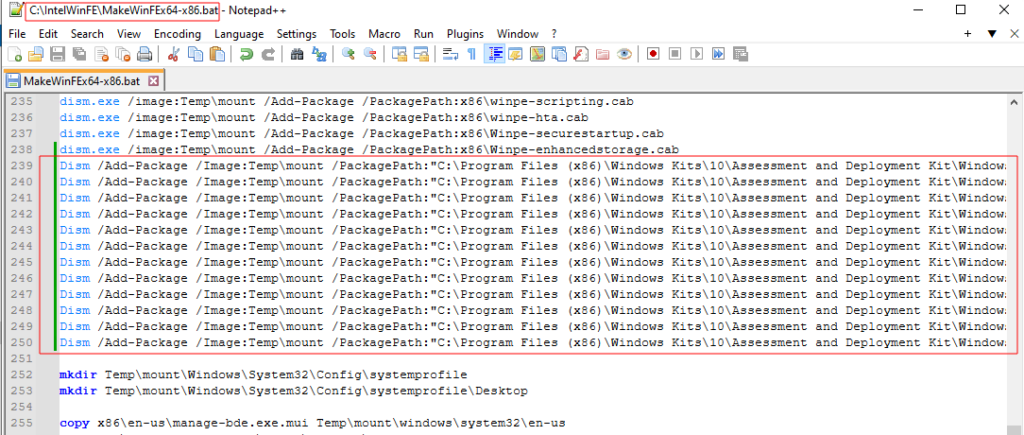
Now go to line 99 in the “MakeWinFEx64-x86.bat” file and paste the new lines below.
:: AMD64 PowerSehll Addons
Dism /Add-Package /Image:Temp\mount /PackagePath:"C:\Program Files (x86)\Windows Kits\10\Assessment and Deployment Kit\Windows Preinstallation Environment\amd64\WinPE_OCs\WinPE-WMI.cab"
Dism /Add-Package /Image:Temp\mount /PackagePath:"C:\Program Files (x86)\Windows Kits\10\Assessment and Deployment Kit\Windows Preinstallation Environment\amd64\WinPE_OCs\en-us\WinPE-WMI_en-us.cab"
Dism /Add-Package /Image:Temp\mount /PackagePath:"C:\Program Files (x86)\Windows Kits\10\Assessment and Deployment Kit\Windows Preinstallation Environment\amd64\WinPE_OCs\WinPE-NetFX.cab"
Dism /Add-Package /Image:Temp\mount /PackagePath:"C:\Program Files (x86)\Windows Kits\10\Assessment and Deployment Kit\Windows Preinstallation Environment\amd64\WinPE_OCs\en-us\WinPE-NetFX_en-us.cab"
Dism /Add-Package /Image:Temp\mount /PackagePath:"C:\Program Files (x86)\Windows Kits\10\Assessment and Deployment Kit\Windows Preinstallation Environment\amd64\WinPE_OCs\WinPE-Scripting.cab"
Dism /Add-Package /Image:Temp\mount /PackagePath:"C:\Program Files (x86)\Windows Kits\10\Assessment and Deployment Kit\Windows Preinstallation Environment\amd64\WinPE_OCs\en-us\WinPE-Scripting_en-us.cab"
Dism /Add-Package /Image:Temp\mount /PackagePath:"C:\Program Files (x86)\Windows Kits\10\Assessment and Deployment Kit\Windows Preinstallation Environment\amd64\WinPE_OCs\WinPE-PowerShell.cab"
Dism /Add-Package /Image:Temp\mount /PackagePath:"C:\Program Files (x86)\Windows Kits\10\Assessment and Deployment Kit\Windows Preinstallation Environment\amd64\WinPE_OCs\en-us\WinPE-PowerShell_en-us.cab"
Dism /Add-Package /Image:Temp\mount /PackagePath:"C:\Program Files (x86)\Windows Kits\10\Assessment and Deployment Kit\Windows Preinstallation Environment\amd64\WinPE_OCs\WinPE-StorageWMI.cab"
Dism /Add-Package /Image:Temp\mount /PackagePath:"C:\Program Files (x86)\Windows Kits\10\Assessment and Deployment Kit\Windows Preinstallation Environment\amd64\WinPE_OCs\en-us\WinPE-StorageWMI_en-us.cab"
Dism /Add-Package /Image:Temp\mount /PackagePath:"C:\Program Files (x86)\Windows Kits\10\Assessment and Deployment Kit\Windows Preinstallation Environment\amd64\WinPE_OCs\WinPE-DismCmdlets.cab"
Dism /Add-Package /Image:Temp\mount /PackagePath:"C:\Program Files (x86)\Windows Kits\10\Assessment and Deployment Kit\Windows Preinstallation Environment\amd64\WinPE_OCs\en-us\WinPE-DismCmdlets_en-us.cab"
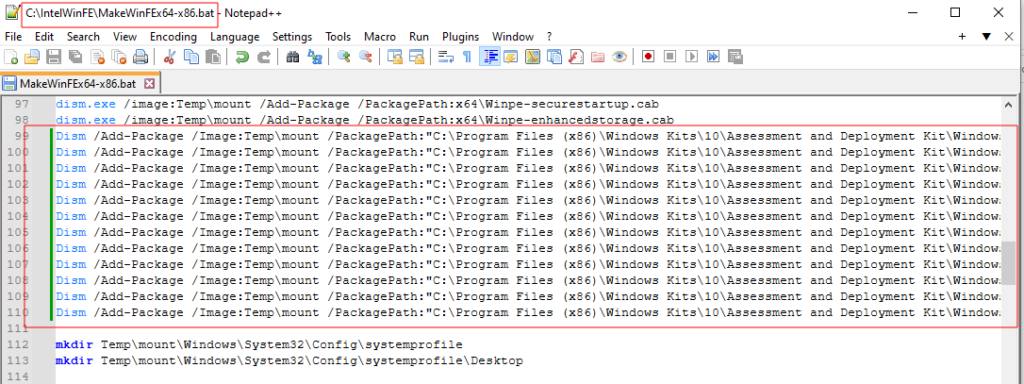
Save and close the “MakeWinFEx64-x86.bat” file.
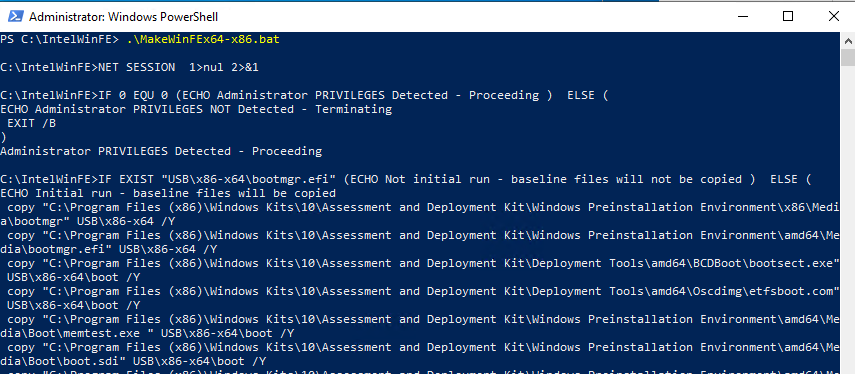
5. Build the WinFE OS File Structure
Open an administrative PowerShell session and navigate to the WinFE framework directory(“C:\IntelWinFE\”). Now run the “MakeWinFEx64-x86.bat” file to start the build process. This process will take 10 to 15 minutes to complete.
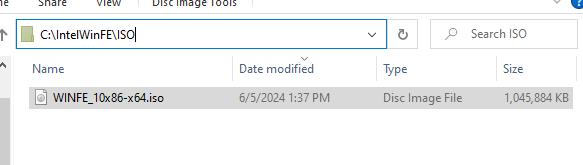
6. Convert the WinFE OS File Structure to a Bootable ISO
The last step is to convert the WinFE OS File Structure to an ISO using the “Makex64-x86-CD.bat” file.
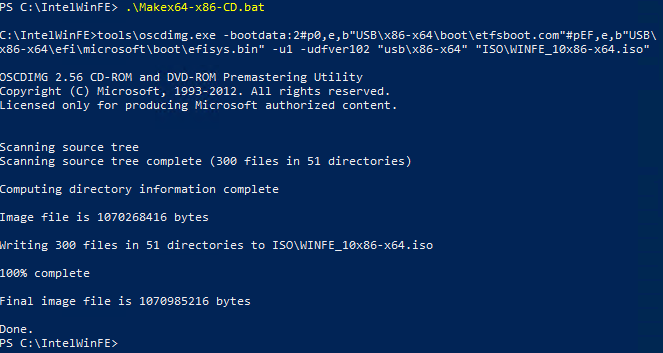
If there are no issues, you should have a “WINFE_10x86-x64.iso” in the “C:\IntelWinFE\ISO” folder.
That is it! We now have a WinFE bootable Live Windows OS with PowerShell support!

Wrapping-Up: Building System Imaging Tools
I use WinFE for all sorts of jobs, not just Incident Response. The Windows PE environment can be very powerful in many applications, such as troubleshooting. You can add portable apps to the WinFE ISO to enhance its capabilities. I have written a script on my copy to automatically perform or undo a sticky keys hack on Windows systems, saving me tons of time. Once you have a copy, you will start thinking of all sorts of useful applications.
Related posts:
 Incident Response Plan: Windows Data Collection
 LetsDefend: Blue Team Training Review
 LetsDefend’s DFIR Challenge: IcedID Malware Family Walk-Through
 LetsDefend’s DFIR Challenge: REvil Ransomware Walk-Through
 How to Stay on Top of Cybersecurity News
Leave a Reply