
System Monitor (Sysmon) brings the detailed logging Windows systems are missing. I personally think it should now be a requirement and installed by default. As such, I have leveraged Group Policy to ensure Sysmon is installed, configured, and updated regularly throughout my environment. I want to share the basic method and script I use so that others can do the same.
System Monitor, AKA: Sysmon
Windows has awful event logging, but Sysmon can fix that issue. Sysmon is a system service and device driver that gives Windows detailed logging for certain types of events. If you ever want to have any idea of what happened on a system post-incident, you need Sysmon.
You can read more about Sysmon at the below URL.
https://docs.microsoft.com/en-us/sysinternals/downloads/sysmonAutomating Sysmon Deployment
Sysmon can be installed automatically on all systems in our domain via a Group Policy Object(GPO). However, we cannot simply make a GPO with an MSI file. To install Sysmon correctly we need to use a Batch script. The Batch script will combine the two key files required for the installation; the Sysmon executable and the Sysmon config. So to recap, three total files are needed, the Sysmon executable, the Sysmon XLM config file, and our Batch script. We will also need a file share that all systems can reach to grab the three files. This requires us to also set up a software distribution point.
Setup Process Overview
- Setup Software Distribution Point(SDP) file share server.
- Add the Sysmon executable, the Sysmon XLM config file, and our Batch script to the SDP.
- Configure the GPO to deploy the software.
1. Software Distribution Point
The Software Distribution Point(SDP) is simply a file share we will use to transfer our installation files to systems. This file share must be accessible by any system we want the software installed on. My preference is to build the SDP on the Domain Controller(DC), this makes the management process easier. Since systems reach the DC for GPO updates, they can reach the file share.
Here is the setup process.
- Login to the DC and create a folder at “C:\Software_Distribution_Point“. Right-click the “C:\Software_Distribution_Point” folder and create a new share.
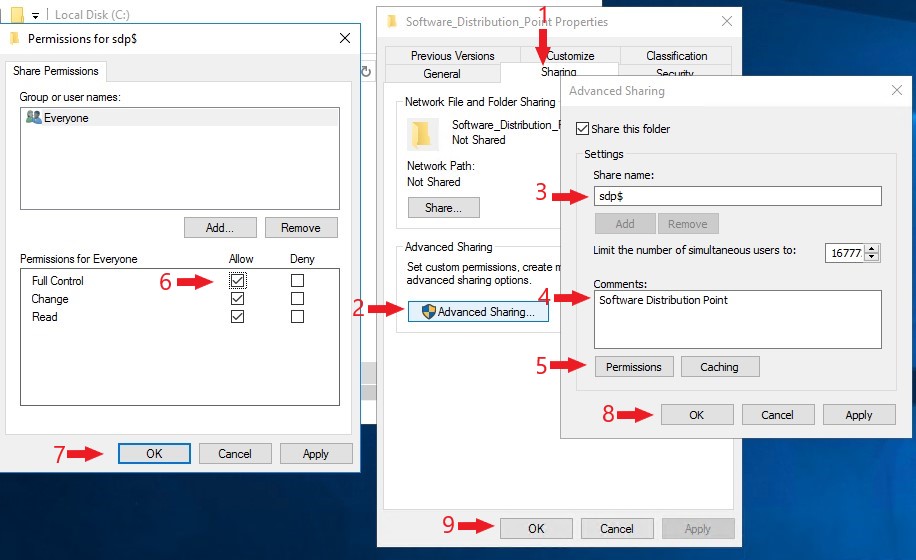
- Click the “Sharing” tab.
- Click “Advanced Sharing“.
- Click the “Share This Folder” box and name the share “sdp$“. The “$” at the end will hide the share.
- Fill in the comment so others know what this share is for.
- Click on the “Permissions” button
- With the “Everyone” group selected, click the “Full Control” check box. Share Permissions are weak, so we will later use “Security Permissions” to really secure the files.
- Click “ok“.
- Click “ok“.
- Click “ok“.
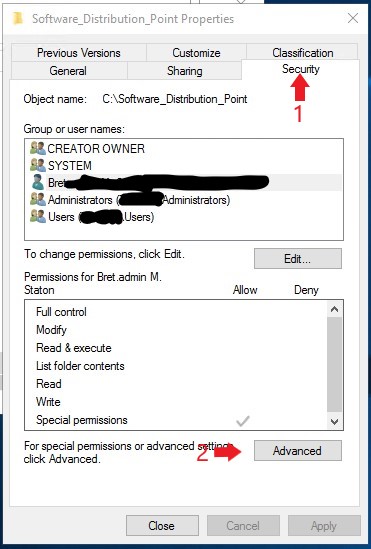
- Right-click the “C:\Software_Distribution_Point” folder and create the Security Permissions.
- Click the “Security” tab.
- Click “Advanced“.
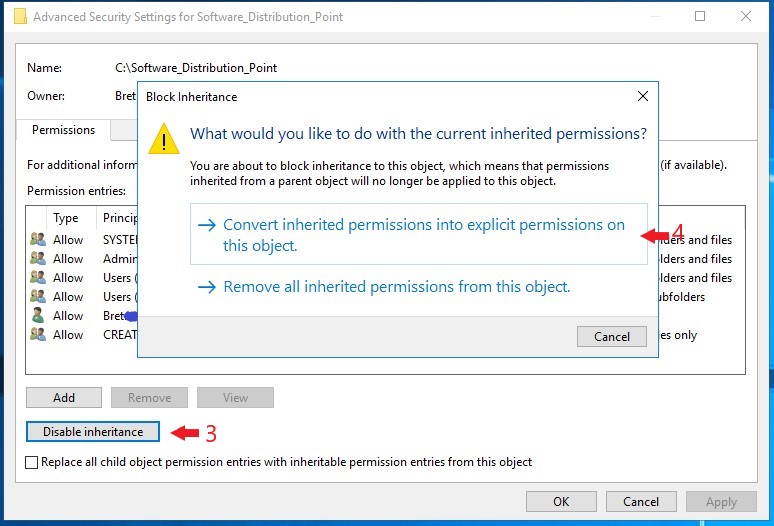
- Click “Disable inheritance“
- Confirm by clicking “Convert inherited permissions into explicit permissions on this object“
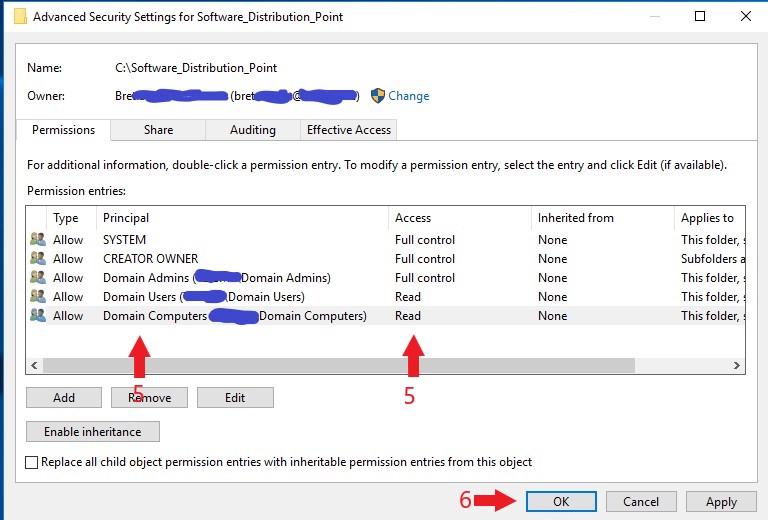
- Now remove any other user’s accounts listed, then add “Domain Users“, and “Domain Computer” with ONLY “Read” permission. Then add “Domain Admins” with “Full Control” permissions.
- Click “OK“
- Click “Close“
2. Sysmon Install Files
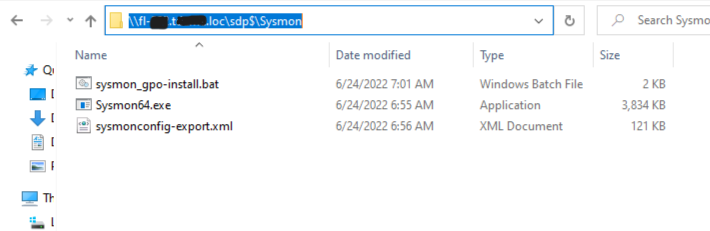
Gather the following three files and add them to the new SDP share we just created.
Sysmon Executable
Download the Sysmon zip file from Microsoft. Unzip the file and copy the “Sysmon64.exe” to the SDP Share.
https://download.sysinternals.com/files/Sysmon.zipSysmon Config FIle
Building a Sysmon configuration file from scratch for the first time is not easy. This is why I recommend starting with the SwiftOnSecurity configuration file. Their config is a great starting point for you to work from, but will need to be customized to match your environment. The config file is heavily commented, explaining each element.
The below link is to a ZIP file with the “sysmonconfig-export.xml” inside. Extract this file and add it to your SDP share.
https://codeload.github.com/SwiftOnSecurity/sysmon-config/zip/refs/heads/masterSysmon Install Script
I have created a Batch install script that will be used by Group Policy to install Sysmon with our config. The script can be found on my GitHub at the following link.
https://raw.githubusercontent.com/Brets0150/CG_BlueTeamTools/main/sysmon_gpo-install.batAfter you download or copy the Batch script you will need to make a few changes to it to match your environment. Once updated, add the script to your SDP share.

SDP Files
You should now have all the files you need to create the deployment GPO.
3. Create a Deployment Group Policy
Now that we have everything in place we just need to configure Group Policy to orchestrate the Sysmon install process in our servers.
- Login to your Domain Controler, open Group Policy editor, create a new Group Policy Object(GPO), and name it “Sysmon_Deployment“.
- Find the new GPO, right-click on it and click “Edit“.
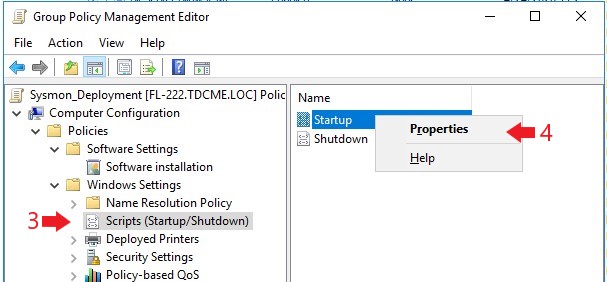
- In the new popup, navigate to the following location,
“Computer Configuration –> Policies –> Windows Settings –> Scripts (Startup/Shutdown)“ - Right-click on “Startup” and click on “Properties“.
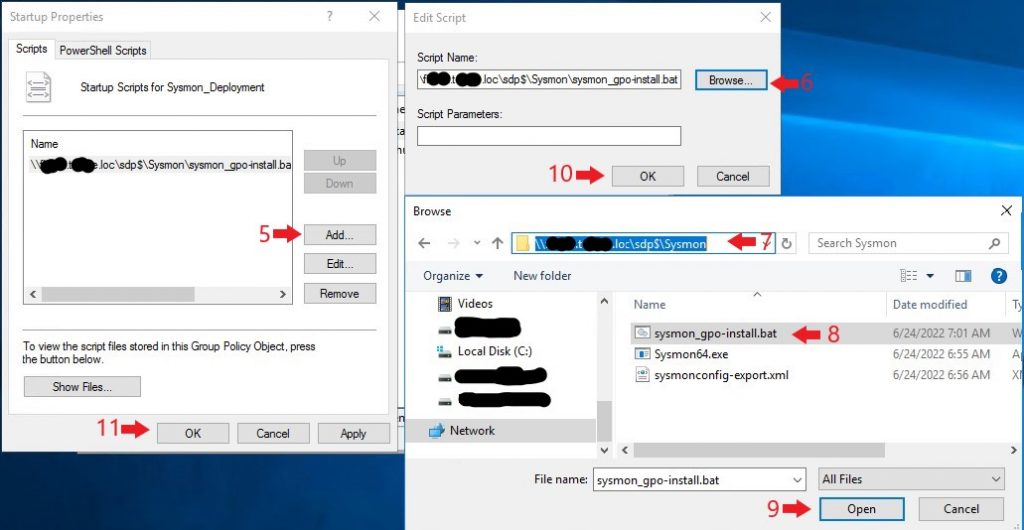
- In the “Startup Properties” windows, click “Add“.
- In the “Edit Script” windows click “Browse…“
- In the popup explorer window, navigate to the SDP share;
“\\fileserver01.mydomain.loc\sdp$\Sysmon“ - Select the Sysmon install Batch script we made earlier.
- Click “Open“
- we don’t need to add any script parameters, so click “Ok”.
- Click “Ok” to complete the changes to the Startup script settings.
That’s it! You can now close out the GPO. The new GPO has not been assigned to any systems yet. To assign the new GPO, right-click an OU and click “Link an Existing GPO…“. I recommend linking the new GPO to an OU with only a few systems in it. This way you can test and make changes before deploying widely.
Resources
- SwiftOnSecurity Sysmon configuration file.
- TrustedSec Sysmon Community Guide.
- Microsoft Sysmon Wiki Page.
- Sysinternals Blog.
- Sysmon For Linux install and build instructions.
- Sysmon Threat Analysis Guide
Related posts:
 AD Hardening Against Kerberos Golden Ticket Attack
 Operating System Hardening 101
 LetsDefend: Blue Team Training Review
 Linux Web Server Hardening: Preventing Apache Information Disclosure
1 Pingback