
Web Application Firewalls(WAF) are one of the best defensive tools for a web server. WAFs work on the application layer, meaning they can evaluate POST and GET requests to the server. At the application layer, we can detect and stop Web exploits like MySQL injection, Remote Code Execution(RCE), and Cross-Site Scripting(XSS). Moreover, Attackers tend to try automated tools against websites before trying more complex exploits. In effect blocking the early automated tools will block the IP of the Attacker, and prevent more complex attacks later that a WAF may not detect.
This article is the third in the Diamond Hard LAMP series.
What is ModSecurity
ModSecurity is an open-source security module for Apache. The module allows for inspection of both the request and the response to the web server made by users. A collection of predefined rules allows administrators to flag, alert, and block malicious traffic.

It is helpful to think of ModSecurity as having two parts; the core traffic monitor(sniffer), and the detection rules. ModSecurity is only as good as the rules built for it. The default detection rules installed by default are good, but the OWASP Project has a better set of core rules with a lower false-positive rate. So we will be using those instead of the defaults.
Installing ModSecurity
Start by installing the ModSecurity packages we need for Apache. I am assuming you already have the basic LAMP stack install, and will not cover that here.
# Install Mod_Secure
apt update && apt -y upgrade
apt install -yq libapache2-mod-security2
Copy the default ModSecurity configuration file to make a production copy. There are no changes we need to make to the file at this time.
mv /etc/modsecurity/modsecurity.conf-recommended /etc/modsecurity/modsecurity.confWe want ModSecurity to have teeth, and block attackers when it detects them. So we are going to change the default from “DetectionOnly” to “On”.
Warning!
We are changing ModSecurity from a detection-only state to block when it detects something. If you are installing this on a new system, you should be fine. If this is a production system, then you should spend some time in the detection-only state. In either case, you will want to spend time tuning rules to minimize false positives, or you risk blocking legitimate users.
sed -ie "s/SecRuleEngine\ DetectionOnly/SecRuleEngine\ On/g" /etc/modsecurity/modsecurity.confAdding OWASP ModSecurity Core Rule Set(CRS)
The OWASP Core Rule Set(CRS) will be replacing default rules that came with ModSecurity. The CRS will give ModSecurity the foundational rules to protect web applications from a wide range of attacks.
We need to download the latest ruleset so we can add them to ModSecurity. Then create the default configuration file.
# Remove Default rules
rm -rf /usr/share/modsecurity-crs
# Download the Core Rule Set
git clone https://github.com/coreruleset/coreruleset.git /usr/share/modsecurity-crs
# Create the default config file.
cp /usr/share/modsecurity-crs/crs-setup.conf.example /usr/share/modsecurity-crs/crs-setup.conf
We now need to point ModSecurity to the new files we added. To do his edit the “/etc/apache2/mods-available/security2.conf” to look just like mine below.
<IfModule security2_module>
        # Default Debian dir for modsecurity's persistent data
        SecDataDir /var/cache/modsecurity

        # Include all the *.conf files in /etc/modsecurity.
        # Keeping your local configuration in that directory
        # will allow for an easy upgrade of THIS file and
        # make your life easier
        IncludeOptional /etc/modsecurity/*.conf

        # Include OWASP ModSecurity CRS rules if installed
        IncludeOptional /usr/share/modsecurity-crs/*.load
        IncludeOptional /usr/share/modsecurity-crs/*.conf
        IncludeOptional /usr/share/modsecurity-crs/rules/*.conf
</IfModule>
After making the changes save the file and restart Apache to apply the changes we have made. We are also enabling mod_header so ModSecurity can have greater control.
a2enmod headers
systemctl restart apache2.service
Test ModSecurity
Enabling ModSecurity protects our websites from the most common attacks. However, we need to test this assumption to confirm everything is working correctly.
Let’s test what a normal HTTP request looks like.
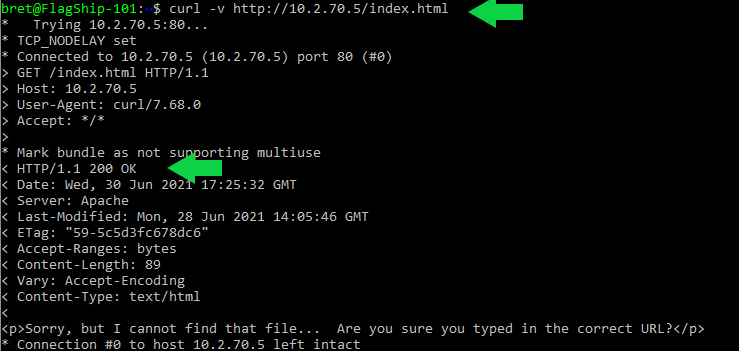
Clean HTTP requests pass through unblocked with a “200” code. Let’s look at a malicious request sent to our system.
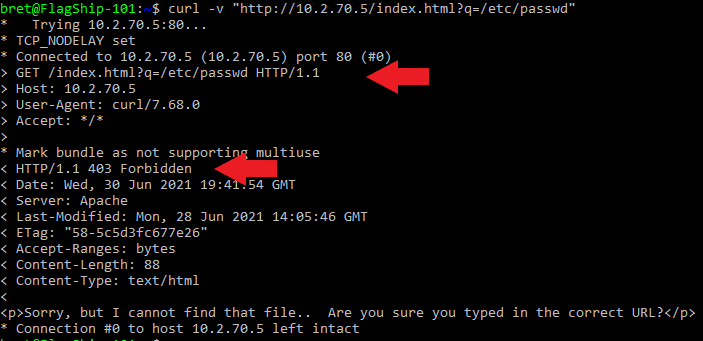
The 403 code confirms ModSecurity caught the directory traversal attack and blocked the malicious request.
Troubleshooting Tip
Troubleshooting ModSecurity events can be tricky. You’ll constantly be asking yourself, “is the website broken, or is ModSec blocking something”? Here are a few tips to help you get to the root of the issue.
Multitail Logs in Real-Time
Multitail is a package that lets you “tail” multiple logs and displays them on screen. This is very helpful when testing how a website action is working.
# Install Multitail
sudo apt install multitail

# Running Multitail so we can monitor all our Apacha & ModSec logs at the same time.
multitail /var/log/syslog /var/log/apache2/*.log
Parsing Apache Error Logs for ModSecurity Alerts
Here is a bash one-liner to help search Apache error logs for ModSecurity alerts and then output discovered alerts. You will see a count of the number of times the alert was triggered, for which website and URL. This one-liner makes it quick and easy to write rule exceptions.
grep 'ModSecurity' /var/log/apache2/error.log | grep "\[id" | sed -E -e 's#^.*\[id "([0-9]*).*hostname "([a-z0-9\-\_\.]*)"].*uri "(.*?)".*"#\1 \2 \3#' | cut -d\" -f1 | sort -n | uniq -c | sort -n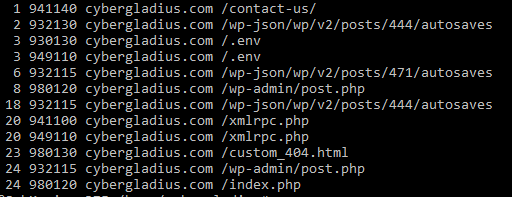
Final Notes
ModSecurity is like any other HID system and that means it will require tuning. Expect to spend time in the log files reviewing false-positive requests, and tweaking your rules. If you want to really understand ModSecurity and what it can do to protect your websites, I suggest reading the ModSecurity Handbook, by Christian Folini and Ivan Ristić. A free online shortened version of the book is helpful to review as well; “ModSecurity Handbook: Getting Started“.









1 Pingback