
A Host-based Intrusion Detection System(HIDS) is a powerful and necessary tool to combat threats to our servers. We need our servers to tell us when there is an issue, and not rely on someone logging in to discover problems. A HIDS job is to monitor, analyze, and if needed alert us about its internal integrity.
There are a ton of great HIDS tools out there; paid and free. For those of us who have simple needs and cannot justify building a full Server & Host IDS, we can use a standalone install of OSSEC.
I will be installing OSSEC in my LAMP server, running Ubuntu 20.04. However, nearly all operating systems have an OSSEC version for them. So if you’re running Windows you can also enjoy this open-source goodness!
OSSEC is an Open Source Host-based Intrusion Detection System that performs log analysis, file integrity checking, policy monitoring, rootkit detection, real-time alerting and active response.
https://www.ossec.net/
This article is the sixth in the Diamond Hard LAMP series.
Installing OSSEC
We will start by installing the basic packages required to run OSSEC.
# Basic updates.
apt update
# Install the basic required packages.
apt -y install gcc make libevent-dev zlib1g-dev libssl-dev libpcre2-dev wget tar
Now we will download the latest OSSEC package version available at the time of writing. I also want to redirect the TAR file output to the “/tmp” folder, just to keep things clean.
wget https://github.com/ossec/ossec-hids/archive/3.6.0.tar.gz -P /tmpUnpack the TAR file we just downloaded and expand its contents to the “/tmp” folder.
tar xzf /tmp/3.6.0.tar.gz -C /tmp/To install the OSSEC software we will run as root the “install.sh” script, which is now in the “/tmp/ossec-hids-3.6.0/” directory. After running you will need to answer some questions on how we want OSSEC set up.
# Run the installer script provioded.
/tmp/ossec-hids-3.6.0/install.sh
Script Install Questions
The install script is going to ask you a series of questions about how you want OSSEC set up. There are really only two questions we need to update; the kind of installation and the alerting email address. If you are not sure how to answer any other questions, it is best to just hit enter and use the defaults.
We want a standalone setup of OSSEC, so on question one answer “local”.
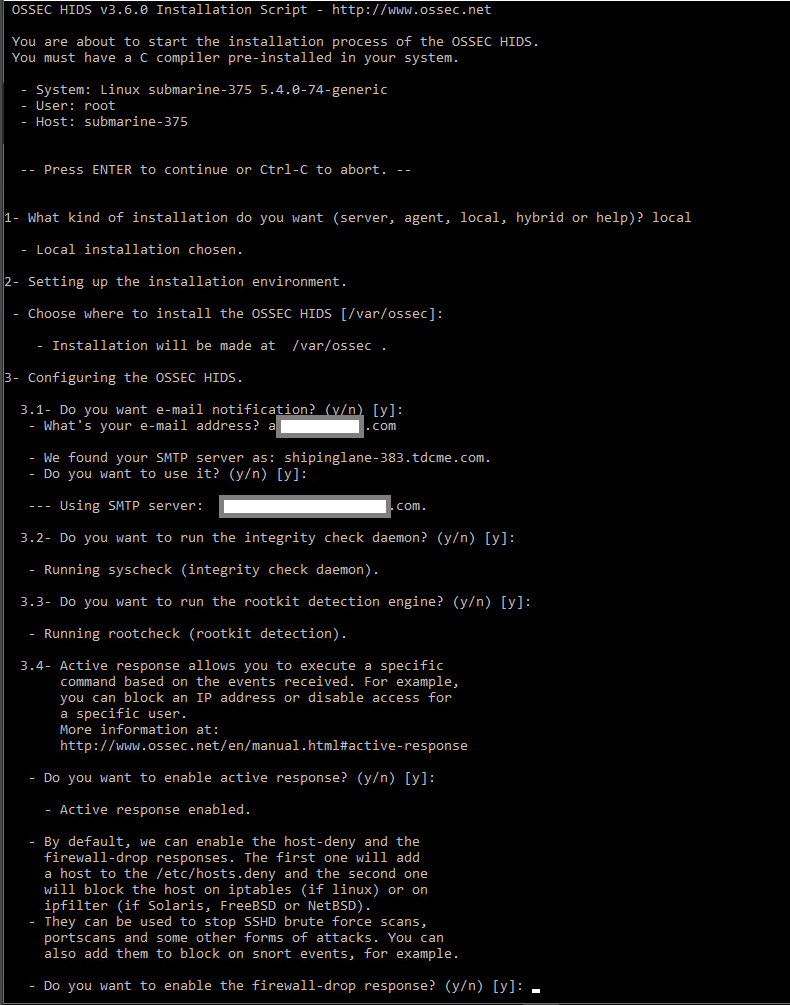
After completing the install script, we need to start the OSSEC service and confirm there are no errors.
# Start OSSEC Service
/var/ossec/bin/ossec-control start
Filtering False Positive Alerts
The default Ubuntu and OSSEC installs will produce false-positive alerts. Ubuntu uses “snaps” as part of the Operating system security. Snaps create small partitions that are always 100% full, and this trips the full disc alert in OSSEC continuously. To fix this issue we can add a filter rule to ignore these types of alerts.
We can add custom rules to OSSEC by adding them to the “/var/ossec/rules/local_rules.xml” file. Add the below code between the “<group> </group>” directive in the “/var/ossec/rules/local_rules.xml” file.
<rule id="100100" level="0">
  <if_sid>531</if_sid>
  <match>cdrom|/media|usb|/mount|floppy|dvd|/dev/loop</match>
  <description>Ignoring external media & snap loop devices</description>
</rule>
After saving and closing the file we edited restart OSSEC to apply the changes.
# Stop OSSEC Service
/var/ossec/bin/ossec-control stop

# Start OSSEC Service
/var/ossec/bin/ossec-control start
Alerts
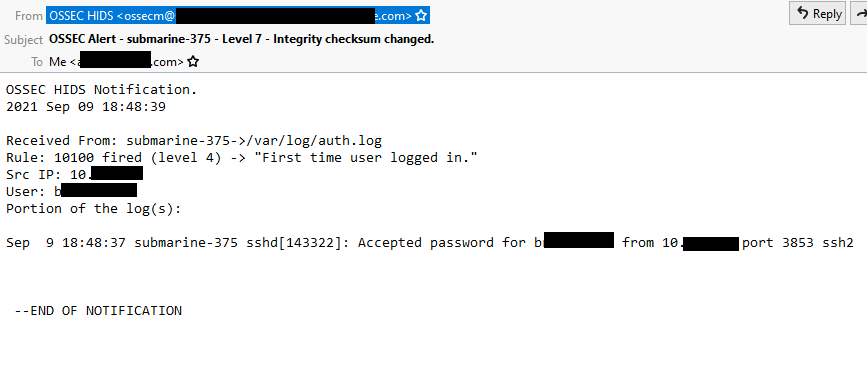
Now we are all set up to get alerts whenever anything on our server happens. Below is an example email of an alert sent when an SSH login occurs.
Related posts:
 Linux Web Server Hardening: The Basics
 Linux Web Server Hardening: Preventing Apache Information Disclosure
 Linux Server Hardening: Banning Malicious Traffic
 Linux Web Server Security Hardening Checklist
 Operating System Hardening 101
1 Pingback