

If you don’t have Sysmon deployed on your Windows server, you don’t have good logging. Since Sysmon is vital to strong security logging, I have created a PowerShell script to install and update Sysmon automatically.
I wrote the PowerShell Sysmon Deployment script to solve several issues, mainly updating and maintaining consistency throughout my environment.
The PowerShell script has the following features.
- Self Updating
- Creates Event logs every time it runs to make troubleshooting easier.
- No network file share needed
- No managing Sysmon MSI/EXE files.
- Sysmon is configured with SwiftOnSecurity’s custom Sysmon Config
- It can be run manually
For a full description of each feature and a script logic flow chart, see my GitHub.
https://github.com/Brets0150/SysmonDeployStartupScript
Sysmon Script Deployment via GPO Options
There are two methods I can recommend for deploying this GPO.
- Fast Deployment via an Immediate Scheduled Task GPO
- A Computer Startup PowerShell Script GPO
In this blog post, I will cover the Computer Startup PowerShell Script GPO method. If you want a fast deployment, use the link above to my blog post on creating an Immediate Scheduled Task GPO. You will still want to set up the startup script GPO for all post-deployment installs.
Creating a Sysmon Deployment via Startup Script GPO
Once you have downloaded the Sysmon Deployment PowerShell script from my GitHub, we can configure Group Policy to orchestrate the Sysmon deployment process on our servers.
- Login to your Domain Controler, open Group Policy editor, create a new Group Policy Object(GPO), and name it “Sysmon_Deployment“.
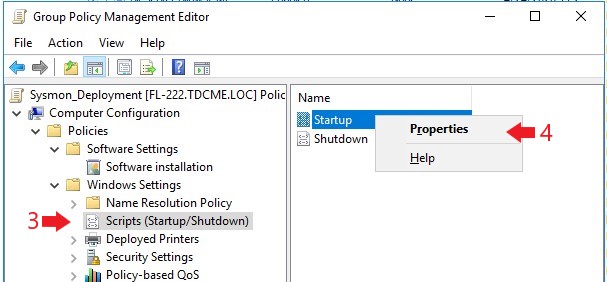
- Find the new GPO, right-click on it, and click “Edit“.
- In the new popup, navigate to the following location,
“Computer Configuration –> Policies –> Windows Settings –> Scripts (Startup/Shutdown)“ - Right-click on “Startup” and click on “Properties“.
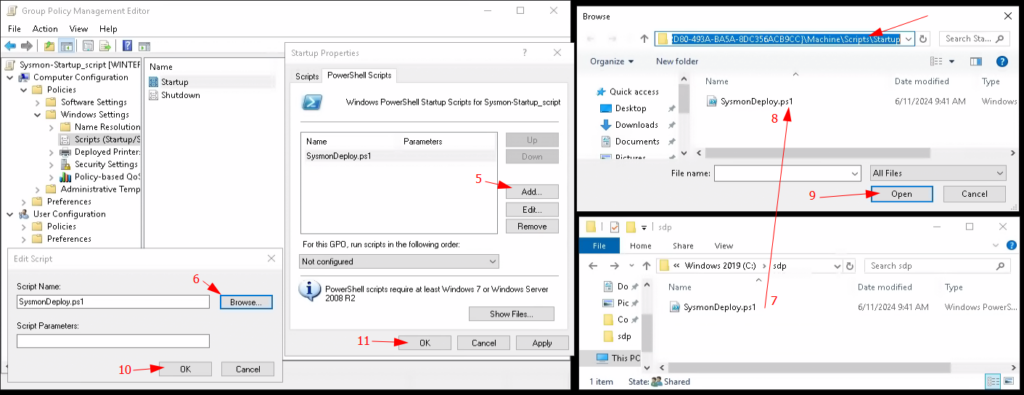
- In the “Startup Properties” windows, click “Add“.
- In the “Edit Script” window, click “Browse…“
- The popup explorer window will open to this new GPO unique network share. Copy the script from your system to the GPO network share. Using this location ensures there are no permission issues.
- In the “Browser” window, select the Sysmon installer PowerShell script we copied over earlier.
- Click “Open“
- We don’t need to add script parameters, so click “OK”.
- Click “Ok” to complete the changes to the Startup script settings.
That’s it! You can now close out the GPO. The new GPO has not yet been assigned to any systems.
To assign the new GPO, right-click an OU and click “Link an Existing GPO…“.
Once you have linked the new GPO, the Sysmon Deployment script will not run until two things have been done; 1) The servers perform a Group Policy update(occurs every 10 hours or on startup), 2) and the system reboots.
Related posts:
 AD Hardening: Inactive Computer Objects
 Free Active Directory Security Tools
 PowerShell Best Practices for Preventing Abuse
 Client System Hardening Best Practices & Testing
 Benchmarking Disk Performance
1 Pingback