

So I didn’t plan on writing about securely running scheduled tasks on Windows Server that require elevated permissions. However, after spending way too much time researching it, I think laying it out for others will be helpful. After reading this post, you will clearly understand how to securely create a Windows Scheduled Task that can run consistently with the right permissions.
Short on time? TLDR
Let me start with a rundown of what I needed to do.
I am building a PowerShell script to automate Windows Server Active Directory security functions. Some functions include Kerberos TGT password rotation, automatically disabling inactive users and computer cleanup. The functions will run daily from a PowerShell script that launches from a Scheduled Task, and both the PowerShell Script and scheduled task will live on the Active Directory Domain Controller. Some tasks require Domain Admin privileges, which is where the trouble starts.
Windows Scheduled Task Permissions Issues
Scheduled Tasks that require Domain Admin rights are tricky. If you create a scheduled task with a standard Domain Admin user account, everything will work as expected, but only if that same user account is logged on when the scheduled task runs. So this is not a reliable option. Running the scheduled task as the SYSTEM user will not work either. The SYSTEM user is helpful for many highly privileged jobs, but it still lacks permissions within the domain. Specifically in my case, the SYSTEM user lacks the right to rotate the Kerberos TGT user account password, among other things.
So what are the options to ensure my script has the permissions it needs when it runs? It should go without saying that hard-coding a Domain Admins password into the PowerShell script is out of the question; also, it’s dumb. The secure way of doing what I need is with a Standalone Managed Service Account.
Standalone Managed Service Accounts
Standalone Managed Service Accounts(sMSA) are Active Directory domain accounts that administrators use to secure one or more services that run on a server. Only a single server can use an sMSA account, securing it from misuse elsewhere within the domain.
sMSAs offer greater security than basic user accounts that act as service accounts. Here is a quick rundown of the benefits of sMSAs over a basic service user account.
- Set strong passwords
sMSA uses 240-byte, randomly generated complex passwords. The complexity and length of the password ensure brute forcing is unrealistic. - Cycle passwords regularly
Windows automatically changes the sMSA password every 30 days, by default. Our script or services don’t need to manage this process, and we will not need to update anything when the password change occurs. - Account Usage Restriction
We can restrict the usage of an sMSA account to a single computer. This reduces the ability to abuse the account, unlike unrestricted user accounts. - Cannot be used to interactively log into Windows
Interactive login is authentication to a computer through the usage of their local user account or domain account. This means that console or Remote Desktop logins are impossible with an sMSA.
In short, the sMSA will allow us to have a highly-privileged user account within Active Directory that can only be used by one AD-connected Computer. That one AD-connected Computer is the only one that can retrieve the sMSA account password and use its given permissions and rights.
Creating sMSA Accounts
Now that we know what the sMSA account is and the security features it adds, let’s create one. To create an sMSA we will need to use PowerShell. I know, it is very out of character for Microsoft not to have a GUI option… but I digress.
Create the sMSA
Open an administrative PowerShell session and run the following commands.
!!READ ME!! !WARNING! !!READ ME!!!
THIS IS THE MOST COMMON MISTAKE MADE!
The “SamAccountName” of the sMSA account cannot exceed 14 characters.
# Create a new sMSA account with PowerShell
New-ADServiceAccount -SamAccountName "NewSmsa" -Name "NewSmsa" `
  -Description "My new sMSA" -RestrictToSingleComputer -Server $(Get-ADDomainController) `
  -Enabled $true
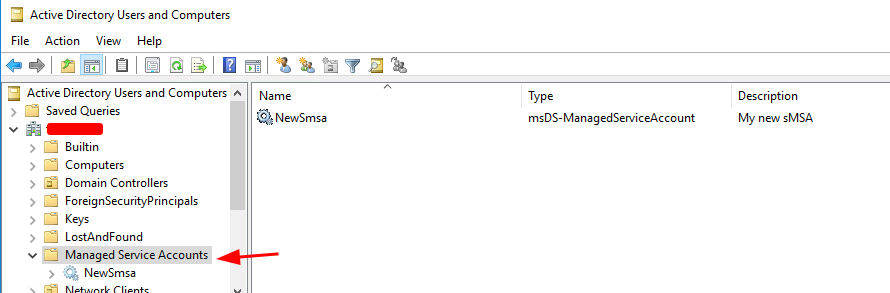
Now the new sMSA account has been created. You can check this in the Active Directory manager tools under the “Managed Service Accounts” folder.
Assigning the sMSA Account to a Computer
Now we need to assign the sMSA account to the one computer we want to use it on. To do this, run the following commands.
# Create a object variable with the Computer/Server we intend to use the new sMSA account on.
$ServerIdentity = Get-ADComputer -identity "Server01"

# Create a object variable with the new sMSA we just created.
$MsaIdentity    = Get-ADServiceAccount -Filter "Name -eq 'NewSmsa'" -Properties *

# Assign the new sMSA account to the one Computer/Server we needed it on.
Add-ADComputerServiceAccount -Identity $ServerIdentity -ServiceAccount $MsaIdentity.sAMAccountName
If you want to confirm the sMSA was assigned to the Computer object we specified, you can do so with the below command.
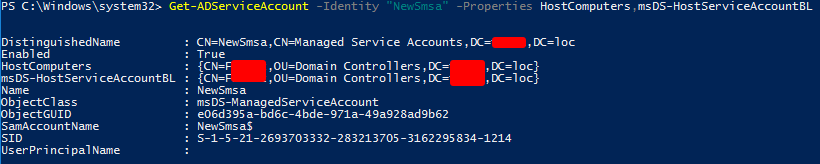
Get-ADServiceAccount -Identity "NewSmsa" -Properties HostComputers,msDS-HostServiceAccountBLThe “HostComputers” and “msDS-HostServiceAccountBL” attribute on an AD-Service-Account define the computer(s) a sMSA or a gMSA account is assigned.
Installing the sMSA in a Computer
We have the sMSA account created and assigned the computer that will use it in Active Directory. We now need to tell the computer using the sMSA account that it can use the new sMSA. If you are not already on the system that will use the sMSA, log on or “Enter-PSSession” to the computer. Then run the following commands.
# Create a object variable with the new sMSA we just created.
$MsaIdentity = Get-ADServiceAccount -Filter "Name -eq 'NewSmsa'" -Properties *

# Installs an existing AD sMSA on the computer on which the cmdlet is run.
Install-ADServiceAccount -Identity $MsaIdentity.sAMAccountName

# Test that this computer can retrieve the sMSA account password from AD
Test-ADServiceAccount -Identity $MsaIdentity.sAMAccountName
That’s it! We have our sMSA done.
Give an sMSA Account “Log on as a service” Permission
The “Log on as a service” permission is a policy setting that determines which service accounts can register a process as a service. Running a process under a service account circumvents the need for human intervention. On the computer that will be using the new sMSA account, we need to add the sMSA account to the “Log on as a service” policy under the “User Rights Assignment” policy group.
This policy can be configured in one of two places. If you need an sMSA on a Domain Controller, as I do, then you need to create a Group Policy Object(GPO). If you need the sMSA on any other type of computer, then you can configure the Local Security Policy. You could use a GPO for a non-Domain Controller computer and set the GPO scope to one computer. However, I will not show you that method here(it’s basically the same anyways; you can figure it out).
Configure “Log on as a service”
If you need to add the sMSA account to a Domain Controller, you will need to open Group Policy manager and edit the existing built-in policy named “Default Domain Controllers Policy“. Otherwise, at the computer you are adding the sMSA to, open the Local Security Policy editor using the command “secpol.msc“.
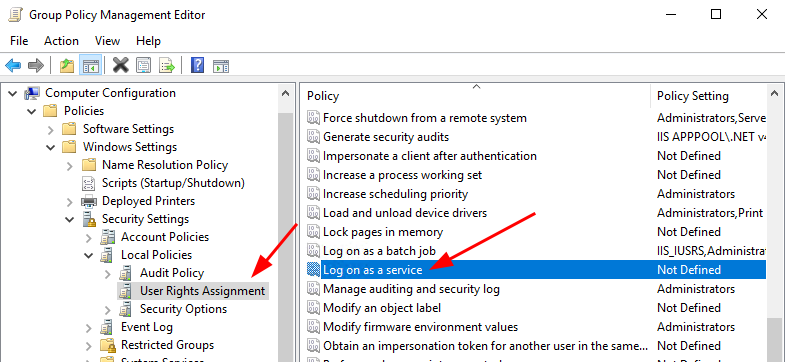
In the policy editor tool, navigate to the following location.
GPO Location: “Computer Configuration/Windows Settings/Security Settings/Local Policies/User Rights Assignment/Log on as a service“
SecPol Location: “Security Settings/Local Policies/User Rights Assignment/Log on as a service“
Right-click the “Log on as a service” entry and click properties.
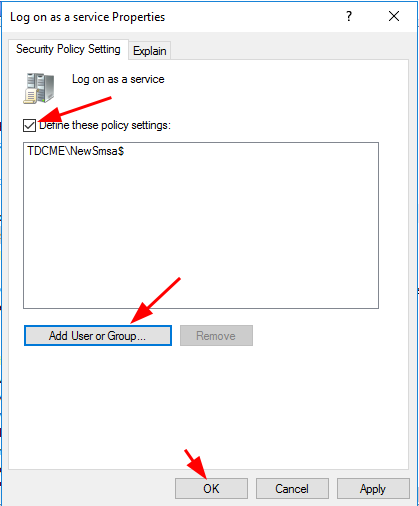
In the new popup window, click the box next to “Define these policy settings“, then click “Add User or Group…“. Add the new sMSA account and click “OK“
Go ahead and close out of GPO or SecPol editor to save the changes. If you want the changes to update right away, run “Invoke-GPUpdate“. You are all good now!
Schedule Task Event 101; Error Value: 2147943785
You will know if you did not do this step correctly once you try to run a scheduled task. If done incorrectly, in the Schedule Task manager, the task history will have Event ID 101, which contains the error value: 2147943785. This means your Managed Service Account is misssing the “Log on as a service” permission.
Creating a Schedule Task with an sMSA
The final step is creating the Scheduled Task with the new sMSA account. The Schedule Task GUI interface does not have a way of assigning an sMSA account as the Runas user for the task; that can only be done through PowerShell. So we need to create the basics of the scheduled task in PowerShell, and we can edit the other task details in the GUI later if required.
Run the following commands in an administrative PowerShell session on the computer using the sMSA.
# Get the DateTime of tomorrow at 9 AM.
$ScheduleRunTime = (Get-Date).AddDays(1).Date + "09:00:00"

# Set the Task to run Daily at 9 AM starting tomorrow.
$Trigger = New-ScheduledTaskTrigger -Daily -DaysInterval 1 -At $ScheduleRunTime

# Define that I want to launch PowerShell and run my scripts.
$Action = New-ScheduledTaskAction -Execute 'PowerShell.exe' -Argument 'C:\Scripts\MyScript.ps1'

# Run only if the server is online, but wake the system to run if needed.
$Settings = New-ScheduledTaskSettingsSet -RunOnlyIfNetworkAvailable -WakeToRun

# Run the task with the sMSA AD account. You must have the "-LogonType Password" flag set for this to work!
# Also, note in the UserID that I added a '$' to the end of the username; this is a MUST for you too!
$Principal = New-ScheduledTaskPrincipal -UserID 'DOMAIN\NewSmsa$' -LogonType Password -RunLevel Highest

# Use all the variables we set up and register the new Scheduled Task.
Register-ScheduledTask -TaskName "MyNewScheduledTask" -Action $Action -Trigger $Trigger -Settings $Settings -Principal $Principal
Ensure ‘DOMAIN\NewSmsa$’ is updated with your domain and sMSA account names in the above command.

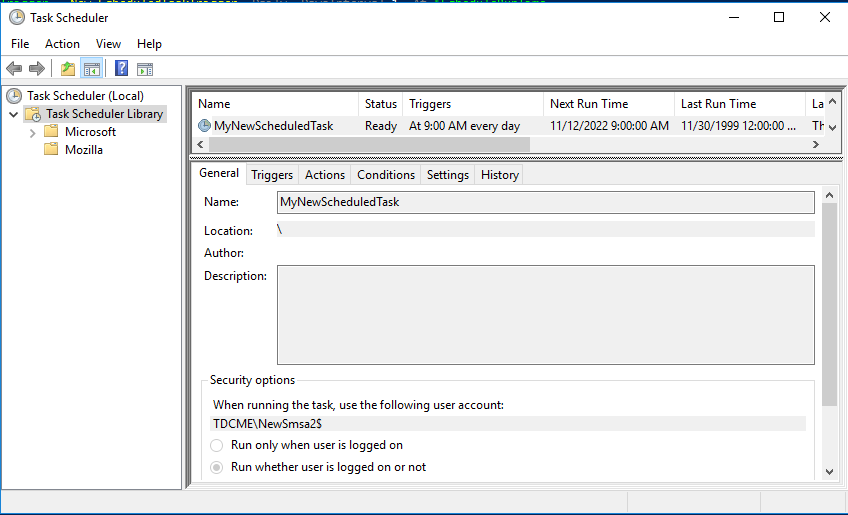
You can confirm and edit the newly created Schedule Task in the task manager. You can make changes in the Task Manager GUI without breaking the Runas sMSA settings.
That is it! We are all set!
Editing a sMSA Schedule Task in the Task Scheduled GUI
After creating the scheduled task with the sMSA account in PowerShell, you can make edits to the task in the Task Scheduler GUI. However, when you save your changes, you will be asked for the sMSA account password, which you will not have. No problem! When applying changes via the Task Scheduler GUI, use your AD user login so the changes can be applied. Yes, this will set the task to run as your AD user, but we will fix this in PowerShell.
Now that you have completed all your scheduled task changes, we will change the task to using the sMSA account. Run the below command to change the scheduled task back to RunAs our sMSA account.
# Create a variable with our sMSA account user details.
#   $Principal = New-ScheduledTaskPrincipal -UserID '<YourDomain\YourSmsaUser>' -LogonType Password -RunLevel Highest

PS> $Principal = New-ScheduledTaskPrincipal -UserID 'DOMAIN\NewSmsa$' -LogonType Password -RunLevel Highest

# Update just the RunAs Principal settings of the scheduled task.
#   Set-ScheduledTask -TaskName <EXISTING TASK NAME> -Principal $Principal

PS> Set-ScheduledTask -TaskName DailyCleanupJobs -Principal $Principal
Wrap-up – TLDR: Too Long Didn’t Read

There are three key steps to securely create a Windows Scheduled Task that can run consistently with the right permissions.
- Create a Standalone Managed Service Account(sMSA) in Active Directory.
- Create a Group Policy Object or Local Security Policy that gives the new sMSA account “Log on as a service” permissions
- With PowerShell, create the new Scheduled Task that is Runas the new sMSA account.
That is it. Did I miss anything? Let me know in the comments below. Last thought, Scheduled Tasks in Windows are way more complicated than it needs to be. In Linux, it is so clean, clear, and straightforward. Ugh… Windows…
Related posts:
 Sysmon Deployment via Active Directory GPO
 AD Hardening: Inactive Computer Objects
 Free Active Directory Security Tools
 PowerShell Best Practices for Preventing Abuse
 Client System Hardening Best Practices & Testing
 Linux Web Server Hardening: The Basics
January 16, 2023 at 1:31 PM
Hello, nice article! I do have a problem with this statement.
“The Schedule Task GUI interface does not have a way of assigning an sMSA account as the Runas user for the task; that can only be done through PowerShell.”
Maybe I’m misunderstanding, but you can absolutely go into the task, click “Change user or group” under “when running the task, use the following user account” and find service accounts (both MSA and GMSA.) At worst you would need to make sure the Service Accounts” object type is selected in the AD search/picker. In this scenario it has always been selected by default in my testing. You can also only select “Service Accounts” and do Advanced > Find All to list all the service accounts and pick the appropriate one.
Don’t get me wrong, the powershell option is fine and easy. If I’ve misunderstood something please just let me know!
January 16, 2023 at 2:43 PM
Hi Doug,
Thanks for the comment, and welcome to the blog!
g/sMSA accounts cannot be assigned using the Task Manager GUI; yes, normal accounts can, but not sMSA or gMSA accounts. I double-checked in a Windows Server 2022 install and my statement appears to be correct.
References URL: “https://techcommunity.microsoft.com/t5/core-infrastructure-and-security/windows-server-2012-group-managed-service-accounts/ba-p/255910#toc-hId-176569136”
See section number 4.
January 31, 2023 at 9:02 AM
Hi, is there a way to update the “Configure For” option at the bottom of the general window with powershell? I have created my task but I need to update that option from Windows 7, Windows Server 2008 R2 to Windows Server 2016.
January 31, 2023 at 9:44 AM
Hi Jason,
Welcome to the blog! The command you are looking for is “New-
ScheduledTaskSettingsSet”, with the option “-Compatibility Win8”. Below is a updated line from the PowerShell Create Task section with the “Configure for” option set.
“$Settings = New-ScheduledTaskSettingsSet -RunOnlyIfNetworkAvailable -WakeToRun -Compatibility Win8”
See more details at the following link.
https://learn.microsoft.com/en-us/powershell/module/scheduledtasks/new-scheduledtasksettingsset?view=windowsserver2022-ps#-compatibility
April 16, 2023 at 11:53 PM
Hi Bret, all things has been done as your very good article.
But when i try to schedule the task with the PS, it fail with this error :
“Register-ScheduledTask : The filename or extension is too long.”
searched around seems that the problem is not in the filename path, but in the
New-ScheduledTaskPrincipal -UserID ‘xxxx\xxxxx$’ -LogonType
if i set “password” flag it fail, if i set “serviceaccount” the task was registered , BUT is not usefull because was set to run only if user is logged on computer.
If i try to set to run to “run if user is logged or not” i get a request of the service account password and obviously i haven’t …
what i’m doing wrong ?
thanks!
April 17, 2023 at 6:30 AM
Hi Pat,
Thanks for the question. I remember having a similar error. In my case, the “sAMAccountName” name of the service account I created was too long. The “sAMAccountName” AD attribute can only be a maximum of 15 characters(plus the “$” so 14 max). Microsoft’s documentation does not highlight this sMSA/gMSA account name limit, but there is one. If you have an sMSA account name 15 characters or longer, shorten it, then try the steps in this blog post again.
February 23, 2024 at 9:34 AM
Brett I am currently having this issue, my account does only have the 15 characters but it keeps changing the setting back to run only when the user is logged in. Everything else works fine. Due to new security protocols I have several of this configurations to go through any direction would be helpful. Thanks.
February 26, 2024 at 6:17 AM
Hi Will,
Thanks for the question.
The only time the scheduled task should change to “run only when the user is logged in” is if it was edited in the Task Scheduler GUI. If you did not edit the task with the Task Scheduler GUI, then, in the Task Scheduler GUI, locate the task and go to the history tab to find what is changing the task.
If you are only using PowerShell to create and edit the task, are you getting any error messages?
January 29, 2025 at 2:29 PM
Always read the comments! I started on another site following steps to schedule a task using an sMSA and kept getting the ‘filename too long error’. I did a lot of wandering looking for an answer. I was just about to give up when I decided to look through the comments on your article. I had made my sMSA account 16 characters. I have been around enough to know better. A Netbios limitation carried forward from LAN Manager all the way to 2025.
Thank you!
April 11, 2023 at 6:31 AM
Thank you. I wondered why the required security policy setting is “Log on as a service”. Shouldn’t it technically be “Log on as a batch job”? Is the reason that (s)MSA always need the “service”-right, even when executing “batch job”?
April 17, 2023 at 7:06 AM
Hi Martin,
Good question! The short answer is that we are using a s/gMSA account and not a standard AD User account.
Log on as a batch job description.
“When you use the Add Scheduled Task Wizard to schedule a task to run under a particular user name and password, that user is automatically assigned the Log on as a batch job user right. When the scheduled time arrives, the Task Scheduler service logs on the user as a batch job instead of as an interactive user, and the task runs in the user’s security context.”
URL: https://learn.microsoft.com/en-us/windows/security/threat-protection/security-policy-settings/log-on-as-a-batch-job
Log on as a service description.
“This policy setting determines which service accounts can register a process as a service. Running a process under a service account circumvents the need for human intervention.”
URL: https://learn.microsoft.com/en-us/windows/security/threat-protection/security-policy-settings/log-on-as-a-service
If we used “Log on as a batch job,” we would still need to provide a username and password. We would need to hardcode a password, or the user be logged in when the script runs.
When I first approached this topic, I thought the same thing; that I needed to use “Log on as a batch job”. However, after testing this, I found that only “Log on as a service” produced the desired results.
April 27, 2023 at 7:14 PM
When trying to create the scheduled task with Managed service account Name of “AuditReportDC01” I got the below during the Register-ScheduledTask
Register-ScheduledTask : The filename or extension is too long.
At line:1 char:1
+ Register-ScheduledTask -TaskName “MyNewScheduledTask” -Action $Action …
+ ~~~~~~~~~~~~~~~~~~~~~~~~~~~~~~~~~~~~~~~~~~~~~~~~~~~~~~~~~~~~~~~~~~~~~
+ CategoryInfo : NotSpecified: (PS_ScheduledTask:Root/Microsoft/…S_ScheduledTask) [Register-ScheduledTask], CimException
+ FullyQualifiedErrorId : HRESULT 0x800700ce,Register-ScheduledTask
Shortening the Managed Service name to ARDC01 fixed the issue
April 28, 2023 at 5:44 AM
Hi Paris,
Thanks for reading! You are correct. The “sAMAccountName” AD attribute can only be a maximum of 15 characters(plus the “$” so 14 max). Microsoft’s documentation does not highlight this sMSA/gMSA account name limit, but there is one. I think it is crazy Microsoft’s documentation does not make this limitation clear.
May 23, 2023 at 7:55 PM
Great article!
I have one issue….How do I get past the step ‘Installing the sMSA in a Computer’ WITHOUT installing RSAT Tools on the server that will be using the sMSA account.
January 2, 2024 at 6:15 AM
Hello Max,
The the best of my knowledge, there is no way around installing RSAT to make the process work.
June 15, 2023 at 8:45 AM
thanks for this article, all fine for me
expect the 15char limitation with the $, but comments helped and saved me
June 15, 2023 at 2:36 PM
Hi Bill,
Thanks for reading and commenting. The character limit comes up a lot.
I updated the post to include this limitation, so hopefully, others will not run into the same issue.
July 24, 2023 at 8:02 AM
When i go to the Task Scheduler GUI and make changes to the task it asks for the Service Account Password.. How do i bypass that? Thank you
August 31, 2023 at 1:24 AM
Register-ScheduledTask : The user name or password is incorrect.
I am getting this error when I am running the script to scheduled task using MSA.
September 6, 2023 at 6:27 AM
Hello Aman,
Welcome to the blog, and thanks for reading! Without more details, I am only guessing. That said, it sounds like you may not have granted the computer permission to access the sMSA account password stored in AD.
Try the steps listed here: https://cybergladius.com/secure-windows-scheduled-tasks-with-managed-service-accounts/#Installing-the-sMSA-in-a-Computer
September 6, 2023 at 12:39 AM
Hello!
I have a problem with creating a scheduled task with powershell. I get this error. How do I solve this?
Register-ScheduledTask : No mapping between account names and security IDs was done.
(18,8):UserId:
At C:\MSA\Create a Schedule Task with an sMSA.ps1:18 char:1
+ Register-ScheduledTask -TaskName “Export1” -Action $Action -Trigger $ …
+ ~~~~~~~~~~~~~~~~~~~~~~~~~~~~~~~~~~~~~~~~~~~~~~~~~~~~~~~~~~~~~~~~~~~~~
+ CategoryInfo : NotSpecified: (PS_ScheduledTask:Root/Microsoft/…S_ScheduledTask) [Register-ScheduledTask], CimException
+ FullyQualifiedErrorId : HRESULT 0x80070534,Register-ScheduledTask
September 6, 2023 at 6:17 AM
Hi Jan,
Welcome to the blog, and thanks for reading! I won’t be able to pinpoint the root cause of your error without a full log of all the steps you did. If you have a full log, create a Pastebin link and comment here, and I will take a look. However, based on your provided information, I would say there is an issue with the sMSA account setup. Maybe you missed one of the steps? Try deleting the sMSA account and recreating it.
January 1, 2024 at 1:16 PM
In case you haven’t solved it yet, or someone else comes across this with the same error, double check that you’re actually replacing the “DOMAIN” portion of the username with your actual domain name. I encountered this myself and was beating my head against a wall until I realized my copy/paste mistake….
January 2, 2024 at 6:08 AM
Hi FotS,
Thanks for the feedback! I hadn’t considered that this maybe an issue. I added a note in the guide under the commands you mentioned, to alter the commands based on your environment.
October 16, 2023 at 4:34 PM
Hi,
What’s the -Compatibility switch for Server 2022?
January 2, 2024 at 6:36 AM
Hi Michael,
Sorry for the delay, and thanks for the questions. I believe you are asking about the “New-ScheduledTaskSettingsSet” commands “-Compatibility” flag. If you are running this on a Windows Server 2022, then you shouldn’t need this. Basically, the Task Scheduler has changed over the OS releases; adding an changing features. So, this flag is set to ensure a Task is backwards compatible. In our scenario, the sMSA account is running on the one server, so we only need to be compatible with this one OS. Thus, you do not need this flag.
Hope this helps!
January 26, 2024 at 1:20 PM
Struggled a long time with ChatGPT to no avail trying to make something like this work. Your little bit about “-LogonType Password” made the difference I believe. I made sure to share a link to this page for ChatGPT.
Thank you
February 21, 2024 at 5:08 AM
When i go to the Task Scheduler GUI and make changes to the task it asks for the Service Account Password.. How do i bypass that? Thank you
February 21, 2024 at 8:04 AM
Hello Mike,
Good question! I have updated this post to include instructions for when you want to make changes via the Task Scheduler GUI.
https://cybergladius.com/secure-windows-scheduled-tasks-with-managed-service-accounts/#gui
Hope this helps!
February 22, 2024 at 12:22 AM
Thanks alot. Too bad my powershell script in task scheduler doesn’t work.
The things i did;
1. Did all steps above, also added in secpol to logon as a service.
2. added the account to local admin group
3. checked the security ntfs settings on the script and gave the account the rights
The script is not working, when i change the account to a domain account it’s working immediatly. do you have any clue?
February 22, 2024 at 6:10 AM
Hey Mike,
So I cannot really troubleshoot without reviewing an error log/message, the script, and your environment. So I would just be guessing.
However, if it works with the domain admin rights, then it sounds like the sMSA and scheduled task are working as expected. The issue may be that the local admin group does not have the rights required by the function/commands within your script. This guide was created around providing domain admin rights only. So I have not tested this process with a local admin group, but in theory, it should work the same.
I would review the scheduled task history event log(Applications and Services Logs/Microsoft/Windows/TaskScheduler/Optional). Also, add a “Start-Transcript” function to the start of your script to get a debug log.
I hope this Helps!
February 26, 2024 at 3:55 AM
Thanks again, i fixed it! The only thing is when you have a script on a domain controller and want to use it with scheduled task, you need to give the sMSA account also local admin rights on the domain controller, how do you did that?
February 26, 2024 at 6:08 AM
Hey Mike,
Great to hear! For my use case, Domain Admin rights were enough, and I have not had an issue. The Domain Admins group is, by default, a member of the built-in (local) administrators group. The issue you have may just come down to what your script is doing and the permissions it requires.
February 28, 2024 at 2:04 AM
Hi Bret,
Weird. For some reason, i’ve added him to domain admin groups, he has log on as batch job rights and log on as a service rights. The script is checking password expires in the domain and notifies the users per mail.
September 9, 2024 at 9:47 AM
Hey Mike, i’m having exactly the same problem and for the same script it seems…
No mails are sent to 365 when using a sMSA account, event giving the permissions in AD for domain admin and others, but If I change to my user it runs normally.
Any suggestions guys? I’m kind stuck and didn’t want to give domain admins permissions to like a generic user for use in it..
August 11, 2024 at 2:31 PM
I followed all your steps and created the task without issue. I didnt edit in in GUI. When task ran got error 332 Condition Warning User “MSAAccount$”not logged in.
Running server 2022 task executes a EXE.
August 12, 2024 at 6:05 PM
I followed your steps and was able to get all the commands to work. The scheduled task when executes at the trigger time has error 332 use msaAcoount$ not logged in