
If you have ever been in charge of server security, you have likely Googled “Server Hardening Best Practices” and been led to the NIST Guide to General Server Security SP 800-123. You were looking for a clear checklist of settings and configurations to harden your server. However, the NIST SP 800-123 is a general, non-specific guidance.
The checklist you are looking for exists, and NIST provides it! This blog post will show you how to turn the NIST SP 800-123 from general to specific guidelines. Additionally, we will also need to take our server hardening procedures beyond implementation to continuous configuration compliance validation.
What to Know Before Deploying NIST Hardening Best Practices
NIST’s server hardening checklists are called Security Technical Implementation Guides(STIG), which is an XLM file that is used with a Security Content Automation Protocol(SCAP) Compliance Checker(SCC) program. SCAP Compliance Checker programs will ingest the XML file that contains test parameters for one specific operating system. Then you will give the SCC a server to test. After the test, you will have a list of issues you must fix and a security compliance score for the system tested.
Alphabet Soup Recap
- STIG = Security Technical Implementation Guide
- SCAP = Security Content Automation Protocol
- SCC = SCAP-Compliance Checker
TLDR: An SCC application uses the SCAP protocol to validate that an OS has a set of STIG configured correctly.
NIST Hardening Best Practices Process Overview
The goal is to build a more secure environment. Here is an overview of achieving 100% NIST hardening best practices.
- Download SCC software and STIG configuration files.
- Set up SCC and import STIG configurations.
- Scan domain-joined servers using SCC.
- Review report for vulnerabilities.
- Follow the report’s guidance to fix vulnerabilities using a GPO.
- Verify the vulnerabilities are fixed with another SCC scan.
- Repeat steps one through six till at 100% compliance.
- Ensure continuous compliance with scheduled SCC scans and report reviews.
Downloading All Software to Test NIST Hardening Compliance
STIG Files
My Windows Lab is all in Windows Server 2016, so I will need the STIG files for that OS. So moving forward, my examples are all from a Windows Server 2016 lab. Whatever OSs you have running in your environment that you want to test requires their versions of the NIST STIGs. Below are some links to the STIGs for the most common OSs.
- Windows Server 2016 STIG
- Windows Server 2019 STiG
- Windows Server 2022 STIG
- Ubuntu 20.04 STIG
- Red Hat 8 STIG
If you are looking for a different OS, just Google “NIST <Name+Version> STIG” and you should be able to find a link.
SCC Software Download
Most SCC software is not free, but one free version has the most features to make our lives easy. A full list of SCC software compatible with NIST STIGs can be found here. The tool I have been using that is free and offers most of the features we need is made by the US DoD Cyber Exchange. Download the SCC software for Windows at the following link.
Main Page: https://public.cyber.mil/stigs/scap/
Direct Link Windows SCC: https://dl.dod.cyber.mil/wp-content/uploads/stigs/zip/scc-5.7.1_Windows_bundle.zip
Our security goal is to perform continuous server compliance hardness validation. This means we need to run SCC frequently. Therefore, we should have a dedicated system to install the SCC software. Determining which server to install the software depends on your security and business needs. You may want to set up a dedicated VM for SCC, but that is not a requirement.
Once you have the STIG files and the SCC software, transfer them to the server in your environment where you want to launch the SCAP test from. SCC can run tests on remote systems; you will need to have a network connection to those other remote servers
Getting Started With SCAP Configuration Check Scans
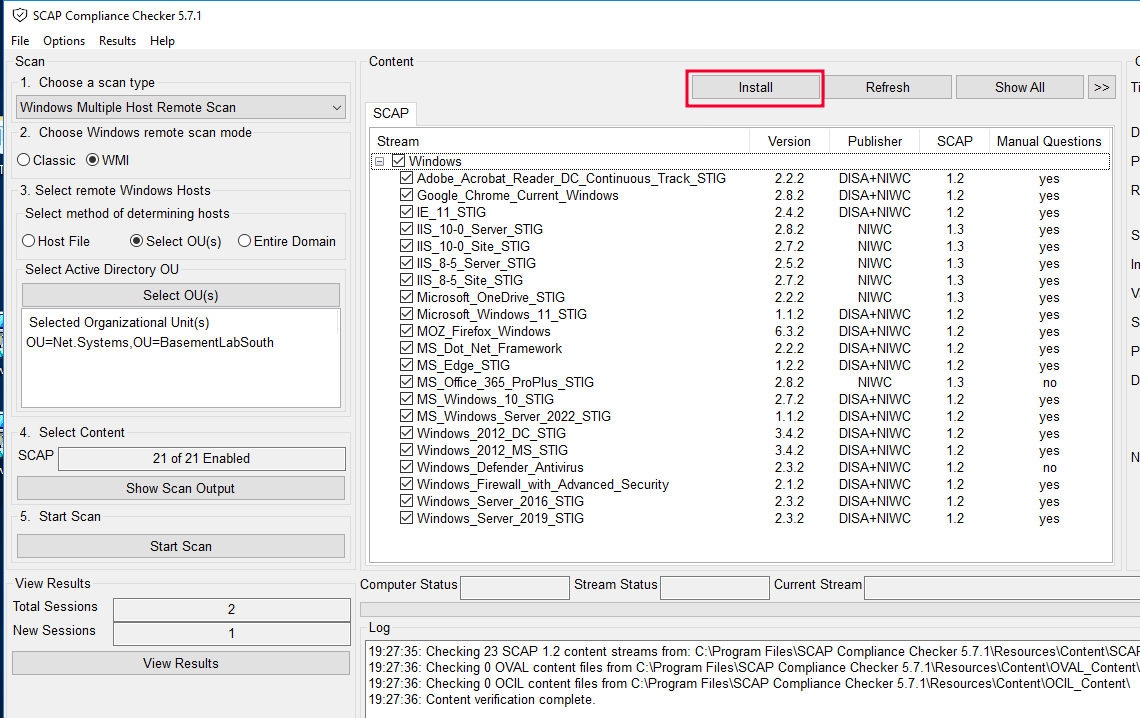
Unpack and install the SCC software with the “SCC_5.7.1_Windows_Setup.exe” you already downloaded. After installing, run the software. You will see the below window. Use the “install” button at the top to install the Windows Server STIG XML file we downloaded.
Starting A SCAP Configuration Check Scan
With the new STIG file loaded, we can run a compliance configuration verification scan.
Let’s configure a new scan with the options on the left-hand side of the SCC tool. The options will vary based on your environment, but here are the basics.
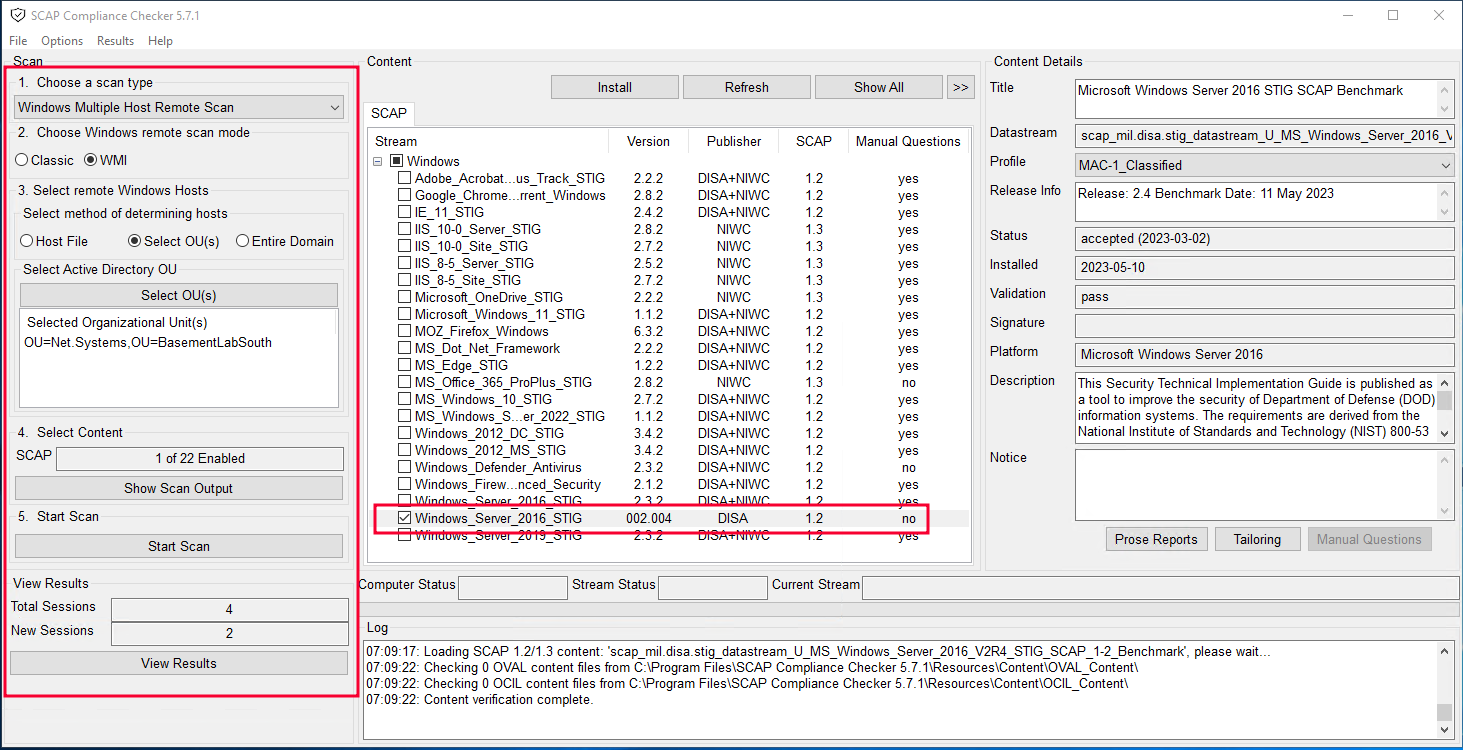
- Choose the type of host(Linux or Windows) and how many, one, or many. I am doing a scan on many Windows hosts.
- The remote connection method. WMI mode is the best option here. Classic is slower. The SCC software connects via WMI to the remote hosts, starting on port 135 to negotiate, then migrating communications to a port between 49152 and 65535.
- SCC links right to Active Directory, so you can select an entire OU of computer objects to run the scan on. This makes this process so much faster!
- As you may have noticed, many STIG tests come with SCC for auditing servers. Start with one STIG(the one we downloaded and installed recently) configuration test for the scan, and uncheck all others. There will be so many failed results that you must focus on one test and pass it before moving on to another STIG test.
Aim small, hit small, aim big, miss big. - Start the scan!!
SCAP Scan In-Progress
During the scanning process, you will see an overview window displaying the test statuses on all tested systems.

Once all the test statuses report as complete or errored out, you can use the “Close” button in the lower right-hand corner to close the test status window.
Viewing SCAP Results
Back in the main window of the SCC program, you will see the new test results file path. Use the “View Results” button on the lower left-hand side to open the test results.

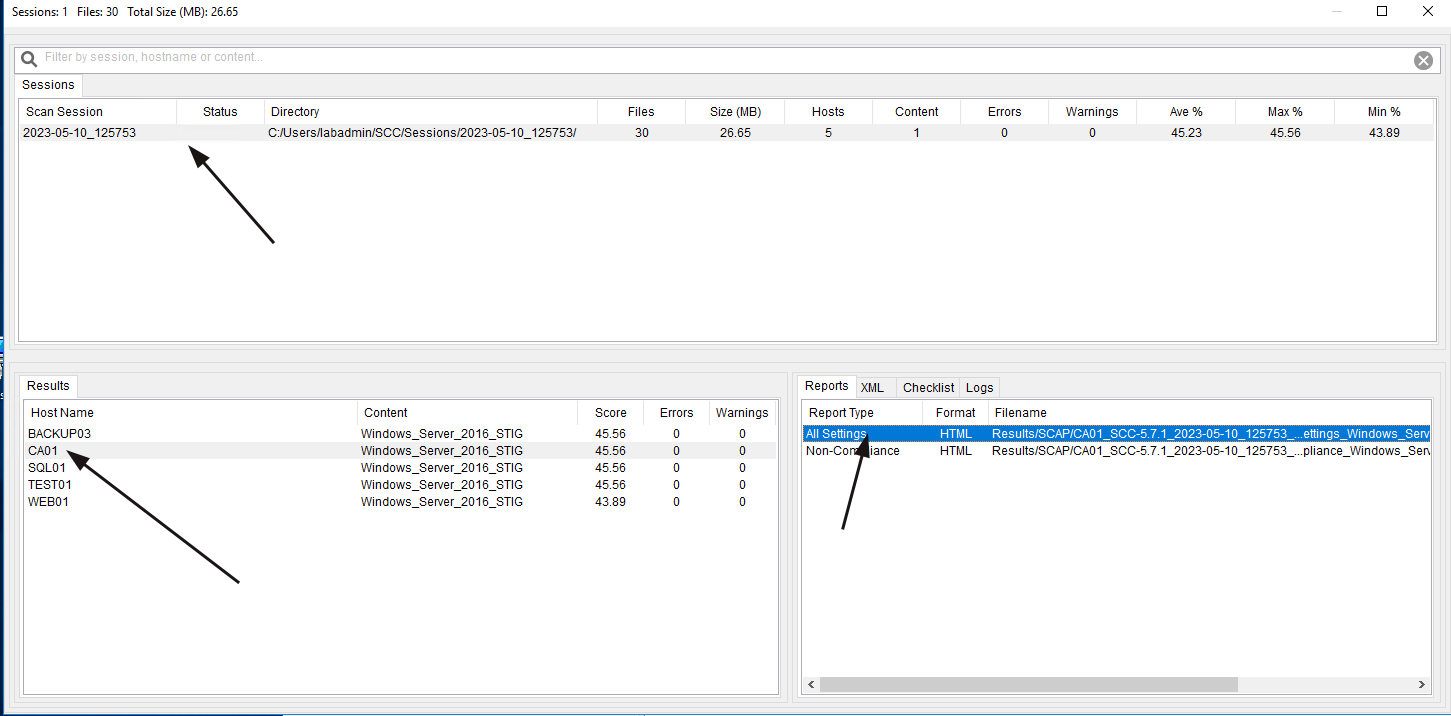
The next window will contain a history of all scan sessions and the reports each session contains.
Click on the most recent scan session at the top, then the server you want to review in the lower left, and lastly, double-click the “All Settings” report on the lower right.
Pro-Tip: Tracking Progress
These test results will track your security improvement over time. This is vital as it shows the quantitative value of your security team’s work and proves due diligence on your behalf.
NIST SCAP Configuration Compliance Test Results
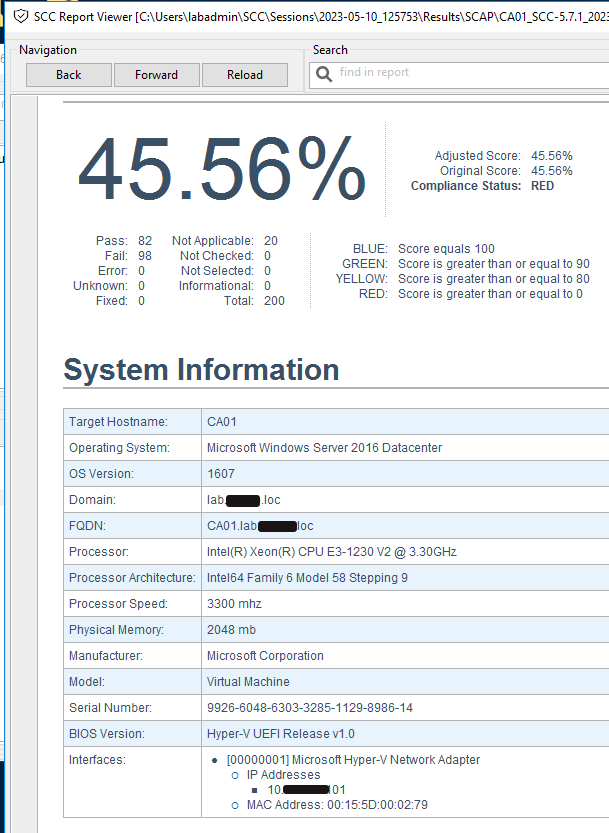
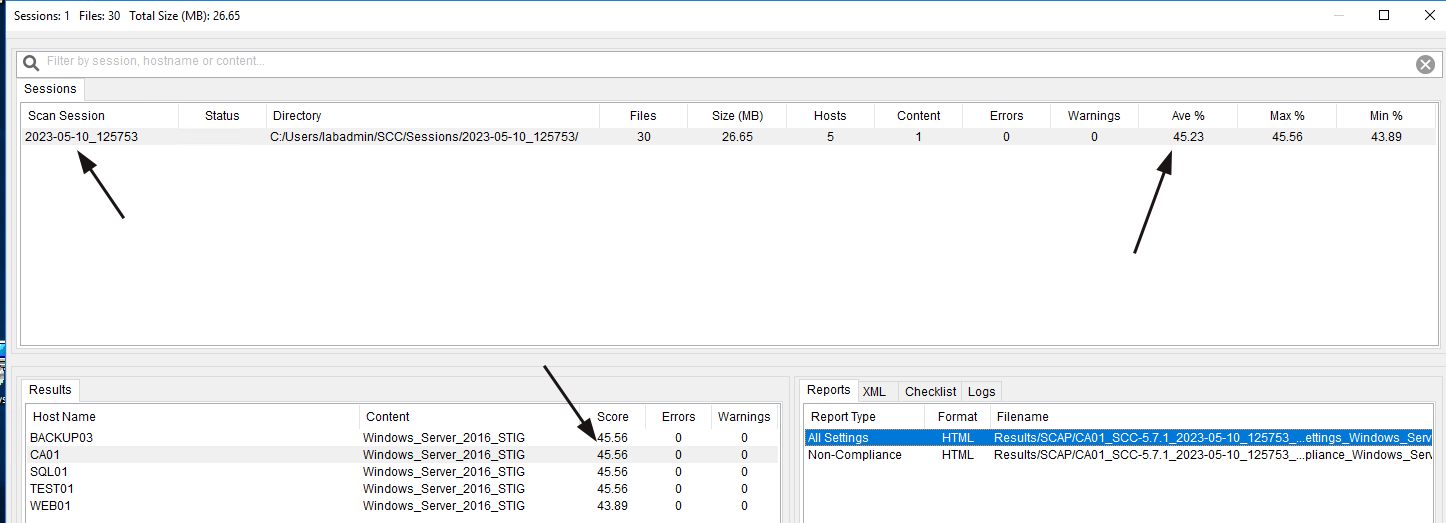
So how did you do? If this is your first test, don’t be surprised by the low score. We are trying to reach US-DoD levels of systems security compliance and hardening. That hardening process takes time and effort.
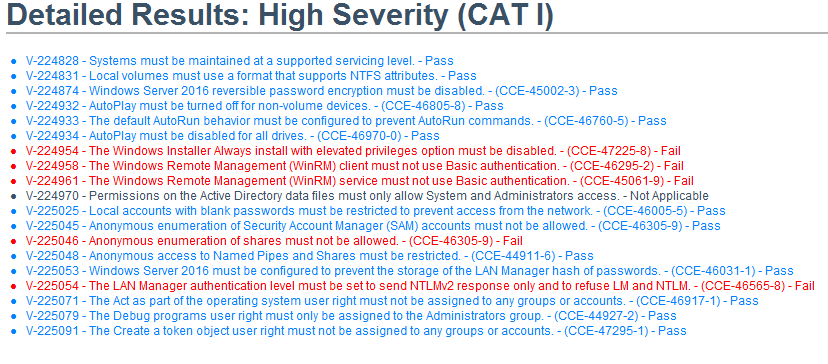
Scroll down to your report’s “Detailed Results: High Severity (CAT I)” and review what was found. Every line of results, pass or fail, is a link to another place in the same report that explains everything about the test, including how to fix and pass the test. So using this information, we can start building Group Policy Objects(GPOs). Building GPOs in Active Directory can improve our system’s compliance score throughout the domain.

Let’s create a GPO to fix the three AutoRun and AutoPlay vulnerabilities highlighted in the report above.
Implementing NIST Server Hardening Improvements
My last SCC scan discovered a vulnerability to AutoRun/Play attacks. To mitigate the vulnerability, I will set up a domain-wide GPO to block AutoRun and AutoPlay.
- To start, open up Group Policy Editor and create a new GPO named “AutoRun/Play Block” then open it to start editing the policy.
- Open the SCC report and follow the “Fix Text” instructions for the three AutoPlay & AutoRun vulnerabilities.
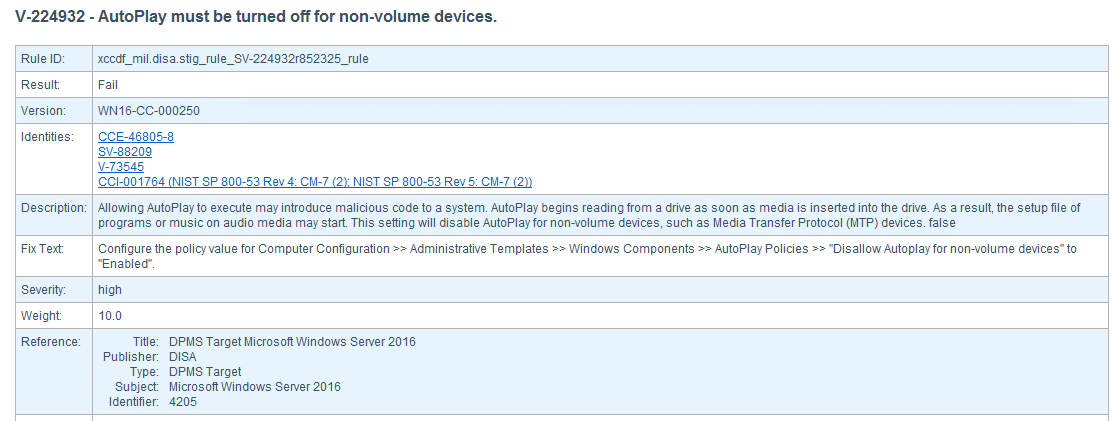
V-224932 GPO Settings Path: Computer Configuration >> Policies >> Administrative Templates >> Windows Components >> AutoPlay Policies >> “Disallow Autoplay for non-volume devices”
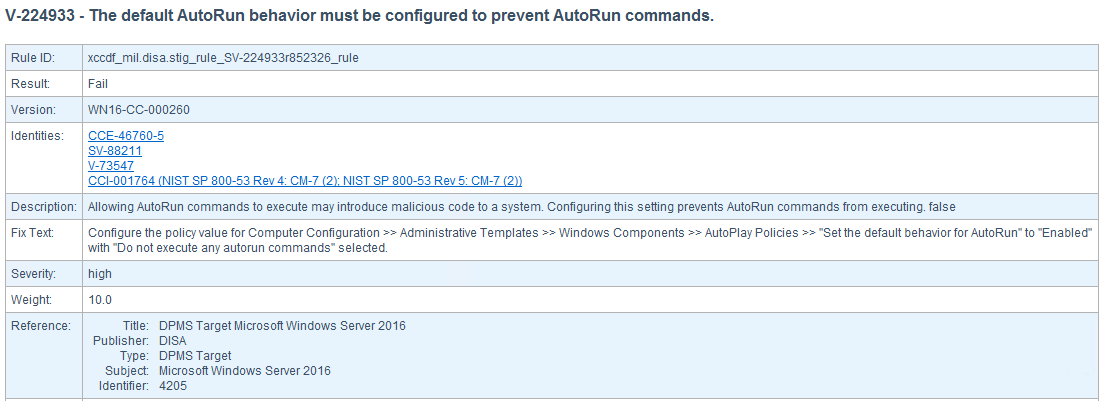
V-224933 GPO Settings Path: Computer Configuration >> Policies >> Administrative Templates >> Windows Components >> AutoPlay Policies >> “Set the default behavior for AutoRun”

V-224934 GPO Settings Path: Computer Configuration >> Policies >> Administrative Templates >> Windows Components >> AutoPlay Policies >> “Turn off AutoPlay”
Your GPO should look like the below image.
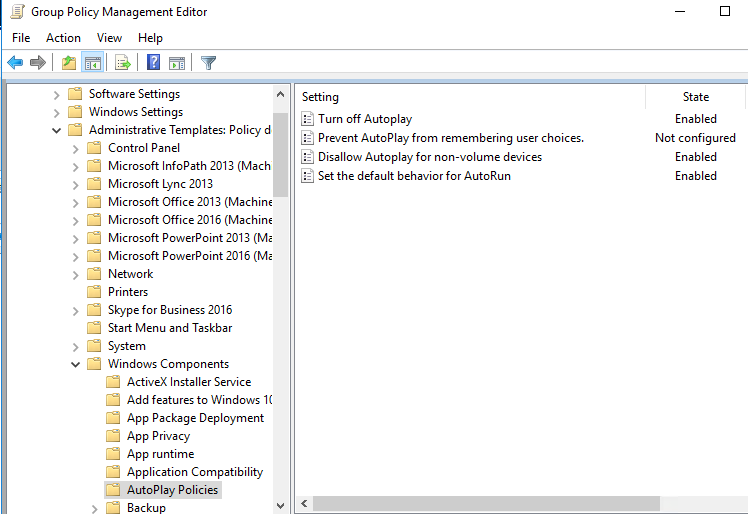
We must link the new GPO, enforce it, and perform a GPO update. Alternatively, you can wait 10 hours for the automatic GPO update to all systems.
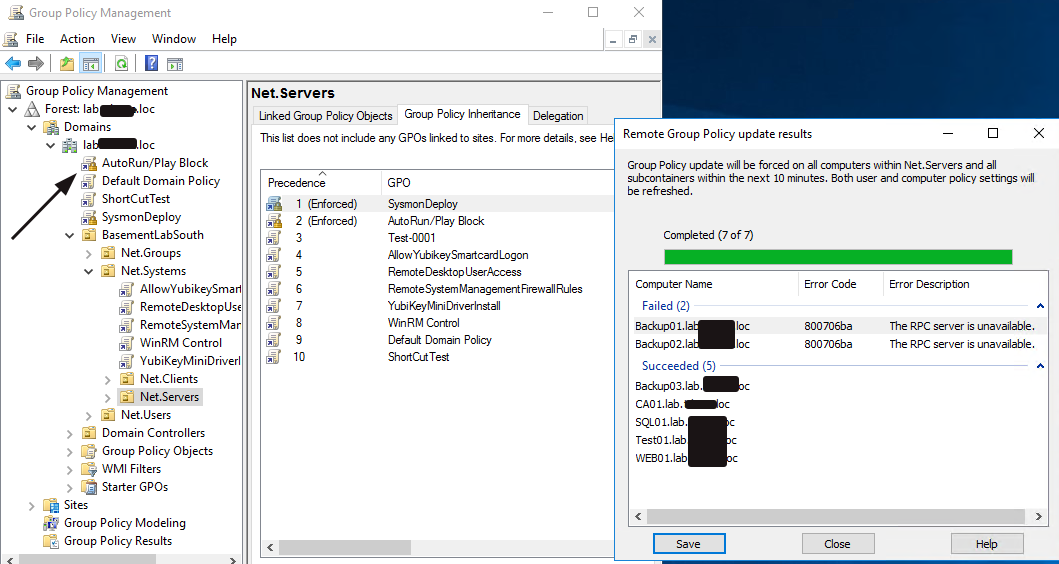
Verify The Server Hardening Improvements
Rerun the same SCC tests to verify that our GPO is working as expected. Let’s see what your score is now.

Hey, look at that, 1.5% improvement! Not bad for five minutes of work!
If you work on fixing a few issues a week from this list, it will not take long to get to 100% NIST system hardening compliance.
TLDR; NIST Server Hardening Best Practices
Getting your environment 100% hardened and compliant with NIST standards will not happen overnight; it requires time and diligence. Nevertheless, you can address several low-hanging fruit vulnerabilities that are easy to fix and have little to no impact on users. To begin, take the following steps.
- Download the free US DoD Cyber Exchange SCAP Configuration Compliance Checker.
- Test how compliant your systems are.
- Fix issues found by SCAP Configuration Compliance Checker.
- Verify the issue is fixed.
- Repeat.
Use the SCAP Configuration Compliance Checker software to track your security posture improvements over time.
You can check out another source to begin working with the SCC software if you need more information. The Naval Information Warfare Center (NIWC) Atlantic has created video tutorials to use SCC.
Do you have any suggestions for good free SCC software? Let me know in the comments below!
Related posts:
 Client System Hardening Best Practices & Testing
 AD Hardening Against Kerberos Golden Ticket Attack
 Free Active Directory Security Tools
 PowerShell Best Practices for Preventing Abuse
 Operating System Hardening 101
 Linux Web Server Hardening: Preventing Apache Information Disclosure
 Secure Windows Remote Management from 2FA Bypass
Leave a Reply