
If you have ever lost important data, then you will understand the panic and dread it causes. Partially failing Hard Disk Drives(HDD) have a few simple methods of data recovery. So I am going to share the simple data recovery method used to recover lost data in one of my recent engagements.
A Businesses MySQL Database held important records, records the business needed recovered. Their two main issues; there newest backup was about a month old, and they knew almost nothing about the server. They had attempted a raid array rebuild, which was mostly successful, but still left some files damaged.
The Setup
The server turns out to be a VMWare ESXi system, with 4x 250GB HDD in RAID5. The ESXi server hosted the MySQL VM with the data we needed. VMDK files are the virtual hard drives of the virtual server, and hold the data we need. However, there were still too many errors to mount the VMDKs file and copy the data. The VMDK files were 80GB and 20 GB in size with lots of file system errors.
Disclaimer
If the data you are trying to recover is mission-critical and the loss of it would cripple your business, then don’t touch the failing HDD in any way! Contact a professional data recovery firm. I recommend the below method only if the data does not matter, or if you are not willing to pay the high cost of a professional data recovery firm. Proceed at your own risk.
Saving the VMDK with DD
To recover the data we need to copy out the VMDK files to the new HDD, but normal copy attempts will fail due to bad and missing disk sectors. To get the VMDK files we need to do a sector-by-sector copy of the files on disk. We can do this using the DD command.
- Add a disk to the system to save the recovered data. This disc needs to be large enough to hold all the data you are copying. In my case 80GB + 20GB = 100GB. So I used a 1TB SSD to be safe.
- Boot a live Linux OS, Ubuntu 20.04.
- mount the failing Raid10 array to “/mnt/vmfs”
- partition, format, and mount the new hard drive used to save data to “/mnt/ext-disk”
- DD the VMDK files to the new “/mnt/ext-disk”
dd if=/mnt/vmfs/VirtualServer.vmdk of=/mnt/ext-disk/VirtualServer.vmdk conv=sync,noerrorThe options on DD are important to get right. DD will stop if it hits an error in the disc when it is trying to copy. With the “noerror”, DD will ignore the errors and just keep copying that data. To preserve the full length of the original data when sectors fail to read, the “sync” flag will pad each bad block with nulls. The errors will still exist in the file we create, but we can repair and recover them after the copy process.
Input/output errors are expected since we are copying from a failed HDD. The copy will also be very slow, maybe days, but be patient.

Working VMDK Files and Mounting to OS
With the extracted VMDK file we can attempt to repair the virtual file systems and recovers some data. Before doing anything to the newly created VMDK files create a copy of them. Only work on the copy of the VMDK files. Think of this as a save-state. If we damage any data in the filesystem rebuild process, we can always start over with the original copied data.
To mount a VDMK file we have to present it to the operating system as a hard disc drives. Run the following command to add the VDMK file as a HDD the OS can see.
# If you don't have qemu-utils, install it
apt update && apt -y install qemu-utils
# Add the new nbd kernal modules
modprobe nbd max_part=16
# Mount the VMDK file as a virtual disk
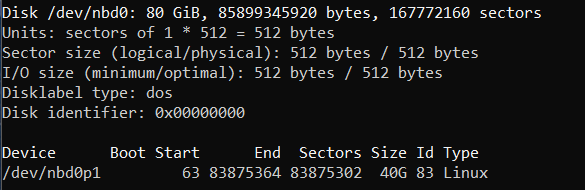
qemu-nbd -c /dev/nbd0 /mnt/ext-disk/VirtualServer.vmdkWe can now run “fdisk -l” and see the VMDK has been mounted as a virtual hard drive to “/dev/nbd0”. We can also see the partition structure. The “/dev/nbd0p1” partition is the one we will need to repair.
Repairing the Filesystem and Mounting to Directory
The VDMK file is mounted as if it were a hard drive connected to the system. We have to repair the underlining partition filesystem before we will be able to mount the virtual drive to a directory and view the data. We will need to run “fsck” to recover the filesystem. My filesystem is EX2 format. You will need to change the command to match your filesystem. If you are not sure about the filesystem format, just use “fsck” and the app will make its best guess at the filesystem type.
#Repair the filesystem of partition "nbd0p1". Auto reply "Yes" to all questions about repairing.
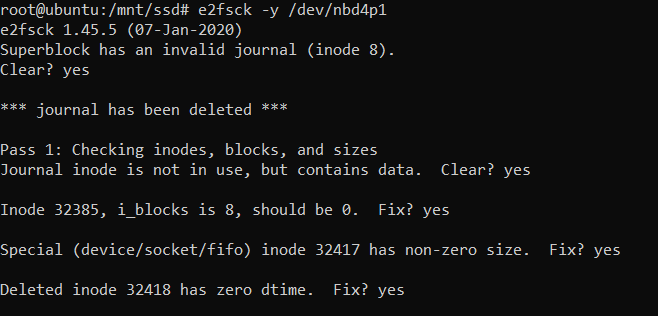
e2fsck -y /dev/nbd0p1This is going to automatically run and try to repair the filesystem the best it can. You will see a lot of disk activity.
Now that we have repaired the filesystem we can try to mount the repaired partition. Since this is actually a file we are mounting and not a disk, we need to add the loop option to the mount command.
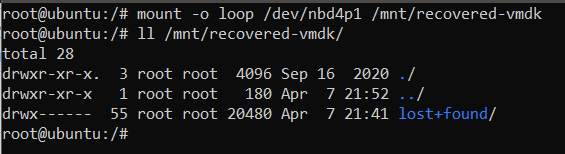
The repaired partition mounted successfully, however, it looks like there was a lot of damage. This was the root server disk so there should be a full OS installation of files here, but there is only the “lost+found” folder.
Recovering Files from Lost+Found
Files recovered via the fsck process are added to the Lost+Found folder. When you run fsck it will look through the partition data for complete files with missing inode or file name data. Files found in this manner are linked in the Lost+Found folder; hence the file was lost but now is found. From the recovery results, we can see the whole “/” root directory lost its file and folder link data. Let’s look at the recovered data.
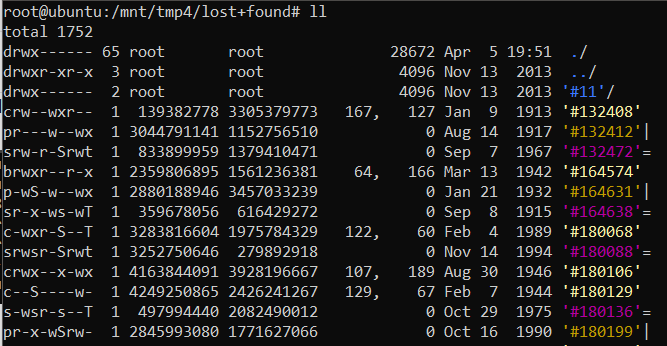
Looking at the metadata about the files you can tell things are a mess. However, we only care about recovering the MySQL live data folder and file. With those files, we can restore the database to a new system. The default MySQL directory for the live database is “/var/lib/mysql/”. The folder contained in that directory is the databases in their “live” format. Getting these files is the first set to recovering the database.
To find the “/var/lib/mysql/” directory lets do the “find”command; duh, LOL.
# Find Directories only with the name mysql.
find ./ -name "*mysql*" -type d 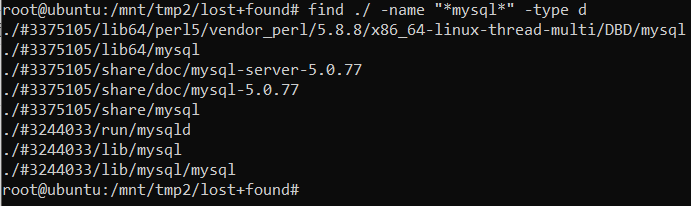
Well well.. It looks like we got lucky and found the recovered directory! Lets take a look at the discovered directory with the MySQL Data “#3244033/lib/mysql/”.
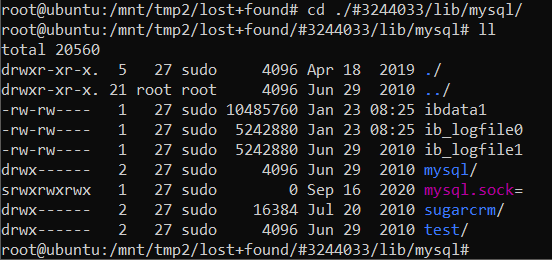
After reviewing the data further it does appear that everything we need is here. We can now TAR up this directory and move it to a new server.
MySQL Version Data
Now that we have the live MySQL database files we can restore the database to a new system. The new system must be running the same version of MySQL as the original server. The administrator of the failed server was not sure of the MySQL version he was using, so I will need to find out. Again, let’s use the find command.
# Find files only with the name mysql.
find ./ -name "*mysql*" -type f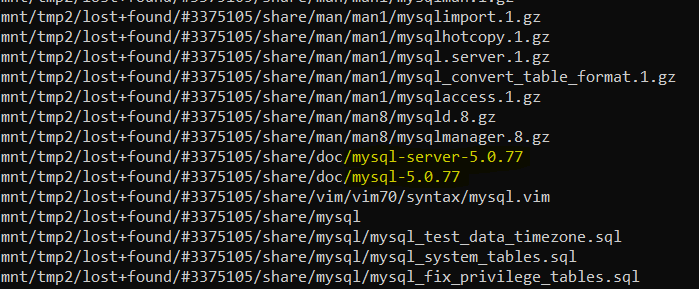
The failed server is using version 5.0.77, or at least that’s the original version installed. If a new version was installed later and these files were never updated, we still will use 5.0.77 as a starting place. We will try the 5.0.77 version first, if there is an issue we will install the 5.1 version and test it. We will continue to upgrade the MySQL minor release until the old database will start up in the MySQL service correctly.
I am not going to cover the MySQL live file service restore in this post, since it is very long already.
TLDR & Wrapping Up
Recovering Data from failing hard drives can be done with a lot of time and a few simple commands. This method, like most data recovery methods, is not guaranteed to recover all your data. So the best Data Recovery method is having Backups! Never skip or cheap-out on the Backup systems!
Recovery Method Recap
- Use the “DD” Command to create an image of the failing drive, or in this case VMDK file.
- Make a backup copy of the new image file, and only work on the copy.
- Mount the copied image file.
- Repair the file systems of the mounted images file.
- Find the recovered files and save them to another disk.
- After Data Recover is complete, BUILD OR BUY A BETTER BACKUP SYSTEMS!
Related posts:
 Troubleshooting Data Transfers
 File Size Transfer Lab
 Linux Web Server Hardening: Preventing Apache Information Disclosure
 Linux Server Hardening: Banning Malicious Traffic
 Basic Networking Troubleshooting
 How To Build A 3-2-1 Backup Strategy
Leave a Reply