
The latest KeePass vulnerability, CVE-2023-32784, has been overblown. Like any other vulnerability, you must conduct a risk analysis to understand the risk’s impact. So before I tell you how you can defend and prevent the KeePass vulnerability CVE-2023-32784 from affecting you, I will rant about how it does not matter.
KeePass CVE-2023-32784 Doesn’t Matter
Let’s review the CVE-2023-32784 vulnerability description so I can then explain why it does not matter.
In KeePass 2.x before 2.54, it is possible to recover the cleartext master password from a memory dump, even when a workspace is locked or no longer running. The memory dump can be a KeePass process dump, swap file (pagefile.sys), hibernation file (hiberfil.sys), or RAM dump of the entire system. The first character cannot be recovered. In 2.54, there is different API usage and/or random string insertion for mitigation.
https://nvd.nist.gov/vuln/detail/CVE-2023-32784
Now let’s walk through what an attacker needs to leverage this risk. An attacker must have physical access or local system administrator rights based on the vulnerability description. We can conclude this due to access requirements to the “pagefile.sys” or the “hiberfil.sys” file. A physical access attack is mitigated by having BitLocker enabled. So this attack vector is easily blocked, ensure BitLocker is turned on, and you are covered.
The other attack vector requires local administrator rights to exploit. This means the attacker already fully controls your local system. Even without using the KeePass vulnerability, the attacker can access your KeePass data. Consider this, if you are an attacker with full admin rights to a system and want to get into the KeePass data, an easier attack would be to install a key logger. The KeePass vulnerability CVE-2023-32784 doesn’t even get you the full password; it will not find the first letter of the password. Exploiting this vulnerability in a real attack doesn’t make sense.
The exploit that would be worth panicking over could break or circumvent the master password on a KeePass database file. Then an attacker would only need read access to the file to make a copy and break it open offline. I mean something that would not require brute-forcing the password with Hashcat or John the Ripper.
Ok, rant over!
How to Defend KeePass Against CVE-2023-32784
The answer to defending KeePass against CVE-2023-32784 is simple; multi-factor authentication. Adding multi-factor authentication will mitigate the KeePass vulnerability and other attack vectors, like offline brute-force attacks. Even if the attacker knows your password they could still not access the KeePass data. However, if the KeePass database is unlocked and the attacker has local admin rights, they could export all the KeePass data in plain text. There is no way to protect data on any system if a malicious actor has administrator rights!
There are two main options for setting KeePass with MFA. Let’s compare the two options.
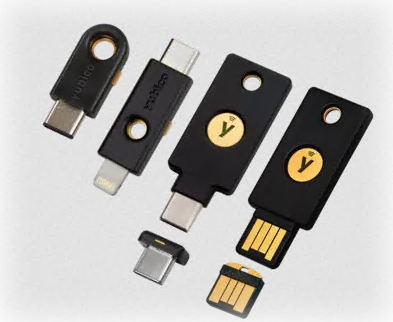
KeePass + KeeChallenge Plugin + YubiKey
YubiKeys are my favorite, and I have been using them for years. See my original blog post here to learn more about them, what they can do, and why they’re better than other 2FA/MFA options.
There are several available MFA options with a YubiKey, but the best ease-of-use method is HMAC-SHA1 Challenge-Response.
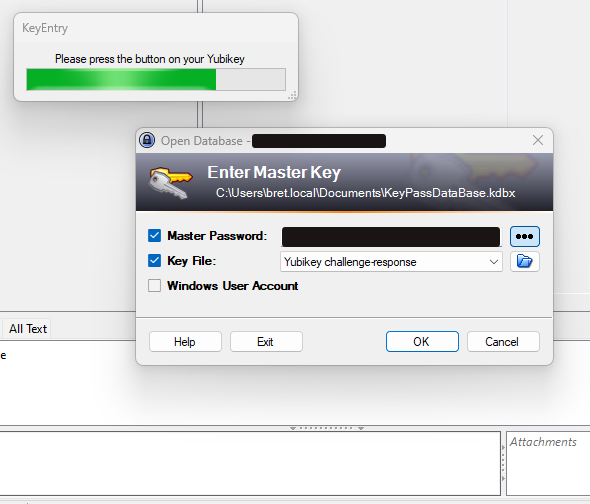
The YubiKey makes the MFA login to KeePass very fast. You enter the master password, then are asked to tap the YubiKey. This means we have MFA with a physical touch requirement adding another layer of security since an attacker could not just ask the YubiKey without physical confirmation.
Pros
- Very fast opening database. Tap the button on the YubiKey once, and you are done.
- Offline Hardware-level encryption, the most secure version of MFA/2FA.
Cons
- It costs $25 to $75 USD, depending on the kind of key you want.
- It is easy to forget at home, locking you out of everything until you retrieve the YubiKey.
- You really need to make sure you create an offline secret keys backup whenever you add new keys. There is NO way to retrieve secret data from the key once it is put in. If you lock yourself out, your data is gone!
Setup MFA for KeePass Using a YubiKey
If you want to buy and set up a YubiKey as your MFA method of securing KeePass, use the YubiKey official guide. The guide is well-written and straightforward.
KeePass + OtpKeyProv HOTP Plugin + Google Authenticator App
KeePass has a lot of plugins that improve functionality and quality of life for password management. With the OtpKeyProv plugin, we can add MFA using an HMAC-based One-time Password algorithm (HOTP). You will also need a phone app to hold and generate HOTP codes. I recommend Google Authenticator since a known and reputable source produces it.
To over-simplify the HOTP process, the phone authenticator app and the OtpKeyProv plugin will hold a Base32 secret key and a total count of all codes produced. With those two factors, a unique six-digit code is created.
Pros
- Free.
- Easy to set up.
- You are less likely to lose or forget your phone when you leave.
Cons
- You must enter at least three six-digit long codes to open the database. It’s time-consuming.
- It’s a counter-based key, so it’s possible to become desynced.
Setup MFA for KeePass with HOTP & Google Authenticator
You can set up HOTP MFA with the OtpKeyProv plugin on a new or existing KeePass database. If you are adding this to an existing database, then make sure you create a backup copy before making any changes! Don’t blame me if you lock yourself out.
Download & Install the OtpKeyProv Plugin
To get started, download the OtpKeyProv plugin from the below URL.
URL:https://keepass.info/extensions/v2/otpkeyprov/OtpKeyProv-2.6.zipUnzip the files and add the “OtpKeyProv.plgx” file to the KeePass plugin directory located at “C:\Program Files\KeePass Password Safe 2\Plugins“, then restart KeePass to load the new plugin.
Update the KeePass Master Password with HOTP
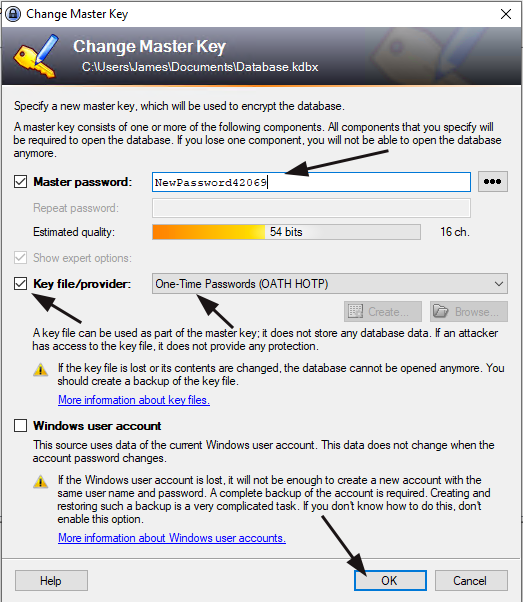
To update the master password, open KeePass, then go to “File” –> “Change Master Key.”
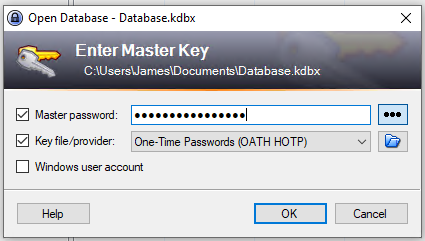
In the “Change Master Key” window, fill in a new master password, then check the box next to “Key file/provider,” select “One-time Password (OATH HTOP),” then click “OK.”
We must do the following in the next “Configure OTP Lock” window.
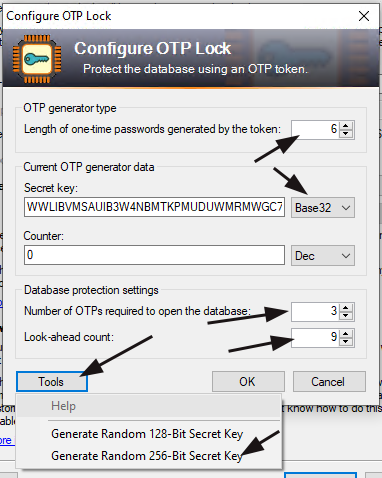
- Change the OTP length to 6.
- Next to the secret key text box, select “base32” from the drop-down box.
- Make sure the “Counter” is set to “0” and “Dec.”
- Set the number of OTPs required to 3, the minimum allowed value. You can set this higher, but you must enter more codes each time you want to open the database.
- Set the look-ahead count to 9. This will help prevent desync issues.
- To generate our new secret key, click “Tools,” then “Generate Random 265-Bit Secret Key,” and you will see the secret key text field above fill in.
- MAKE A NOTE of the secret key!
- Click “OK” to complete the OTP setup and save the database.
!IMPORTANT NOTE!
If you ever lose access to your authenticator app, you need the base32 secret key to recover the KeePass database. I recommend you print out or write down the secret key on paper and store it somewhere safe, like a filing cabinet at home.
Importing the HOTP Secret Key into Google Authenticator App
We now need to use the secret key we created in the KeePass HOTP setup and add it to our Google Authenticator application on our phone.
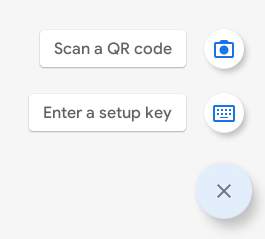
Install the Google Authenticator app from the Google Play store, open it up, click “+“(Plus sign) in the lower right-hand corner, and then click “Enter a Setup Key” to add a new key.
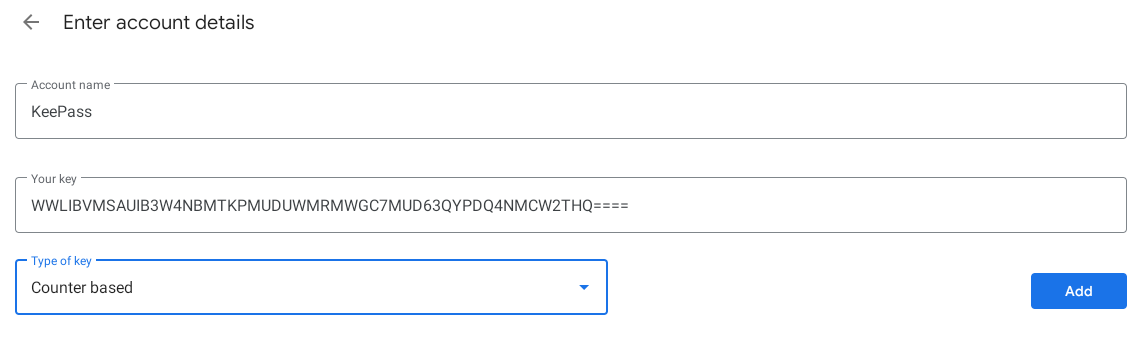
In the “Enter Account Details” window, enter an account name(can be any name), the base32 key we already created and set the key type to “Counter based.” Yours should look like mine below.
TIP: You can take a picture of the base32 secret key with your phone, then use the built-in Android photo lens feature to copy the image text to your clipboard.
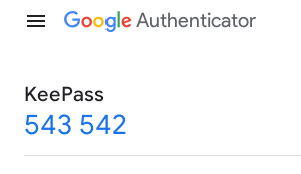
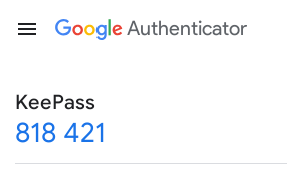
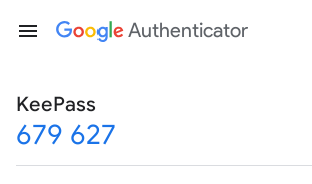
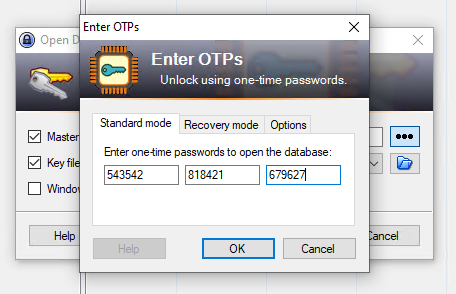
Now when we want to unlock the KeePass database we will need to get three OTP keys and input them into KeePass’s login. After entering a correct password you will be asked for the three OTP codes created by Google Authenticator. See the screenshots below.
Important Setup Note for Both KeePass MFA Options!
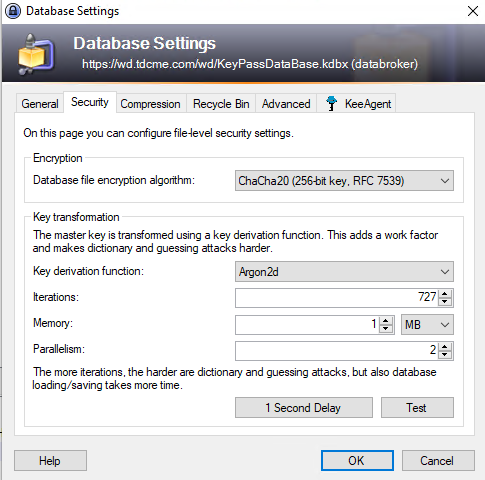
You must use the right database encryption algorithm and key transformation method for either the Google Authenticator & HOTP or the YubiKey & HMAC-SHA1 Challenge-Response method. Use the “ChaCha20 (256-bit Key, RFC 7539)” database encryption algorithm and the “Argon2d” key transformation method. If you are not using the right one on an existing database, you can change this in KeePass by going to “File,” “Database Settings,” then the “Security” tab. Make the changes, then resave the database.
TLDR: KeePass CVE-2023-32784 Doesn’t Matter!
While I agree any vulnerability is bad, those requiring administrator rights to exploit should not be treated as critical. So many other security measures would need to fail for this to be a concern. Moreover, exploiting KeePass CVE-2023-32784 is not the best method for gaining the KeePass master password. With local admin rights, a better attack vector is setting up a key logger. There is a plethora of keylogging malware with many battle-tested features. A key logger will yield even more data about the target user.
To defend KeePass against master password-based attacks, set up MFA.
- KeePass MFA using KeeChallenge Plugin + a YubiKey Overview
- Setup MFA for KeePass Using a YubiKey
- KeePass MFA using OtpKeyProv HOTP Plugin + Google Authenticator App Overview
- Setup MFA for KeePass with HOTP & Google Authenticator
Related posts:
 Operating System Hardening 101
 Linux Web Server Hardening: Preventing Apache Information Disclosure
 Linux Server Hardening: Banning Malicious Traffic
 AD Hardening Against Kerberos Golden Ticket Attack
 Free Active Directory Security Tools
 Client System Hardening Best Practices & Testing
Leave a Reply