

If you found this post, I’ll assume you know what honeypot traps are and how they can help improve your security. In this post, I will explain how to build an OpenCanary honeypot to give more visibility into your network.
We must think like an attacker to build honeypot traps to catch one. After an attacker compromises the first server in the network, they will look for a way to spread further. Compromising other systems requires an attacker to either port scan them or attempt a login. So our honeypot traps need to alert us whenever it detects port scans or access attempts on standard ports. Since Windows is the dominant attack target, we will build our honeypot with standard Windows services.
Let’s use OpenCanary to build a honeypot masquerading as a Windows server.
Building OpenCanary Honeypot Traps
OpenCanary is a daemon-based honeypot that will fulfill our requirements. OpenCanary can alert us through multiple methods, but we will set up email alerts in the tutorial.
To start, you will need a fresh install of Ubuntu 22.04 LTS server dedicated to only the canary service. Install using the following command to the fresh install Ubuntu.
1 – Update the OS and Install the Prerequisite Packages.
apt update && apt -y dist-upgrade && apt -y autoremove
apt -y install python3-dev python3-pip python3-virtualenv python3-venv python3-scapy libssl-dev libpcap-dev samba jq
2 – Setup the Canary User Account
We must set up a dedicated user account to run the canary service. This is an additional security measure. Later, we will add this user to the sudoers file to run only the canary daemon. We will not need the canary account password, so we will set a random 32-character password for the account.
useradd --shell /bin/bash -m -p "$(tr -dc A-Za-z0-9 </dev/urandom | head -c 32 ; echo '')" canaryGive the canary user admin sudoer rights over the opencanaryd service with the following command.
echo 'canary ALL = NOPASSWD: /home/canary/env/bin/opencanaryd --start, /home/canary/env/bin/opencanaryd --restart, /home/canary/env/bin/opencanaryd --dev' > /etc/sudoers.d/canaryNow the canary user can run the following commands with sudo rights.
- /home/canary/env/bin/opencanaryd –start
- /home/canary/env/bin/opencanaryd –restart
3 – Build the Virtual Environment
For security, we will run the canary services in a virtual environment. Run the following command to start the building process.
# Become the canary user.
sudo -u canary -i
cd ~

# Create the new virtual environment.
virtualenv env/

# Drop into the new environment.
. env/bin/activate

# Install the python3 packages that are needed.
python3 -m pip install opencanary scapy pcapy

# Copy the default config for opencanary.
cp /home/canary/env/lib/python3.10/site-packages/opencanary/data/settings.json ~/opencanary.conf
4 – Configure the OpenCanary service.
At this point, we have a “/home/canary/opencanary.conf” file that contains the default setting for OpenCanary. We need to edit this file to enable the honeypot services we want to use.
Port Scan Detection
We will start with enabling port scan detection. Find the port scan section and alter it to match the one below.
"portscan.enabled": true,
"portscan.ignore_localhost": true,
SMB Detection
Find the SMB section and alter it to match the one below.
"smb.auditfile": "/var/log/samba-audit.log",
"smb.enabled": true,
SSH Detection
Find the SSH section and alter it to match the one below.
"ssh.enabled": true,
"ssh.port": 22,
"ssh.version": "SSH-2.0-OpenSSH_5.1p1 Debian-4",
Email Alerting Settings
We now need to set up the email settings we want for when an alert needs to be sent. Find the “logger” section, then within that section, find the “handlers” section. In the subsection of “handlers“, add the “SMTP” setting. See my example below. Also, note that I am not using tabs; you need to use four spaces instead of a tab.
    "logger": {
        "class": "PyLogger",
        "kwargs": {
            "formatters": {
                "plain": {
                    "format": "%(message)s"
                },
                "syslog_rfc": {
                    "format": "opencanaryd[%(process)-5s:%(thread)d]: %(name)s %(levelname)-5s %(message)s"
                }
            },
            "handlers": {
                "SMTP": {
                    "class": "logging.handlers.SMTPHandler",
                    "mailhost": ["smtp.yourserver.com", 587],
                    "fromaddr": "noreply@yourdomain.com",
                    "toaddrs" : ["alert@domains.com"],
                    "subject" : "OpenCanary Alert",
                    "credentials" : ["alert@domains.com", "asecretpassword"],
                    "secure" : []
                },
                "console": {
                    "class": "logging.StreamHandler",
                    "stream": "ext://sys.stdout"
                },
                "file": {
                    "class": "logging.FileHandler",
                    "filename": "/var/tmp/opencanary.log"
                }
            }
        }
    },
Add IPs to Ignore List – Optional
If you have any vulnerability scanner within your network, you may want to add those IPs to the config. Find the “ip.ignorelist” and add any IP you do not want to alert on.
"ip.ignorelist": [ 10.0.0.22, 10.0.0.33 ],Test OpenCanary Honeypot Config
The OpenCanary’s config file has a JSON format. Use the command line tool “jq” to confirm all our settings are in the correct JSON format. Use the below command to confirm the config is good.
cat ~/opencanary.conf | jqIf you do not get any “parse error:” messages, then you did everything correctly, and the config is good. This does not mean your settings are correct, just that the formatting is correct.
Samba Config for OpenCanary
We must create a new Samba SMB config to serve as a dummy file share server. Any IP connecting to this file share will trigger alerts.
As the root user, copy the below config to the file “/etc/samba/smb.conf“. You can remove the existing content of “smb.conf” in lieu of the below config.
[global]
   workgroup = CorpNet.loc
   server string = CorpNet
   netbios name = CorpNetFile8
   dns proxy = no
   log file = /var/log/samba/log.all
   log level = 0
   max log size = 100
   panic action = /usr/share/samba/panic-action %d
   #samba 4
   server role = standalone server
   #samba 3
   #security = user
   passdb backend = tdbsam
   obey pam restrictions = yes
   unix password sync = no
   map to guest = bad user
   usershare allow guests = yes
   load printers = no
   vfs object = full_audit
   full_audit:prefix = %U|%I|%i|%m|%S|%L|%R|%a|%T|%D
   full_audit:success = pread_recv pread_send
   full_audit:failure = none
   full_audit:facility = local7
   full_audit:priority = notice
[CorpNetFiles]
   comment = CorpNetFiles
   path = /home/canary/smb_share
   guest ok = yes
   read only = yes
   browseable = yes
We will now create a folder that will act as our fake file share.
mkdir /home/canary/smb_share
chmod 444 /home/canary/smb_share
chown canary. /home/canary/smb_share
echo '$FileCreateMode 0644'  >> /etc/rsyslog.conf
echo 'local7.*            /var/log/samba-audit.log'  >> /etc/rsyslog.conf
touch /var/log/samba-audit.log
chown syslog:adm /var/log/samba-audit.log
Now start the service and confirm the settings work correctly.
systemctl restart rsyslog && systemctl restart syslog
smbcontrol all reload-config
systemctl restart smbd && systemctl status smbd
If the service is actively running, then the config is all good!
SSH Config for OpenCanary
OpenCanary will open a fake SSH service on port 22 when we start it up. In order to have the fake service, we need to move the actual service to another port. I moved the real SSH service to the random port number 55421. Pick your own random high(above 1024) port number to move SSH on.
To make this move, we need to update the following files.
/etc/ssh/sshd_config
# Find and update the below parameters.
Port 55421
ListenAddress 0.0.0.0
/lib/systemd/system/ssh.socket
# Find and update the below parameters.
[Socket]
ListenStream=55421
Accept=yes
Now restart the ssh service to apply the changes.
systemctl restart sshdOpenCanary Remote Desktop Protocol(RDP) Detection
TLDR: No RDP, for now…
I wanted to have a fake RDP protocol running on my honeypot. Unfortunately, the OpenCanary RDP module is temporarily deprecated. Searching GitHub forums reveals that the RDP python module OpenCanary relies on(rdpy) is in Python2. Due to Python2s deprecation, the RDP python model is unusable. As of June 2022, the OpenCanary project has stated they plan to bring RPD back, but it is not yet ready.
Start OpenCanary
Lastly, we need to start the opencanaryd daemon. As the canary user, in the virtual environment, run the below commands.
# Become the canary user.
sudo -u canary -i
cd ~

# Drop into the new environment.
. env/bin/activate

# Start the opencanary service.
sudo /home/canary/env/bin/opencanaryd --start
If you are receiving a lot of errors when starting the OpenCanary service, they are likely related to your SMTP email setting being incorrect. Review the SMTP settings for errors, and try to restart the service.
Testing OpenCanary Honeypot Traps
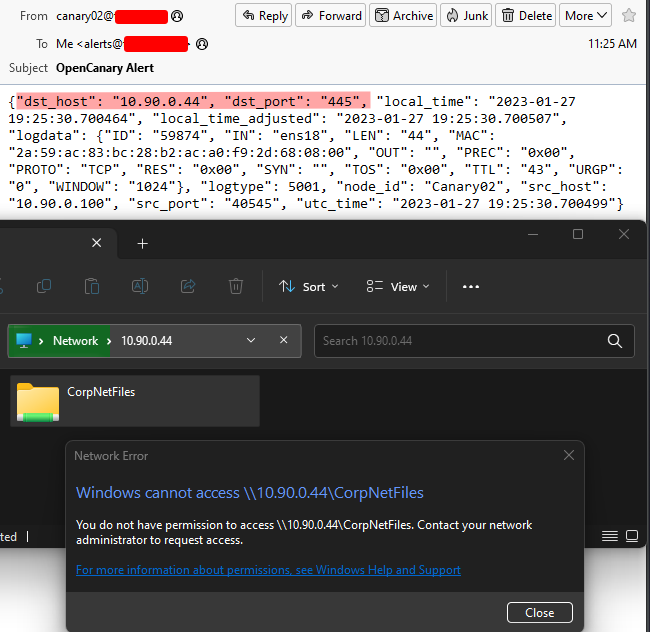
We have our honeypot up and running! Let’s make sure it is working as we intend. To trigger some alerts, we can open the SMB file share. Open a Windows Explorer window and type into the URL bar “\\10.90.0.4\“(change the IP to your OpenCanary server IP). Doing this simple action will trigger OpenCanary to send an alert.
We can also nmap the OpenCanary honeypot and trigger port scan alerts.

A nmap scan will trigger multiple alerts, leading to alerting emails that multiple ports were touched.
Run OpenCanary Honey as a Service
We want OpenCanary to run on boot-up by default. To do this, we have to add a few settings.
As root, create the file “/etc/systemd/system/opencanary.service” and fill it with the following.
[Unit]
Description=OpenCanary honeypot
After=syslog.target
After=network.target

[Service]
User=canary
Restart=always
Environment=VIRTUAL_ENV=/home/canary/env/
Environment=PATH=$VIRTUAL_ENV/bin:/usr/bin:$PATH
WorkingDirectory=/home/canary/
ExecStart=sudo /home/canary/env/bin/opencanaryd --dev

[Install]
WantedBy=multi-user.target
Now enable the OpenCanary service to run at boot.
# Enable the service at boot.
systemctl enable opencanary.service
We can now use systemctl to control the OpenCanary service.
# Start the service.
systemctl start opencanary.service

# Stop the service.
systemctl stop opencanary.service

# Status of the service.
systemctl status opencanary.service
Wrap Up OpenCanary Honeypot Traps; TLDR
OpenCanary honeypot traps are a simple and quick way to add an extra set of eyes to your network. An early warning system could differentiate between a breach and complete data loss from ransomware. OpenCanary is a free tool that is set and forget. It would be best if you considered adding one to your network for such little overhead.
Related posts:
 Operating System Hardening 101
 Linux Web Server Hardening: Preventing Apache Information Disclosure
 Free Active Directory Security Tools